LEIGH RTJ400 ONGOING REVIEW

jmarkflesher

Member
Joined
Aug 22, 2010
Messages
248
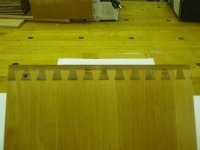
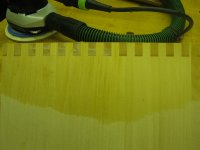
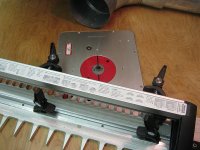
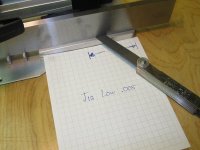
Recently received the Leigh RTJ400 from Lee Valley. This IS my first dovetail jig. I will post as I muddle through. Some pictures first before the quality control. Disregard the plywood spline which appears in photo. This was a scrap from a drafting table.Both pieces of theHalf Blind Dovetail are cut at once.

[attachimg=1]

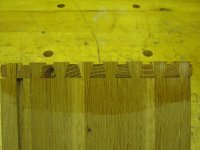
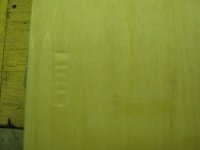
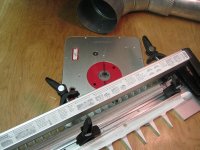
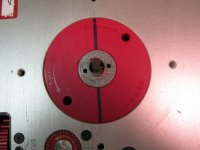
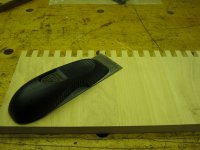
This was first cut starting at #5 on E-bushing. Tightness was good but it was over flush.

[attachimg=2]

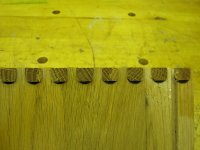
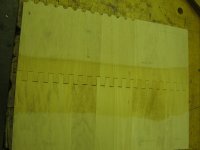
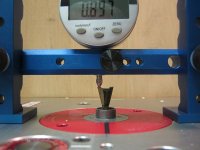
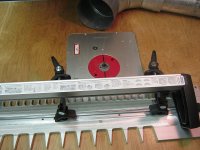
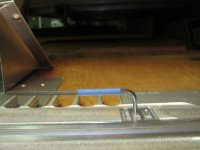
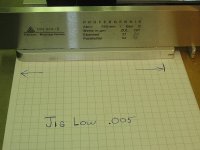
This now was also good for flush by following directions and moving jig to -1. The photo shows I failed to reposition the board centered on jig so it was symmetrical.

[attachimg=3]

[attachimg=4]

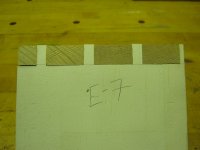
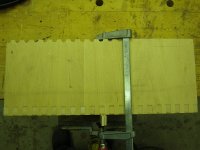
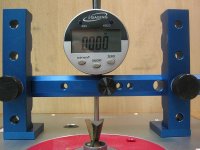
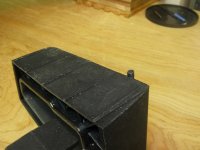
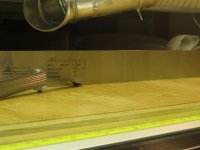
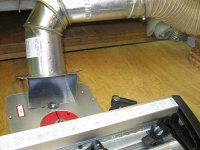
These photos show 3/8" oak used for front and side. Sides can be 3/8" but front must be a minimum of 1/2" thickness, thus the tailboard goes through the face of the front pin board.I started out using scrap pieces of pine, slightly bowed or twisted. Don't waste your time, this will not give you good results and gives you a bad impression of the jig.

[attachimg=5]

[attachimg=6]

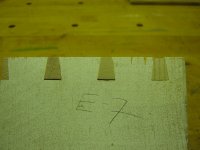
This is my first attempt at Through Dovetails. It is to loose at E-7. I will add to this post as I continue to use jig. MARK
 

Attachments

  • H-B DOVE 1.JPG
    H-B DOVE 1.JPG
    71.6 KB · Views: 5,103
  • H-B DOVE 2.JPG
    H-B DOVE 2.JPG
    63.6 KB · Views: 5,116
  • H-B DOVE 3.JPG
    H-B DOVE 3.JPG
    93.9 KB · Views: 4,988
  • H-B DOVE 4.JPG
    H-B DOVE 4.JPG
    93.8 KB · Views: 4,907
  • T-D DOVE 1.JPG
    T-D DOVE 1.JPG
    69.8 KB · Views: 5,016
  • T-D DOVE 2.JPG
    T-D DOVE 2.JPG
    87.9 KB · Views: 4,956
[attachimg=1]

[attachimg=2]

Bits included with Leigh RTJ400 Dovetail Jig.

I called Whiteside for a set price, no set for the RTJ400 yet.

[attachimg=3]

[attachimg=4]

[attachimg=5]
[attachimg=14]
[attachimg=15]

E-Bushing set at 5,halfway. 0 to 10 changes elliptical bushing .020. They are supposed to be .001 every number. They are close but check your own bushing out yourself.Thus if you do not feed your jig at 90 degrees you will either make joints tighter or looser depending on which way you turn the jig. You MUST feed at 90 degrees.
[attachimg=6]

This works for me to cut off fuzzies.
[attachimg=7]
[attachimg=8]

[attachimg=9]

Box joints have no full or shy adjustments. You must adjust with bit height only and you must pick the high wing. initial height is set with board set on fingers of jig. Fine tune from there.

[attachimg=10]

Marks from jig clamps. Wood IS soft pine. I may have clamps to tight.
[attachimg=11]
[attachimg=12]

[attachimg=13]

So far joints are fairly good although I have no past jig to compare to. What are some opinions on joints only? None were sanded. Next I will look at the jig itself. Thanks, MARK
 

Attachments

  • Bit Right Wing.JPG
    Bit Right Wing.JPG
    80 KB · Views: 4,931
  • Jig Clamp Marks Pine.JPG
    Jig Clamp Marks Pine.JPG
    44.3 KB · Views: 4,834
  • Box Joint First fit.JPG
    Box Joint First fit.JPG
    77.2 KB · Views: 4,839
  • Box Joint Second Fit No Glue.JPG
    Box Joint Second Fit No Glue.JPG
    91.5 KB · Views: 4,717
  • Box Joint Glued.JPG
    Box Joint Glued.JPG
    77.4 KB · Views: 4,862
  • Feed off 90 degrees.JPG
    Feed off 90 degrees.JPG
    114.1 KB · Views: 4,871
  • Bit Left Wing.JPG
    Bit Left Wing.JPG
    78.2 KB · Views: 4,781
  • Plate at Zero.JPG
    Plate at Zero.JPG
    93.6 KB · Views: 4,748
  • rtj 400 bits 1.JPG
    rtj 400 bits 1.JPG
    58.9 KB · Views: 4,845
  • rtj 400 bits 2.JPG
    rtj 400 bits 2.JPG
    55.1 KB · Views: 4,871
  • E Bushing at 5.JPG
    E Bushing at 5.JPG
    106.7 KB · Views: 4,990
  • Feed at 90 Degrees.JPG
    Feed at 90 Degrees.JPG
    108.6 KB · Views: 4,846
  • Feed  off 90 degrees.JPG
    Feed off 90 degrees.JPG
    115.4 KB · Views: 4,969
  • Fuzzy Cutter.JPG
    Fuzzy Cutter.JPG
    97 KB · Views: 4,712
Last part of review. The RTJ400 Dovetail Jig needs a flat router table top for good results.[attachimg=5]                            Moving the jig seems more stable than moving the router in and out over the jig. Flatness of the jig is below. The bottom actually is flatter before you mount the top piece and clamp into position. c                                                                                                                                                                      [attachimg=2][attachimg=3]                                                                                                                                                                    [attachimg=4]                                                                                                                                                                                                                                                                                                                                                      Plastic stop piece supplied. Mine was not square to the hole so I made one out of an allen key. It is the size of a #30 drill bit slightly sanded. .                                                                                                                                                                                        [attachimg=8]                                                                                                                                                              Plastic pins that mount top piece into jig for various cuts. Hope they hold up. This is a main concern. .                                                                                                                                                                        [attachimg=6]                                                                                                                                                                [attachimg=7]                                                                                                                                                              Dust pickup out of a 4" dryer vent.                                                                                                                    [attachimg=9]                                                                                                       
Thanks,MARK
 

Attachments

  • Allen Key Fitted For Stop.JPG
    Allen Key Fitted For Stop.JPG
    70.6 KB · Views: 4,614
  • Plastic Pin 2.JPG
    Plastic Pin 2.JPG
    61.1 KB · Views: 4,565
  • Plastic Pin 1.JPG
    Plastic Pin 1.JPG
    76.6 KB · Views: 4,723
  • Table Must Be Flat.JPG
    Table Must Be Flat.JPG
    67.1 KB · Views: 4,779
  • Jig Flatness 3.JPG
    Jig Flatness 3.JPG
    70.1 KB · Views: 4,704
  • Jig Flatness 2.JPG
    Jig Flatness 2.JPG
    90.6 KB · Views: 4,601
  • Jig Flatness 1.JPG
    Jig Flatness 1.JPG
    80.4 KB · Views: 4,793
  • Table Must Be Flat.JPG
    Table Must Be Flat.JPG
    67.1 KB · Views: 817
  • Dryer Vent Dust Pickup.JPG
    Dryer Vent Dust Pickup.JPG
    111.8 KB · Views: 4,682
Thanks for this review. Just to give another perspective of the jig in case it helps others. I've had the jig for a few months, and can say within the last 3 weeks I've been using it heavily. I've spent the majority of my time on 1/2 blind dovetails.

Let me say up front the support from Leigh is great as well as the documentation. I've never had a leigh jig before but from all the reviews, this holds true for this product as well.

The jig as a whole a light weight and somewhat easy to maneuver once you get the hang of it. The quality of the jig itself, aside from the actual base, is disappointing. The construction of the handle is one of my biggest complaints. The tabs on the end WILL break. Even if you're careful. This tool is meant to be used in a wood shop, not a china closet. I've broken the tabs now twice. First time, yes it was my fault, and I snapped it by swapping the handle by pulling from the left side first. The second time however, I accidentally knocked into the unit, and it fell about 3 mins, and the same part, ended up snapping. Yes it probably was my fault, but the design is really poor.

Secondly, I'm using the kreg router table. I had mounted my triton long before I got the jig, and to my satisfaction it was aligned just fine.. With the collar that comes with the jig, if you're not 100% spot on with where your router is positioned, you're gonna be in for a big surprise.. I had to re-order the plate and re-drill.

Lastly I've had a hard time getting repeatable cuts. To be clear I've not just used this for a few hours and declared failure. I've literally spent 60+ hours over the past few weeks on just on 1/2 blinds and still its crap shoot. Its too easy slightly lift up and throw the whole fit off. I've made some decent fits but its just to finicky.

So in the end I have to say, unlike their other products, this unit will not have a home in my shop. This router tries to offer too much, and skimps on design in the most fragile of places. So for now I have a 400+ dollar investment collecting dust.

 
Given these reviews, I'm not sure what Leigh has to offer if you are doing equally spaced, stock dovetails.

I use Leigh jigs for variable spaced dovetails, and they work well for that once you are done with the finicky adjustments.  However, as many dovetails as I cut, I could do them as easily by hand - if I were that good at it.  I was thinking about the Leigh jig for stock dovetails, but would now I would lean toward the Porter Cable jigs.  Are either of you able to do that comparison?
 
I have had fairly good results with this jig.  Repeat-ability has been one of the strengths.  I am using a Kreg router table and table top with a Jessem Router Lift and a standard Porter Cable 7519 router.  I have read the comments about this jig not creating consistent results and I would suggest there may other factors creating errors.

First, I will say that I am an experienced dove-tailer with both the old Leigh jigs and the jig that is router table based.  I recently completed 16 blind dovetail drawers.  After one test run to adjust the height of the bit and the e-collet settings, I was able to produce 32 perfect board ends. 

Suggestions for improved accuracy,

1)  Make sure all components of your router table and lift are properly set.  The router MUST be perfectly mounted in the router lift so that the bit id in dead center of the collet.  I am using a standard PC Router the is an exact fit.  Other router that require mounting to a router table plate will have slight inaccuracy.  This is not the fault of the Leigh Jig.
2)  The height of the bit needs to be set with an accurate height measurement.  The measurement needs to be taken at the highest tip of the blade on the bit.  If you have a router lift, the height adjustment needs to be locked in.  The vibrations of the router will change this setting over time and cause inconsistent results.
3)  The router lift insert plate must be perfectly flush with the router table, and the table tap itself needs to be perfectly flat (under the weight of the router - see table sag below).
4)  It is suggested that a line be drawn on the router plate insert to be used as a reference for the e-collet adjustments.  I suggest that a perpendicular line be drawn all the way across your router table.  This line can assist in keeping the jig aligned on the table during use.  This is a major issue for accuracy, because the e-collet is actually oval and not round.  (THE INSRUCTIONS EMPHASIS HOW IMPORTANT THE ALIGNMENT IS TO ACCURACY).
5) The last producer of errors is the router table itself.  Home made table tops made of MDF, Plywood or other sheet goods are prone  to sag and warp.  Actually, my Kreg router tabletop made of (Some Phenolic or other polymer) will sag under the weight of the router motor.  This can be minimized by mounting steel "L" bars under the table to reinforce.  In my case, I build a dust collection box under the table.  The box actually stabilizes the top and limits sag.

For those of you that don't believe their homemade router tables have inaccuracies due to sag, try making a raised panel on your router table.  You should be able to get all four corners to match perfectly.  I hate to say, that many home made router tables cannot achieve this accuracy.

Sincerely,

Ray
 
Ray:
Thanks for the review of the RTJ400.  I had been considering picking one up, but was looking for a review from someone who had achieved success with one.  Looks like your review might cost me some money.

Steve
 
Thank you for the review. I was thinking of getting one of these but now I think I should pass.
I didn't realize the wood drawer side lays flat on the table. I thought the router passed over the wood as the panel is fixed to the jig and the jig fixed to the workbench. After reading the posts they read like a dreaded tool to use. I'm not sure I'm up to learning a new trick to perfect dovetails.....sometimes. After spending money on a tool of any kind you should at least enjoy it, this doesn't sound like the case.

Thank again for the review very enlightening

Mark
 
I am gluten for punishment. I like the upside down concept and took delivery on one today.

I think my table is pretty rigid and flat and the Incra Mast R II lift should be precise.

Will report back on results.  Thanks for starting this thread. I know its a few months old but showed up via a Google Search !

 
Back
Top