I'm excited about the new Leigh RTJ400 Router Table Dovetail Jig but according to Highland Woodworking "Router tables made by Festool are not designed for table mounted template guided routing." I have the Festool CMS-VL MFT/3 Router Table Set and am wondering if there's a workaround to use the RTJ400 with the Festool table router. Anyone making a template or bushings to solve this problem OR anyone have a better router table dovetail jig that works with the Festool CMS-VL?
You are using an out of date browser. It may not display this or other websites correctly.
You should upgrade or use an alternative browser.
You should upgrade or use an alternative browser.
Leigh RTJ400
- Thread starter lebortn
- Start date
This doesn't really help, maybe it does some good though. http://festoolownersgroup.com/festool-tool-problems/using-standard-bushings-in-cms-router-table/ Cool jig though
Looks like it doesn't have any dust extraction. If that's important to you, look at the D4R Pro with the VRS vacuum support. Is use it with my OF 1400, and don't need to connect the CT hose to the dust chute on the router. I just connect it to the VRS and it picks up the chips very well.
lebortn said:I'm excited about the new Leigh RTJ400 Router Table Dovetail Jig but according to Highland Woodworking "Router tables made by Festool are not designed for table mounted template guided routing." I have the Festool CMS-VL MFT/3 Router Table Set and am wondering if there's a workaround to use the RTJ400 with the Festool table router. Anyone making a template or bushings to solve this problem OR anyone have a better router table dovetail jig that works with the Festool CMS-VL?
I've looked at this as well and don't see why it won't work. I'm about to buy the jig but the Highland Hardware note bothers me. I've looked at my table and the bit is centered in the table hole. I can easily find a way to thread/mount the guide bushing in a Festool plate. Anyone have any hard data on this?
Brian
[/quote]
I looked at this again and the only issue I see is that the insert is snap-in and therefore could not support a lateral load which would be applied when using the guide bushing supplied by Leigh.
Brian
Brian
[/quote]
I looked at this again and the only issue I see is that the insert is snap-in and therefore could not support a lateral load which would be applied when using the guide bushing supplied by Leigh.
Brian
It's my understanding the DJ400 jig requires a router table plate that accepts a stepped insert. Other than doing some research to see which plates permit that and and are equipped with that type of insert, I don't know that much about it. Does the Festool table accept that type of insert. Also, the insert opening must be the specified size that Leigh indicates.
grbmds said:It's my understanding the DJ400 jig requires a router table plate that accepts a stepped insert. Other than doing some research to see which plates permit that and and are equipped with that type of insert, I don't know that much about it. Does the Festool table accept that type of insert. Also, the insert opening must be the specified size that Leigh indicates.
That is correct but the issue has to do with the stability of the guide in the insert plate. If you look at any of your plates, you'll find that any side load could displace it from the table. The other router tables (Kreg, Bulldog, etc) all use a 3" (or so) plate that twists in and locks. The festool one snaps into the inner ring and from what I understand from looking at mine, this is the only way to mount the guide from Leigh. It would be possible (I believe) to remove the ring located in the table (the larger one) and put in an insert blank that has been drilled to fit the Leigh guide which would then be screwed (below) to the plate. I just don't know if I can get a large blank that will fill that larger OD hole.
Brian
My son and I decided to build a prototype and made some progress on this tonight that others may appreciate.
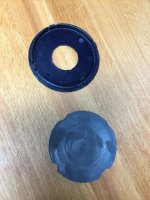
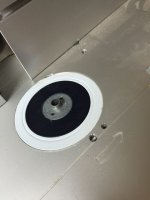
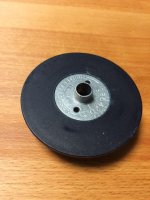
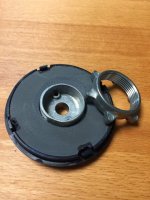
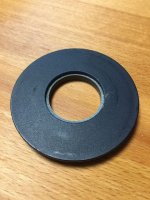
1) We used the stock smaller sized Festool insert for the CMS table
2) He turned a piece of nylon rod stock (4") down to exactly fit the I.D. of the underside of the Festool insert.
3) We notched the nylon insert to allow for the movement of the Festool tabs when the plate is inserted into the table.
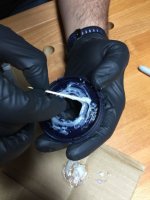
4) We bonded the two materials together and clamped.
5) The top countersink was bored to 0.100" x 1 3/8" to match the size of the guide bushing.
6) A second hole was bored through the entire assembly to allow the threaded portion of the bushing and allow for the nut to be secured on the back of the bushing during use.
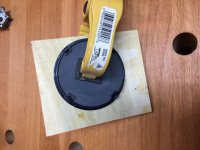
Note that it is very important to maintain center references through this entire process. The lathe made this simple as there was always a center point.
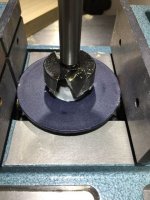
The completed assembly fits perfectly in the table and bit clearance is concentric. We will test the RTJ400 tomorrow as the top guide rotates to allow for adjustments in the dovetail fits. I don't expect this to be an issue.
Total cost: $40 as I had to purchase a larger amount of material than was necessary. 2 hours of turning, assembly and machining plus gas. If this works well, we will 3D print them for others.
Brian
1) We used the stock smaller sized Festool insert for the CMS table
2) He turned a piece of nylon rod stock (4") down to exactly fit the I.D. of the underside of the Festool insert.
3) We notched the nylon insert to allow for the movement of the Festool tabs when the plate is inserted into the table.
4) We bonded the two materials together and clamped.
5) The top countersink was bored to 0.100" x 1 3/8" to match the size of the guide bushing.
6) A second hole was bored through the entire assembly to allow the threaded portion of the bushing and allow for the nut to be secured on the back of the bushing during use.
Note that it is very important to maintain center references through this entire process. The lathe made this simple as there was always a center point.
The completed assembly fits perfectly in the table and bit clearance is concentric. We will test the RTJ400 tomorrow as the top guide rotates to allow for adjustments in the dovetail fits. I don't expect this to be an issue.
Total cost: $40 as I had to purchase a larger amount of material than was necessary. 2 hours of turning, assembly and machining plus gas. If this works well, we will 3D print them for others.
Brian
Attachments
voirdire1st
Member
- Joined
- Oct 21, 2013
- Messages
- 3
bmikiten said:If this works well, we will 3D print them for others.
Brian
Definitely interested
jmarkflesher
Member
- Joined
- Aug 22, 2010
- Messages
- 248
Any input on the RTJ400 jig yet?
A quick update for everyone who has been emailing or asking about the RTJ400 with the Festool table:
1) The insert we built worked well. My only complaint is that you have to push the router bit about 1/2" or so out of the collet to get the proper engagement when using the procedures described by Leigh. The bit has plenty of meat on the shank so that really isn't a huge concern but not typical so I thought I'd note it.
2) We are going to produce a final design with some very minor mods like a built-in scribe point for positioning the Leigh insert and another countersink for the underside nut that attaches the insert to the throat plate.
3) The jig works well. I have the pro model and well but between forgetting how to use it and the setup annoyances that come from using it so rarely, I find this one to be much simpler to use, repeatable, etc. You do need to do the usual test runs with sample woods to be sure bit heights, spacing, etc are all right but that is typical of most jigs of this type.
4) Workmanship is good although I would have liked to have a better finish job on the jig aluminum surfaces. Most are surface round and left very rough. Clamps, instructions, etc. are all good.
I was very pleased to be able to use the RTJ400 without having to buy another table so overall, this is a success.
Brian
voirdire1st said:bmikiten said:If this works well, we will 3D print them for others.
Brian
Definitely interested
Me too, looking forward to your result and I should either buy one from you, at a reasonable price of course [big grin], or use your 3D file if my 3D printer arrive on time
Similar threads
- Replies
- 0
- Views
- 552
- Replies
- 76
- Views
- 8K
- Replies
- 4
- Views
- 27K