Let's talk about Paraffin core cooled diamond dry cutting drill bits.

Joined
Jun 26, 2016
Messages
2,219
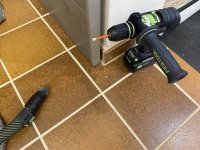
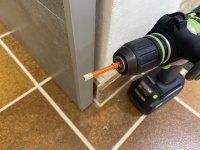
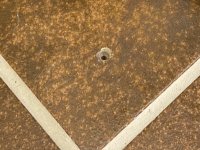
I need to drill in tile/ceramics on a project that is close to being finished. Not the typical "single accessory add on" that requires two holes, but round about 30 holes in total. 6 & 8 mm.

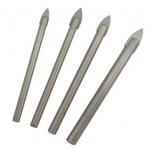
The couple of holes I needed to drill into tile/ceramics in the past were drilled using the Festool CE Stone drill bits (or Bosch multi construction drill bits) and under extensive (water) cooling. That works generally, but it is not exactly the fastest nor most convenient solution.

I was chatting with one of my suppliers the other day, because I'm generally interested in Eibenstock's battery powered diamond wet cutting drill. ->https://www.eibenstock.com/en/produ...-wet-core-drilling/diamond-wet-drill-end-40-a

In my opinion its an interesting machine powered by Metabo CAS batteries & there are adapters available directly from the manufacturer so you can use existing (angle grinder) drill bits with M14 thread, for example.

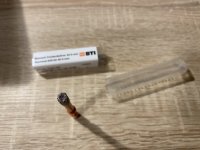
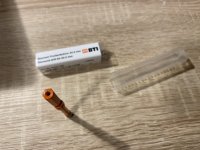
The supplier then recommended also looking into dry cutting with Paraffin/wax core cooled diamond dry cutting drill bits which are available with 1/4" hex shaft for drill/driver use and M14 thread for angle grinder use.

I did my research, and now I would like to hear "the good, the bad, the ugly" from real world experience.

The idea of dry cutting with a self cooling drill bit and using regular dust extraction is very intriguing to me, actually more than a new machine, even if water cooled, right now.

The main difference seems speed. The water-cooled Eibenstock linked above will drill with 8000 RPM (no load), if I use the self cooling dry cutters I'm limited to 1500 RPM and depending on manufacturer/supplier to different cooling off times/ use cases. I have not found reliable information on the M14 thread bits, if they require an angle grinder with speed control. Because if they don't, they will go far beyond 1500 RPM.

Looking deeper into that, there are suggestions of drilling not more than 30 seconds at a time with those self cooling dry cutters, others simply say not recommended for serial drilling.

To me that is a big difference. The first suggestion is pretty clear, the latter, well - I would think that - drilling two or three holes into the tile/ceramics with the self cooling drill bits, then switching to regular drill bits to finish said holes, fixing the accessories, then going for the next holes with the self cooling bits, (...) - is not exactly exzessive/ or "serial drilling".

But judging by ratings/ user reviews I've read, a fair amount of people have ruined these self cooling diamond dry cutting drill bits and were not too fond of them.

The price for a set of the self cooling drill bits (6 - 14mm) is about half of the price I was quoted for the water cooled battery powered drill. If I only buy the 6 and 8mm sizes I currently need, it's significantly cheaper - however only if I get more than the 30 holes out of them and can occasionally use them in the future. If I go with the water cooled batter powered machine, that is rated for core drilling up to 40mm, I have significantly more options considering future projects.

Has anyone used these Paraffin/wax core cooled diamond dry cutting drill bits and wants to share about the use and experience with them?

Thank you!

Kind regards,
Oliver
 
The only time you'll ever need to cool a drill bit is when you're drilling into porcelain. For regular 6/8mm holes into ceramic, tungsten carbide-tipped spear bits do a lovely job. They're cheap to buy and each one will easily do 20-30 holes. The added advantage of the spear tip is that the bit won't slide around on the surface as you start the hole. Use your regular cordless at slow (screwdriver) speed. Once you're though the ceramic, swap out to a regular masonry bit to complete the hole into whatever surface you've tiled onto.

[attachimg=1]

Kevin
 

Attachments

  • 1598V_P.jpg
    1598V_P.jpg
    22.7 KB · Views: 929
Can't say that equals my experience, I have tried to use those, definitely not what I'm looking at/for currently.

Kind regards,
Oliver
 
Diamond hole saws I either drill into a sponge, dip in water, redip as need or drill into ice cubes.

I’ll also recommend making drilling jigs out of 1/2 or 3/4 plywood that you 2 side tape to the tile. This gives you a guide and helps retain water to cool the bit.

Tom
 
Not having any previous experience with the paraffin core diamond drills I decided to check into the process, unfortunately, there's not much real qualitative information out there. Most of the available information centers around add copy and marketing releases.

At this point, this technology seems to be in the "Wild West" stage of drill specifications.

Some claim to use drill speeds of 500-1200 RPM while others claim the drill speed needs to be in the 2000-3000 RPM range and they don't recommend using a cordless drill because of its low RPM range...corded drills only.

Some claim a "virtually unlimited" number of holes can be drilled while another claims "up to 20" holes.

The overall marketing theme for dry drilling: "A Diamond Drill Bit integrated with a paraffin wax lubricant inside which melts while dry drilling and cools the cutting surface."
However, this caveat is then usually added later on in the ad "Water can be used as additional cooling to prolong the life of the bit as wet drilling can significantly increase life service time of the bit."

One manufacturer offered up this piece of advice which makes me wonder what the actual finished piece would be like. "We tested larger sizes but found the cores got stuck in the paraffin wax. If you need to drill larger holes dry, see our M14 Vacuum Brazed bits which are available up to 65mm diameter."

And finally, this retailer decided this statement would properly cover his fanny, "If you need multiple holes, it will be highly recommended to stop and let the bit cool down after each hole."

So buyer beware, read the small print as some drill bits are recommended for porcelain while others are not. Personally, I'd just take the tjbnwi approach and use a sponge or a plywood fixture that allows for a water reservoir.

 
Thank you very much everyone!

I agree/ come to the same conclusion that this is pretty much "uncharted" territory with very little reliable data/experience available.

I actually do have means for cooling, it's a drill guide system/jig with pump sprayer attached sold by Bosch (Professional). But I was and still am looking for an alternative to that.

I got the first of quite a couple of deliveries I'm awaiting, on the subject of this thread, today. I will do some testing, evaluation & comparison on the subject in close future.

Again, thank you very much everyone appreciate all of you taking the time to read and reply here!

Kind regards,
Oliver
 
When I started in the glass industry 44 years ago, I was taught to make a ring dam of putty and insert turpentine for coolant.  Now when we drill glass there are suction dams and we use water and tool toolant.  This obviously does not work on vertical surfaces so we dip into small container of water.
 
Let's start to dive into this topic. It will take some time, this is only be the first post of quite a few to come.

Starting with something simple is best, I needed a 6 mm hole through a floor tile to install a back stop for a sliding door. I wanted to look up the specifics/ technical details on the floor tiles, as I know exactly the make and model - however the manufacturer does not list those in an easy accessible way online, so I have to wait for them to respond to my e-mail. It's not that important right now anyway.

Since it was exactly that "one occasional hole", I had the dust extractor out anyway, perfect timing to try a Paraffin core cooled diamond dry cutting drill bit.

This is what the drill bit looks like when new.

[attachimg=1]

[attachimg=2]

[attachimg=3]

The red-ish/purple in the middle is the Paraffin core. The hole in the shaft goes probably through, my best guess is it is to make sure there is no pressure build up when the Paraffin melts to cool the bit or in case of overheating while the front is obstructed during drilling.

Not that it matters, but there was a noticeable "waxy" smell when I removed the drill bit from its packaging.

This 6mm drill bit is rated for a speed of up to 1500 rpm. I didn't have this information at hand when I needed to drill the hole, so I put my PDC in first gear - which is a lot slower. I wasn't concerned with speed here at all. However I remembered you are supposed to use only very little pressure and the drill bit should make a grinding noice.

I put the drill bit at an angle to the tile, so I could cut/grind a little recess that I would then use as a positive stop while slowly raising the drill to get straight/level. Basically the same technique used when using angle grinder diamond drill bits.

I got that grinding noise straight away, even at the much slower speed, and that hole was cut within 30-45 seconds tops. I had the dust extractor running, didn't use any attachment as I wanted to have a clear view on the drill bit/ hole. Besides the grinding noise it gave me zero indication of what was going on/ if I was doing it right/ if it got hot. Pretty unspectacular if you ask me.

But I ended up with a clean cut hole that was then easily extended into the concrete with a rotary hammer and regular SDS-plus drill bit.

[attachimg=4]

[attachimg=5]

The only residue/ evidence of using a Paraffin core cooled drill bit was a bit of that red-ish/purple Paraffin on the bottom of the hole before extending it.

[attachimg=6]

This is what the drill bit looked like after cutting that one hole and wiping it down.

[attachimg=7]

I think when compared to the initial pictures it's easily spotted that it lost quite a bit of the aggressive/coarse look - and to the touch that is as easily felt. That doesn't necessarily need to lead to a problem down the road or to be a sign of excessive wear just yet, we will see. It still feels like it would cut well/ get the job done. Also I don't think that the build-up of tile dust on/ inside the Paraffin core is particularly severe, I had read some warnings during my research that the dust might clog/ build up and mix with the Paraffin.

Right now, pros: Ease & speed of setup & use. Cons: Estimated ratio of price to wear/tear and ultimately expiration.

That's it for now, when I have time I will go for part 2.

Kind regards,
Oliver
 

Attachments

  • IMG_6880.jpeg
    IMG_6880.jpeg
    315.6 KB · Views: 682
  • IMG_6882.jpeg
    IMG_6882.jpeg
    145.5 KB · Views: 674
  • IMG_6884.jpeg
    IMG_6884.jpeg
    165.4 KB · Views: 674
  • IMG_1138.jpeg
    IMG_1138.jpeg
    384.7 KB · Views: 669
  • IMG_1139.jpeg
    IMG_1139.jpeg
    194.9 KB · Views: 670
  • IMG_1140.jpg
    IMG_1140.jpg
    250.5 KB · Views: 664
  • IMG_1152.jpg
    IMG_1152.jpg
    172.7 KB · Views: 664
Never heard of this paraffin cooled core bit. Sounds like some marketing fluff. Based on the amount of material loss from your pictures I can't see spending whatever the high cost is for those.
I've tried all kinds of bits that cost varying amounts of too much. Haven't had good luck with the spear bits either.
For me, regular masonry, SDS bits or hole saws work best and most cost effective. On material where I can't afford chips, I tape the area, start out with a smaller diameter bit first, then move up to the full size bit on regular mode not hammer mode unit through the tile. It may sound cumbersome but its reliable.
I've tried water, oil, wd40, lithium grease spray. They all help. I'll use what is around
 
I believe the answer is deceptively simple:

The reason why one cannot do "serial" holes is that:
1) the paraffin is being consumed
2) there is no force pushing the paraffin once liquified, so it will work best drilling into a floor, OK-ish to a wall and pretty badly to a ceiling
3) the paraffin acts as a lubricant, not as a coolant, it reduces friction which in turn reduces heat, the bit just does not heat up as fast as it would otherwise and if never running out of paraffin, and never overheated, would last likely longer than a normal water-cooled bit does

What would be interesting is if there are ways to re-fill the paraffin core. That could change the game ref. how many holes the bit can handle before it turns into a basic "dry drilling" diamond bit.

As for the pointed-tip bits. They are absolutely fine for glazed ceramics which has a brick-like structure under the glazing. They completely fail when drilling into artificial stone which has the same hardness across the thickness of the tile .. such tiles are harder than the carbide tip and diamond-infused bits are a must there.

From the photo it seems a traditional glazed tile, a carbide bit would have probably been fine for this one.
 
I have experience with diamond core drills from a different work environment.  One of my "other duties as assigned" included the inspection, maintenance, repair, and neutralization of GSA secure containers.  Neutralization was required when the lock failed or the owners could not remember or find the combination.

Sometimes, the neutralization required drilling through the carbide hard plate using a 1/4-inch diamond core drill in order to access the lock mechanism.  This was a slow process because the drill speed was about 500 RPM and the feed rate was very slow in order to keep the diamond cutting edge cool.  The drilling process could take over an hour to penetrate the 1/2-inch thick hard plate. 

The end of the $70 core drill was filled with wax, which melted during the process to remove the swarf from the carbide plate.  Fortunately, the drill came with several wax cylinders that could be inserted in the core when needed.  I wasn't as patient with the drilling as my mentors, and I could only use a drill for one or two containers.  My mentors could use the same drill for five or six containers before the diamond coating was gone.
 
I use these since a couple of years.

Here are my tips

# starting, like you said, angled is the way to go.
# ...but I keep it angled throughout the cut. That is, I rotate my drill angled while it is cutting. That way your hole is (slightly) larger than the diameter of your drill. Why? That way your followup drill is certain not to touch the tile and no pressure from the anchor/plug is tranfered to the tile (important when it's close to an Edge)
#make shure that the drilled core isn't stuck inside the drill. Clear it out before commensing on the next hole. This can be done thru the hole in the end of the bit with a long nail. The rotating action in my previous tip also helps to not get it stuck
# get them as cheap as possible, no brand Amazon is as good as any.
# RPM? As fast as you're drill will go is my suggestion.
# you need to re-aply the wax during/after the drilling, you can get little cups of this wax over here, and I use this. But a simple candle wil probably work just as well
cool-dip-boor-wax.jpg

#lifetime? It depends, there is much difference in hardness of tiles. If the Diamond wears down it's almost always at the very tip and often it's because there is a core stuck in the drill. It will prevent the drill to advance and it gets destroyed.

Good luck, and let me know what you're experiences are.  Best to try a couple of test holes in some offcuts.
 
I found proper dust collection to be surprisingly effective at cooling while sanding. Maybe it would help with diamond core drilling?
 
Back
Top