Library bookcase

Crazyraceguy

Member
Joined
Oct 16, 2015
Messages
4,901
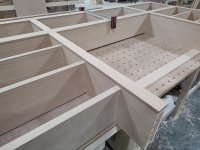
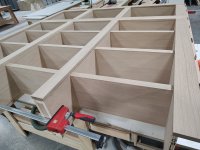
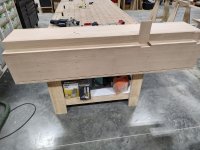
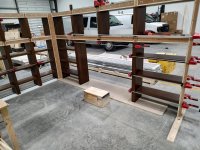
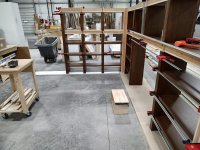
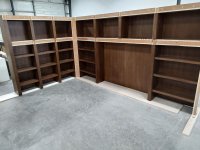
This is just the initial dry-fit. I've been working on the parts, for last couple of days. The shelves are two layers of 3/4" ply with a 1/4" solid front edge. They are set back from the vertical members about an inch. The verticals have a ladder-frame spacer, as do the thicker shelf parts up near the top. The thicker ones are there to support a rolling ladder, which only attaches to the smaller unit.
It is a corner unit, thus the pic showing the corner-filler arrangement.
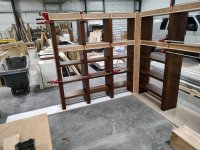
There will be more pics after the stain-finish is done and the parts come back to me. It will ship fully assembled, in 2 pieces, split at that corner. It joins there with Dominos and Lamello Zeta Clamex connectors.
 

Attachments

  • Library shelves.jpg
    Library shelves.jpg
    287 KB · Views: 332
  • Library shelves 2.jpg
    Library shelves 2.jpg
    273.5 KB · Views: 308
  • Library shelves 3.jpg
    Library shelves 3.jpg
    273.4 KB · Views: 286
Crazyraceguy said:
The shelves are two layers of 3/4" ply with a 1/4" solid front edge.

Looks good - just curious, how did you attach the ¼" solid front edge to the plywood? Glue? Brads and Glue? ¼" is too shallow for biscuits or dominos....
 
This looks great. Do you usually get photos of the final install? It looks like white oak and I'd love to see what the final result looks like.

Are the shelves joined to the case by tenons, or is there some hardware they slide onto, that allow removal for any reason?
 
The 1/4" front edges were simply glued in place. They were slightly over width (1 5/8") so they didn't have to be perfect, trimmed flush with the MFK700. I usually do this by combining two shelves in the same clamps, with the glued edges facing each other. It cuts down on the amount of clamps required.

It is indeed white oak, rift sawn to be exact. The shelves are doweled into the sides. These parts are all cut out on a 5' x 12' CNC machine, which does all of the dowel drilling. Then the horizontal parts are doweled by another boring/inserting machine. This is all done by the "production" side of the shop. Then  it comes to me for the assembly, building up the thickness of the shelves, sides, etc. along with the edges. The edges of the other parts are 3/4" thick and are joined with Dominos.
Not shown in these pics, but they all have backs too.
As far as installed pics, it's hard to tell. Sometimes I can get them, others not. Since this will ship in a mostly assembled state, I will get better pics before it leaves at a minimum.
It's all back apart today and I would have taken a pic of the stack of parts, but I forgot my phone at home this morning. The parts are going to the finish department tomorrow, probably not back to me until after the holiday.
 
smorgasbord said:
Thanks.

I'm trimming some thick plywood edging (¾") and am using something like this:


I used a similar configuration recently for the same purpose but the router was the MFK 700 in the vertical base and the bit was a Whiteside 1” diameter spoil board surfacing bit. (Didn’t have the right kind of bit handy for the horizontal base) Had to add a 1/8” shim to the base to clear the glue squeeze out and surplus edging but it was really satisfying to just easy peasy slide the router along and mow the surplus down, mostly dust free. The easy height adjustment to the sub .1mm on the MFK is wonderful.
 
I have seen that method, but much prefer to do this cut horizontally. I even go as far as to do it with a climb cut. You get a fantastic finish that way.
 
The parts are back from the finish department, and mostly assembled. They still need the backs. That will happen tomorrow after the rest of the clamps come off. It will ship in two pieces, split at the corner joint. The outer trim pieces will have to be installed in the field to cover the connector panels.
This entire unit sits on top of a run of base cabinets with doors, so it will be quite high. The wider shelf, the one not covered yet, will support a rolling ladder.
 

Attachments

  • Bookcase7.jpg
    Bookcase7.jpg
    324.5 KB · Views: 147
  • Bookcase8.jpg
    Bookcase8.jpg
    369.7 KB · Views: 123
  • Bookcase9.jpg
    Bookcase9.jpg
    339.8 KB · Views: 130
The backs are in, so now all that is left is separating the corner joint again to ship it.
 

Attachments

  • Bookcase11.jpg
    Bookcase11.jpg
    263.6 KB · Views: 138
Back
Top