alltracman78
Member
- Joined
- Dec 25, 2022
- Messages
- 220
*Just a clarification. I understand Woodpeckers suggests guide bushings instead of bearings. Tools are limited by your imagination, not the suggestions of the manufacturer.
The only beef I really have is the track clamps not fitting. The rest is more cautionary than critical.*
I recently bought the Woodpeckers variable router jig when it was on sale; I thought I'd post my thoughts on it so far.
I bought the "kit" because only it was on sale. I can already tell I could use the longer track, most likely the 60 inch. Something to note for the future.
I haven't used it for it's intended purpose (all 4 tracks combined) yet.
I have used one track to route tennons for slats in a privacy fence.
It worked pretty well, better than the straight piece of MDF I originally used. Because I had to clamp the MDF on the top rear so the router could slide across the guide the wood tipped up in the front.
I went to clamp one of the long tracks to the wood and found my biggest complaint.
The slots in the extrusions won't fit a track clamp. I have multiple brands; tried them all. Festool, Bessey, Powertek, ect. The clamps are all too wide. Fortunately it's only by a little bit, so I was able to grind down the edge so it fit.
It would be nice to have it fit out of the box though.
I understand clamping with track clamps isn't the main design for this, but I feel like it should be considered in the design for obvious reasons.
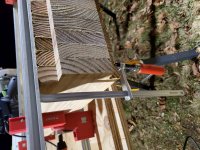
Once the clamps fit I was able to clamp on the front bottom, making a huge difference in how well the guide seated.
Obviously any extrusion that's wide enough to comfortably seat a router would work here, nice to be able to use one too in another way instead of having a separate one just for this.
[attachimg=1]
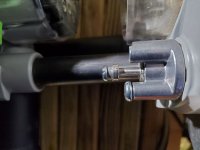
The other "issue" I have is more unavoidable. The slot on the thin side of the extrusion effects the depth you can cut in certain circumstances because the guide bearing needs to be somewhat centered on the 2 flat sections on either side of the groove.
I was routing a 1 inch deep rabbet and I had to take a good sized bite for one of the cuts, as you can see from the distance between the 2 depth stops.
Obviously cutting a smaller relief in the wood with a shorter bit wouldn't be much of an issue, the bearing can comfortably ride on the flat spot then.
The groove is a necessary evil so the sections can be joined at 90*; not a whole lot that can be done about it.
Just something to consider.
[attachimg=2]
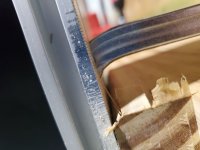
The very edge of the flat section obviously is rounded; I tried one of my cuts with the very edge of the bearing just a little too much on the rounded portion and ended up cutting a very small amount from the guide itself. Not an issue, it was my fault, something to keep in mind next time.
Fortunately I used the side opposite the measurements, in case there was an issue.
[attachimg=3]
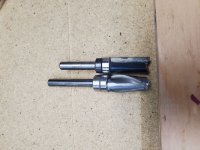
Router was my OF220. I started with a 1/2 inch Bosch straight bit (I'd rather use cheaper bits that I already have instead of more expensive spiral ones on wood that doesn't need as nice a finish) but was having a lot of chatter with the large bites required.
Ended up using my Woodpeckers 1/2 inch spiral bit. Absolutely astonishing how much smoother and faster of a cut it was. Another reminder of how much of an improvement spiral cut bits are.
The Bosch bit is used, but carbide and still sharp.
The WP bit had a very slight amount of wear.
The wood was still damp pressure treated.
As far as the longer sections (the kit comes with 2 18 and 2 32 inch guides), I though about using it as a guide for some dados; the 32 inch section was slightly too short. The longer sections would definitely come in handy.
The only beef I really have is the track clamps not fitting. The rest is more cautionary than critical.*
I recently bought the Woodpeckers variable router jig when it was on sale; I thought I'd post my thoughts on it so far.
I bought the "kit" because only it was on sale. I can already tell I could use the longer track, most likely the 60 inch. Something to note for the future.
I haven't used it for it's intended purpose (all 4 tracks combined) yet.
I have used one track to route tennons for slats in a privacy fence.
It worked pretty well, better than the straight piece of MDF I originally used. Because I had to clamp the MDF on the top rear so the router could slide across the guide the wood tipped up in the front.
I went to clamp one of the long tracks to the wood and found my biggest complaint.
The slots in the extrusions won't fit a track clamp. I have multiple brands; tried them all. Festool, Bessey, Powertek, ect. The clamps are all too wide. Fortunately it's only by a little bit, so I was able to grind down the edge so it fit.
It would be nice to have it fit out of the box though.
I understand clamping with track clamps isn't the main design for this, but I feel like it should be considered in the design for obvious reasons.
Once the clamps fit I was able to clamp on the front bottom, making a huge difference in how well the guide seated.
Obviously any extrusion that's wide enough to comfortably seat a router would work here, nice to be able to use one too in another way instead of having a separate one just for this.
[attachimg=1]
The other "issue" I have is more unavoidable. The slot on the thin side of the extrusion effects the depth you can cut in certain circumstances because the guide bearing needs to be somewhat centered on the 2 flat sections on either side of the groove.
I was routing a 1 inch deep rabbet and I had to take a good sized bite for one of the cuts, as you can see from the distance between the 2 depth stops.
Obviously cutting a smaller relief in the wood with a shorter bit wouldn't be much of an issue, the bearing can comfortably ride on the flat spot then.
The groove is a necessary evil so the sections can be joined at 90*; not a whole lot that can be done about it.
Just something to consider.
[attachimg=2]
The very edge of the flat section obviously is rounded; I tried one of my cuts with the very edge of the bearing just a little too much on the rounded portion and ended up cutting a very small amount from the guide itself. Not an issue, it was my fault, something to keep in mind next time.
Fortunately I used the side opposite the measurements, in case there was an issue.
[attachimg=3]
Router was my OF220. I started with a 1/2 inch Bosch straight bit (I'd rather use cheaper bits that I already have instead of more expensive spiral ones on wood that doesn't need as nice a finish) but was having a lot of chatter with the large bites required.
Ended up using my Woodpeckers 1/2 inch spiral bit. Absolutely astonishing how much smoother and faster of a cut it was. Another reminder of how much of an improvement spiral cut bits are.
The Bosch bit is used, but carbide and still sharp.
The WP bit had a very slight amount of wear.
The wood was still damp pressure treated.
As far as the longer sections (the kit comes with 2 18 and 2 32 inch guides), I though about using it as a guide for some dados; the 32 inch section was slightly too short. The longer sections would definitely come in handy.
")