Little test - CNC Knee Mill/Router vs kaizen foam

Scorpion

Member
Joined
Jan 15, 2014
Messages
587
For some time now I've wondered if there was a way to use a CNC and end mills on foam inserts.  Haven't really gotten into getting samples so I don't have experience with different types of foam.  I started with Kaizen foam by Fastcap because I can get it from the local Woodcraft.

Challenge #1 - how the heck do you hold it in the view?!  It's foam and a machinist vise is...well, designed for something of more substance.  I was taking some measurements when I had an idea. What if I cut it while in the systainer base?  I did a little test cut and found it held the foam quite nicely once cut to fit.

14439d93d3e1c168c0db0929bade6281.jpg


I used an up cutting 1/2-inch 2 flute end mill and ran the mill at max (safe) RPM - 3300.  The foam does "move" out of the way as the end mill moves but it still cots quite nicely.  The surface part of the cut moves out of the way so cleanup with a razor will be necessary however the bottom is perfectly awesome flat.

e4cc8749451a1e1dccd1cc6bdbd3d77f.jpg


After playing with it I found that adding 3/16-inch to the desired dimension resulted in nearly a perfect fit.

fb2a83c4ba4d36367d3397e7770ede6a.jpg


10b9140f0ff77a4b33b2b361e9dd6ffa.jpg


I think what I like the most is the perfectly smooth bottom of the cutouts and the dimensionally perfect measurements of the cutouts.  I tried to clean up the surface imperfections left by the process and found it less than easy. 

My assumption is that if I were t find a foam that had a tighter cell construction, it may result in a much cleaner cut.  If I could get my hands on an end mil with a more aggressive cutting angle it would probably make a cleaner surface cut.

I'm curious if the higher RPM of a CNC router or if an end mill with a sharper profile would leave a cleaner finish. 

3a6677ef4cf9ae4d7ab629bbf85c9a91.jpg


For those interests, it seems that it works.  Pictures I've seen of others using a razor/blade seem to have sharper edges but I'm certain that my cuts are more perfect otherwise. 

I'm on the fence if I'll mess with the mill and foam going forward.  I have a few samples of other types of foam on the way.  Hopefully one is the is more conducive to machining.
 
Ha! Good luck finding that much room in my freezer...  [poke] Great idea however.

I got some kaizen a while back and have been somewhat frustrated/unimpressed by the results I get with the slice & pluck method. Seems to me they could use an adhesive that released the layers easier or make separating the layers easier in some way. So far I would give my results a C+ at best.

I recently (last week) added a small CNC mill to the fleet, when time presents itself I will give this method a try. After emptying out the freezer.  [big grin]

RMW
 
I wish I had been able to take pictures when I was at an upfitters shop a couple years ago.  They had a CNC system they used to cut foam inserts for aviation and medical toolboxes.  It uses an ultrasonic transducer to vibrate the blade 20-40k times per second.  Cuts through carpet like a hot knife through butter.  Disadvantage, well, the price starts at around $4,000 for an ultrasonic knife and Neccessories(just made that word up, shouldn't be called "accessories" if you essentially need them to run the system)

Well, this is interesting.  Haven't checked in a while and I was curious as to the prices of the ultrasonics, if they've gone down.  Definitely.  The starter kit from NSK is right around $1500.  Still not exactly an impulse buy, but I might have to pick one up because of one of my side businesses.  I rent out bounce houses, inflatable obstacle courses and the like.  Material for those is a stone cold B*tch to cut when I need to do some repairs. 
 
I noticed that sometimes Woodpeckers will pack their OT Tools in 2 different foam densities. The bottom layer of foam is a hard, very plastic type of closed-cell foam while the top layer is a more conventional, softer style of foam.

Here's a place that may supply you with a few foam samples to try.
http://www.ufpt.com/materials/foam/
 
Richard/RMW said:
Ha! Good luck finding that much room in my freezer...  [poke] Great idea however.

I got some kaizen a while back and have been somewhat frustrated/unimpressed by the results ...So far I would give my results a C+ at best.

RMW

Conceptually I get that kaizen foam makes it easy to get organized but the process doesn't seem to align to the fastidious nature of Festool owners.      I could see using it to organize all of my tools yet, with the time investment required to organize well, I also feel like I'd want the results to have a little cleaner finish.

Maybe I'd be happier if it were a little denser.
 
Thunderchyld said:
... Neccessories...

I'm stealing this, my word now.

Thunderchyld said:
The starter kit from NSK is right around $1500. 

Isn't cutting is only half the equation?  Also need a way to scan in the profile.  Saw a pic someplace that showed a setup with a lit table and a camera over the top.  Lay out the tools and snap a pic.  Then machine loads it and cuts the tool profile in the foam.

If it was $1500 all in it may be worth it if a group of buddies all were able to do all of their drawers and split the machine expense...maybe
 
Anyone know what kind of foam Lee Valley and Veritas use in their foam layouts?  I really like the look and feel of it. Very surgical looking!

Cheers. Bryan.
 
Richard/RMW said:
Didn't even know foam cutting bits existed. Tools Today has them too:
http://www.toolstoday.com/p-6221-solid-carbide-spiral-foam-cutting-up-cut-router-bits.aspx

RMw
.

Me neither but makes sense.  I'm using an up cutting end mill designed for wood but had the suspicion that the rake of the cutting edge wasn't right - which is why it semi pushes the material out of the way and then cuts.  That's the reason I have to oversize all dimensions by about .188 (though I suspect it's really only .150 that's really needed).

Anyway, thinking I'll order one and see if it makes a difference.  If it cuts as well as that video shows, it would be worth it.
 
bkharman said:
Anyone know what kind of foam Lee Valley and Veritas use in their foam layouts?  I really like the look and feel of it. Very surgical looking!

Cheers. Bryan.

That's exactly the foam I really want though I don't personally have any of their organizers/kits.  I suspect it's 4lb density XPE foam like offered here -http://www.toolfoam.com

The site explains how to laminate it yourself with heat or adhesive or, if you wish, you can order it to any thickness up to 5-inches thick pre-laminated.  It's chemical and fuel resistant so probably the stuff the aviation guys use for their boxes.

Hopefully I'll have samples beginning of next week.
 
Don't know if this helps but here are a few shots of my drilling kit:

352cbef8b0822ab983dd5740ebb3bc3b.jpg


Two layers

0fdd2dc0ffab217b1d0c1fdfda94a141.jpg


The stuff is very dense like a camping mat.

Cheers. Bryan.
 
bkharman said:
Don't know if this helps but here are a few shots of my drilling kit:

352cbef8b0822ab983dd5740ebb3bc3b.jpg


Two layers

0fdd2dc0ffab217b1d0c1fdfda94a141.jpg


The stuff is very dense like a camping mat.

Cheers. Bryan.

Man that looks nice.  Does it have a smooth surface or feel porous?  Maybe it's not the kind of foam I think it is.  Looks like 3 layers too.  Top, black 1/4-inch, mid yellow 3/4?, bottom yellow 1/4-inch?

Edit:  looked up their site and the stuff they use is called EVA (Ethylene-Vinyl Acetate) foam which is another closed cell foam. 
 
Let me know how it turns out Richard. If it is user-friendly I would love to understand how to do it.

Cheers. Bryan.
 
What about using a drag knife on the cnc to first cut the outline , the cnc out the interior?
 
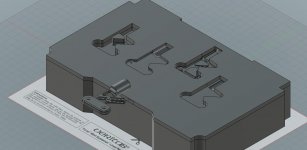
It's funny that you all should bring this up just now... this week I've been playing around with just this concept and how you could model the 3D cutouts for CNCing them.

Attached in an image of the results of my playing around. In this case, I already have a 3D model of a Drag Knife that I've thinking about having 3D printed in aluminum. So I just took the component and tried several different ways of intersecting it with the model of the systainer foam to create the cutouts. This ranges from either just placing the tool halfway into the foam and doing a "subtract", to using a construction plane to take a cross section of the tool, project that outline onto the foam and then "push pull" it into the foam.

The one I like the best (third from left) is where I put the tool in the foam, created the cavity (fully engulfed), and then created a cross section that I "extruded" straight up to then create a flat sided cutout through the top plane of the foam. That gives you fully inset cutout that still conforms to the bottom shape of the tool for a nice snug fit. Will combine with what I did on the second from left, where I filled in the voids first so that the bottom surface was all flat.

Now, as you've been discussing, to find the right foam and cutters for making it.

As for tools you just have on hand, note how I made the foam component. I imported an image (PDF in this case) with the outline of the systainer, and "traced" it with a polyline tool, then closed it off, so I could push pull it to 3D. You could do the same with any tool. You just take a picture of the tool and import it, then "scale" the image with a measure of the tool and it becomes "actual sized" in the drawing.

[attachimg=1]
 

Attachments

  • testcut.jpg
    testcut.jpg
    74.4 KB · Views: 5,979
Richard/RMW said:
This thread initiated a serious bout of ADD, the TT foam router bits are ordered and it looks like EVA foam is the stuff used for floor mat tiles:
http://www.amazon.com/BalanceFrom-P...ss&ie=UTF8&qid=1454613070&sr=1-1&keywords=eva+foam

Opens up interesting possibilities of laminating up multiple colors to come up with your own version of the LV black/yellow look.  Lots of options in 1/2" thick for < $1/PSF.

This is fun.

RMW

Richard, which mill dos you end up ordering?

The mats are made out of that foam but I've noticed that most have a texture on them which would make lamination interesting.  If you find flat ones, let me know.  Not sure they're actually cheaper than ordering a roll of the stuff from a supplier but maybe.
 
fritter63 said:
As for tools you just have on hand, note how I made the foam component. I imported an image (PDF in this case) with the outline of the systainer, and "traced" it with a polyline tool, then closed it off, so I could push pull it to 3D. You could do the same with any tool. You just take a picture of the tool and import it, then "scale" the image with a measure of the tool and it becomes "actual sized" in the drawing.

[attachimg=1]

Interesting.  Take a pick with a phone and scale to correct size in CAD.  Would work well for a 2D exactly outline and super simple.  I like it.
 
Back
Top