Long run of cabinets

Joined
Jul 27, 2018
Messages
169
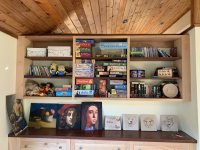
I’d like to build a long run (over 10 feet) of what are essentially wall cabinets. It would be pretty easy to build 5 boxes and hang them together, but...

I’m not going to put doors on them, and I would prefer the sides not be double thick between boxes (like partitions).

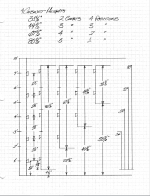
I’m thinking 6 sections, about 30 inches tall, with adjustable shelves in each section.

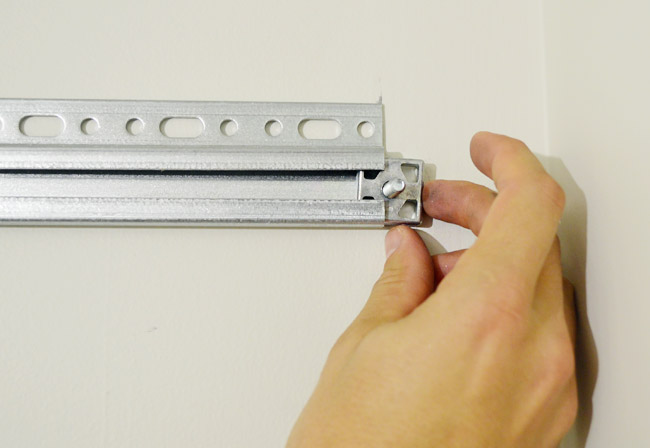
Anybody got any favorite joinery or hanging techniques for something like that?
 
The Domino connectors come to mind. Or the system(s) from Lamello. Or a combination of Domino with Lamello connector.
 
The two sides are cabinets with four walls.  The outer walls are only 3/4", the inner walls, tops and bottoms are 1 1/2" (two 3/4" sheets vacuum pressed together) because we did want the more substantial look.  But there is no reason they have to be thick.  I attached them using Orange Aluminum Z channel behind the top maple cleat in the back.

The middle section is just a top/bottom connected to the sides using dominos and domino connectors to draw everything tight.

View attachment 1
 

Attachments

  • Maple Balu Shelves.jpg
    Maple Balu Shelves.jpg
    903.6 KB · Views: 550
I'd suggest a well-leveled french cleat system, with no less than two cleats supporting each cabinet.  The system I use has five cleats; the first one 12" AFF, and the remaining four spaced up at 18" intervals (12", 30", 48", 66" and 84").
 
Sparktrician said:
I'd suggest a well-leveled french cleat system, with no less than two cleats supporting each cabinet.  The system I use has five cleats; the first one 12" AFF, and the remaining four spaced up at 18" intervals (12", 30", 48", 66" and 84").

If I am understanding this you have base cabinets that hang off the 12" and 30" cleats and wall cabinets on the upper cleats. If so how deep are the base cabinets, the normal 24" depth or something less?

Or is it all one tall cabinet which is supported at five levels.
 
Ikea has a very neat system using rails and clips.  I am finding the rails online for $11.00 for 84" piece.  But you also need the mounting studs shown below and I am not seeing them.  They allow you to slide the cabinets in position.  It is a very elegant French cleat system.  French cleats will also work.  If you use a conventional French cleat, then make the wall-mounted section about 3" narrower than the box.  That will allow you to slide the box into position exactly where you want it.

For the Ikea system, you make notches on the sides of the cabinets so that you can install long runs of the cleats.  I suppose you can do that with a conventional French cleat, just don't notch  out the exposed sides.

French Cleat
2.jpg


Ikea Sektion cleat system
Uppers-Hang-9-Add-Little-Things.jpg
 
Bob D. said:
Sparktrician said:
I'd suggest a well-leveled french cleat system, with no less than two cleats supporting each cabinet.  The system I use has five cleats; the first one 12" AFF, and the remaining four spaced up at 18" intervals (12", 30", 48", 66" and 84").

If I am understanding this you have base cabinets that hang off the 12" and 30" cleats and wall cabinets on the upper cleats. If so how deep are the base cabinets, the normal 24" depth or something less?

Or is it all one tall cabinet which is supported at five levels.

In my system, there are four standard cabinet heights.  The tallest cabinet sets on all five cleats in only one position.  The remaining three are capable of being raised or lowered, depending on need and available cleats.  The concept is that by taking the time to get the cleats straight, level, and plumb (in relation to the other cleats) it is very easy to initially set, then later reposition them with no loss in precision. 

Check this message

I tried to post my drawing, but it's apparently too large and the FOG whines and balks.  Send me a PM with your email address and I'll send it directly.
 
Why wouldn't you just build one 10+ft long cabinet? It will weight less than 6 individual cabinets.

 
cpw said:
The middle section is just a top/bottom connected to the sides using dominos and domino connectors to draw everything tight.

Thanks - those look terrific (including the paw print drawer pulls below!).

The is essentially the only method I could come up with that made sense to me.  Did you hang the outer two and then connect the middle section once they were on the wall, or did you connect them ahead of time? Connected ahead of time, I can envision it as moderately fragile.

If I went with 5 sections, it should be pretty doable to hang the 1st, 3rd, and 5th on cleats with a little room for lateral movement, then connect the 2nd and 4th (like your middle section) before screwing it all to the wall.

Also, what's the width of your middle section?

Thanks much.
 
Peter_C said:
Why wouldn't you just build one 10+ft long cabinet? It will weight less than 6 individual cabinets.

That's my preference (at least visually).  But at some point, I'm going to have to join multiple sections, as I don't have 10+ foot material for the tops and bottoms. I've not done that before without just hanging multiple separate boxes next to each other, and I'm trying to get my head around the joinery/mechanics of it.
 
Peter_C said:
Why wouldn't you just build one 10+ft long cabinet? It will weight less than 6 individual cabinets.

There are several limitations in this. First is simply fitment. A 120" cabinet may not go around corners to get through doorways. It can also be rather difficult to move if the shop where it's being built is any distance from the final location. Then comes the awkward handling and weight. Then comes the material itself, more specifically, length of the boards. It may not be practical or possible to get it in the length required. Another is weight. Overall a single unit would be lighter than a few sections connected together, but those smaller sections would be lighter/shorter and just easier to handle while moving them into place.

I work in a big commercial cabinet shop, building large reception desks and things of the sort every day. One of the biggest concerns with these is transportation and reassembly.  Trucks, doorways, sometimes elevators come into play in most of them.
 
Dr. P. Venkman said:
Thanks - those look terrific (including the paw print drawer pulls below!).

The is essentially the only method I could come up with that made sense to me.  Did you hang the outer two and then connect the middle section once they were on the wall, or did you connect them ahead of time? Connected ahead of time, I can envision it as moderately fragile.

If I went with 5 sections, it should be pretty doable to hang the 1st, 3rd, and 5th on cleats with a little room for lateral movement, then connect the 2nd and 4th (like your middle section) before screwing it all to the wall.

Also, what's the width of your middle section?

Thanks much.
Thanks!  We got the Paws from Lee Valley.  We have a GSD, so a wolf paw is not so different.  I joke that I like my tools and dogs German engineered.  The maple and red balau decking matches the rest of the furniture I did for the room too.

The middle section is 32".  I put the two outer sections up, without the filler strips; which gives me several inches on each side.  I was then able to have enough play to get the middle shelves in, centered etc.

The filler strips are mostly so I could deal with out of plumb and square walls and not have to adjust the baseboard element that is below on the left side.  I wanted the top to have the same dimensions as the bottom so the extra space for the heater ends up going upwards (and equal on both sides for symmetry).  The extra lateral play made this assembly pretty simple, without it I think that I would need to come up with another solution.  I don't have backs because we didn't want the shelves to overpower the room, so assembling beforehand I think would just be a no go.

If I did need to assemble the run beforehand, there is enough meat in these at 1 1/2" to use a powerhead screw and Fastcap on top, but this way there are no fasteners visible so they just float there.
 
Thanks to [member=60461]Bob D.[/member] for reducing the size of my PDF file regarding my french cleat system.  It's attached. 

One thing I forgot to mention is that I prefer to use maple or Douglas fir to make the actual cleats, rather than plywood.  The reason is that both maple and Doug fir stay straight and deflect less than similarly-sized plywood.  Also, both woods are better for lateral repositioning of cabinets when loaded. 
 

Attachments

  • Sparktricians French Cleat System.png
    Sparktricians French Cleat System.png
    281.2 KB · Views: 301
Legible handwriting, and legible handwriting with style and flair are both skill sets that are hopefully not lost to history as we move forward through the computer age.  Very nice, [member=7493]Sparktrician[/member] !
 
squall_line said:
Legible handwriting, and legible handwriting with style and flair are both skill sets that are hopefully not lost to history as we move forward through the computer age.  Very nice, [member=7493]Sparktrician[/member] !

Thank you, [member=75217]squall_line[/member] !  [smile]
 
I generally find that hitting more than 2 french cleats exactly equally is rather difficult. If any one of them is even slightly higher, it is bearing all of the weight and the others are not even helping hold the cabinet back against the wall. If any are low, they are not doing anything either. This is made even worse if you have multiple cabinets in a row, because then they have to hit all of the cleats and land at the same height too.
I like to do it with one "true" french cleat at the top and the others with opposing rabbets that don't fully bottom out. That way, the top one is holding the weight in sheer strength and back against the wall. The lower ones have rabbets that engage before the angles of the french cleat bottoms out, but then they don't necessarily bottom out themselves. This holds the cabinet back against the wall too, but doesn't require the fussy adjustment. A slight bevel to one or the other edge allows them to start easier, like a french cleat, but they don't have to bottom out to work.
 
Getting several French cleats to be in perfect alignment can be difficult. Why not mount one long French cleat on the wall, and after screwing in place, use a multi-tool oscillating saw to cut small sections out to suit the cabinets?

I have not tried it, but it would be my approach to this.
 
Packard said:
Getting several French cleats to be in perfect alignment can be difficult. Why not mount one long French cleat on the wall, and after screwing in place, use a multi-tool oscillating saw to cut small sections out to suit the cabinets?

I have not tried it, but it would be my approach to this.

[member=74278]Packard[/member], depending on the length of the cleats, one can make two (or more, as needed) cleat hanging jigs.  Get the top cleat in the right place vertically, level it perfectly, screwing it to the studs, then hang the jigs from the top cleat and use them to place the remaining cleats as needed.  If you're hanging only a couple of cabinets, it's likely overkill, but if you're repeatedly hanging long runs or many cabinet systems over time, it's a huge time-saver. 

And while I'm in a stream-of-consciousness mindset, if you choose to use a system like mine (or invent your own), make a couple of similar concept jigs to align and space the cleats on the cabinet backs before you screw them to the cabinet backs.  [smile]
 
I don’t see the need to take the time to build a special jig and then store it, when for almost no extra work I could install one long cleat. Assuming 1 minute per cut, a 10 foot run will likely have no more that four cabinets. That would require 6 cuts or about 6 minutes work (with a multi-tool.)

No jig I ever made was built in 6 minutes.

I may be missing something here, but without some obstacle to my approach, I don’t see making a jig.

Maybe Woodpeckers will make a One-Time tool for this at $400.00. I would watch their video, but I would not buy the jig. (Their videos are always very good.)
 
Thanks for all the input on this.  I got around to making them last weekend, and I went with [member=63643]cpw[/member] method of putting three "normal" cabinet boxes on the wall and connecting them with just an upper and lower via Domino connectors.

I actually used connectors for the whole thing, just because I'd never used them before and I wanted to try them.  I probably wouldn't use them for boxes again, unless I absolutely had to, but they worked pretty well and were perfect for creating the 2nd and 4th sections the way [member=63643]cpw[/member] mentioned.

The picture isn't very good, but here's how it ended up.

Edit: it's tough to tell from the perspective and my poor photography skills, but the 1st, 3rd, and 5th sections are all the same size, and the 2nd and 4th are smaller.

Thanks again for the input/suggestions!
 

Attachments

  • IMG-9414.jpg
    IMG-9414.jpg
    1.7 MB · Views: 323
Back
Top