Looking for workflow advice: cabinet making with TS 60 and parallel guides

sebna

Member
Joined
Jul 30, 2025
Messages
12
Hi All,

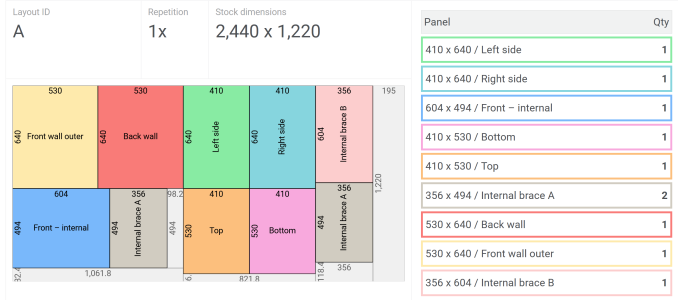
I'm a complete novice to woodworking, but I'd like to approach my first project with as much accuracy as possible. I’ll be building 8 sealed subwoofer boxes (see attached cut sheet) and I have a few questions about best practices.

The saw I plan to use is the Festool TS 60.

Would the following workflow be considered good practice (please suggest improvements or more efficient way about it)?
  1. Rip the factory edge off the plywood sheet (removing 2-4 mm including kerf) to create a clean reference edge. I’d use a full-length FS 3000 rail for this.
  2. Using this freshly cut edge, a square rail setup (Benchdogs or TSO style), and a shorter rail like the FS 1400, trim the adjacent factory edge (removing another 2–4 mm including kerf) to create two known reference edges that are square to each other.
  3. Using the long reference edge from step 1 and a parallel guide system (Benchdogs or TSO style), rip the board at approximately 645 mm, using the TS 60’s splinter guard to protect the off-cut edge.
  4. Proceed to crosscuts. Would I be better off switching to a rail square (e.g. FS-WA or TSO), or continuing to use the parallel guide system? I’ve read that crosscuts using a square may be faster and easier, but I’m not sure if they’re as accurate.
Would this plan justify owning both an FS 3000 and FS 1800 rail, or is there a better rail setup or cutting approach? I read somewhere that starting with parallel cuts instead of crosscuts improves squareness and accuracy, which is why I planned it this way.

Once I’ve completed the first box and confirmed I can hit the accuracy I’m aiming for, I plan to rework the cut sheets for the remaining 7 boxes to streamline the process and take better advantage of repetitive cuts using either the parallel guide or rail square system.

Thanks in advance for your advice!

EDIT: I have two more projects coming after this one. One would be 2.8m long AV cabinet, so FS3000 will be probably handy for that as well.
1754300460375.png
 
Last edited:
I personally loathe longer rails and rather just keep a 1900 and cross cut sheets smaller instead of trying to rip 3000. Which you've got plenty of places you can do that here.

Anyway, I'd say parallel rip first. Then do the perpendicular cuts. While technically you should be referencing the same first edge all the time - realistically if your parallels are parallel, the deviation is acceptable to use either edge. This may be needed at times for things such as melamine or cheap birch which will always flake on the bottom side unless you really bury the blade. I make sure the show face is what I can see with the tracksaw. Tape is also your friend in addition to the splinter guards.

tldr - you didn't need step 2.

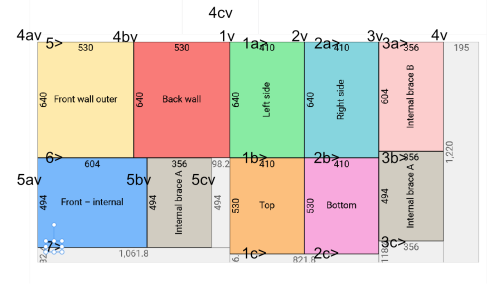
You'll be trimming the factory edge on 1a, 2a, 3a, 4a, 5a, 5, 4av, 5av so make sure you have the appropriate buffer there.
1754308170969.png

I only started in the middle to make it easier to manage the sheet. Some older hands here might have just started nibbling from one edge instead which is perfectly valid. Just get them narrow enough to throw up on your MFT for cross cuts (or floating cuts with TSO squares).
 
Last edited:
Having cleaned up the long edge and squared/cleaned up one end, from there I would normally take care of all the crosscuts first, then the rip cuts, then rip the pairs of crosscut boards to separate them.
 
A better representation of what I was trying to explain earlier :D.

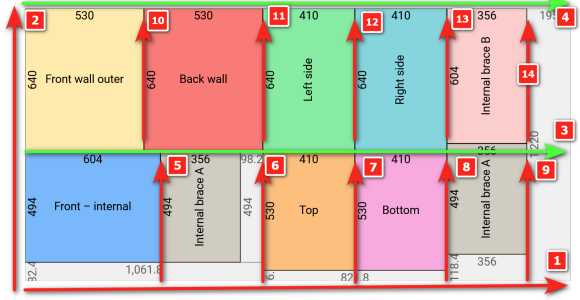
Green would be parallel cuts using Benchdogs parallel system (same general operation as TSO). Cut 1 is FS 3000 reference cut, 2 is reference edge cross cut. Of course I would move panels close to right edge not to be cut with rip cut.

1754324556675.png
 
The grain orientation is going to be a bit a bit odd on these isn't it?
Not sure if that is what is the point but cabs will be painted or wrapped in fabric so grain orientation, at least from visual perspective plays no role.
 
Having cleaned up the long edge and squared/cleaned up one end, from there I would normally take care of all the crosscuts first, then the rip cuts, then rip the pairs of crosscut boards to separate them.

Thanks. Would that approach not have more room for introducing inaccuracies / deviation vs splitting the sheet with parallel cut fist and then moving on to cross cuts?
 
I personally loathe longer rails and rather just keep a 1900 and cross cut sheets smaller instead of trying to rip 3000. Which you've got plenty of places you can do that here.

Anyway, I'd say parallel rip first. Then do the perpendicular cuts. While technically you should be referencing the same first edge all the time - realistically if your parallels are parallel, the deviation is acceptable to use either edge. This may be needed at times for things such as melamine or cheap birch which will always flake on the bottom side unless you really bury the blade. I make sure the show face is what I can see with the tracksaw. Tape is also your friend in addition to the splinter guards.

tldr - you didn't need step 2.

You'll be trimming the factory edge on 1a, 2a, 3a, 4a, 5a, 5, 4av, 5av so make sure you have the appropriate buffer there.
View attachment 377206

I only started in the middle to make it easier to manage the sheet. Some older hands here might have just started nibbling from one edge instead which is perfectly valid. Just get them narrow enough to throw up on your MFT for cross cuts (or floating cuts with TSO squares).
Thank you. I must admit that I am having a bit of difficult reading your diagram but that is on me I am sure with not being familiar with all that yet.

But I see that you agree with my approach in general with some small tweaks for convenience down to your own working preferences.

If so that is good to hear that I got the basics right.

I am also thinking if the first box comes out fine I could stack 2-3 panels and see how that goes to speed up things and increase repeatability.
 
My diagram is a mess. Cut 1v, 2v, 3v etc first using the parallel guides. They're short < 1400 cuts but 1900 is still my preferred rail. You don't have to worry about rail flexure over a 3000 span. The xa, xb, xc cuts can all be done on your MFT cross cut station.

Only other gotcha I'd do is to reserve a buffer on 'internal bracing' by a few mm and come back to trim those to fit.
 
Not sure if that is what is the point but cabs will be painted or wrapped in fabric so grain orientation, at least from visual perspective plays no role.
Wouldn't MDF be the better choice for speaker boxes in that case?
 
My diagram is a mess. Cut 1v, 2v, 3v etc first using the parallel guides. They're short < 1400 cuts but 1900 is still my preferred rail. You don't have to worry about rail flexure over a 3000 span. The xa, xb, xc cuts can all be done on your MFT cross cut station.

Only other gotcha I'd do is to reserve a buffer on 'internal bracing' by a few mm and come back to trim those to fit.
Ah, ok makes sense now. So completely different approach to what I was planning. Don't have MFT station as such (but myself Bora Centipede 8x4 model) but that should be doable with what I have planned.
 
Usually the Festool workflow would be the rips first then the crosscuts. Rips would use optimally parallel guides and then the crosscuts would use a repeatable stop like afforded by a MFT. Of course the accessories mentioned make things easier and there are ways to accomplish the same without them.

Peter
 
Back
Top