LR32-ish stationery jig

rmwarren

Member
Joined
Jul 11, 2010
Messages
3,063
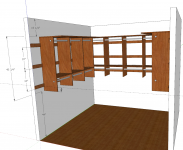
I have a spring project to finally finish the closet, which will entail making ~40 panels w/32mm line boring. Also going to use French cleats, but that's a separate topic. The panels will mostly be 16" nominal, with some 24" lowers and possibly some 12" in one area. Industrial Plywood in Reading PA sells precut white birch 8' panels that have one edge banded, which are perfect. Partially complete design:

[attachimg=1]

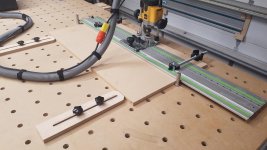
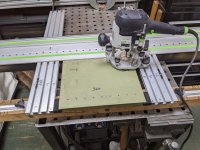
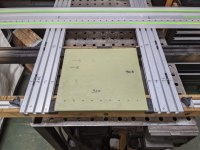
I have the LR 32 setup with a 1010, love the router guide/rail but always disliked the stops and alignments arms gadgets. Not that I do a lot of 32mm cabinets, but every time I do I end up fiddling with the setup to frustration. What I wanted was a stationary, adjustable setup that I can turn over to my "assistant" (SWMBO) while I focus on routing cleats, etc. Anyway, this is where things stand so far (proof-of-concept):

[attachimg=2]

[attachimg=5]

[attachimg=8]

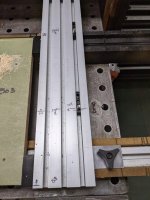
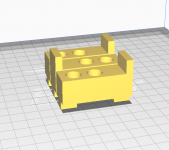
Using Woodpeckers Super Track and the 8020 extension arms I printed an adjustable 6mm pin thingy and an edge stop that both spaces the offset to the pins and locates the panel to be bored. We were snowed in this weekend, so Fusion/3D printer…

[attachimg=3]

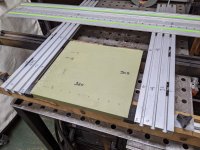
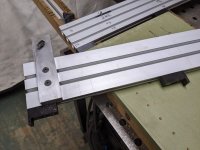
The track attaches to the extension arms with 1/2 by 1-12" AL bar stock, slides anywhere along the arms and a knob locks it down.

[attachimg=4]

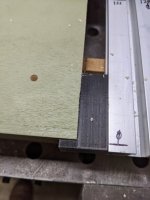
My plan is to make balanced panels in increments of 32mm. The spacer/stops offset from the pin so the panel end is 96mm from the pin centerline. One screw attaches the stop with a tee nut, the other hole is threaded and the screw acts as an adjuster in case the panels lengths end up slightly
 

Attachments

  • Closet.png
    Closet.png
    416.7 KB · Views: 1,428
  • Table.png
    Table.png
    8 KB · Views: 1,382
  • PXL_20220131_000210731.jpg
    PXL_20220131_000210731.jpg
    238.9 KB · Views: 1,367
  • PXL_20220131_000328593.jpg
    PXL_20220131_000328593.jpg
    317.1 KB · Views: 1,435
  • PXL_20220131_000558651.jpg
    PXL_20220131_000558651.jpg
    314 KB · Views: 1,323
  • PXL_20220131_000237103.jpg
    PXL_20220131_000237103.jpg
    102.4 KB · Views: 1,351
  • PXL_20220131_000151552.jpg
    PXL_20220131_000151552.jpg
    315.8 KB · Views: 1,421
  • PXL_20220131_000735176.jpg
    PXL_20220131_000735176.jpg
    254.6 KB · Views: 1,343
  • Stops.png
    Stops.png
    255.8 KB · Views: 1,331
  • PXL_20220131_000300937.jpg
    PXL_20220131_000300937.jpg
    313.7 KB · Views: 1,419
Very creative,  I too loved the LR32 but hated those set back arms.  Putting on/off for every panel drove me nuts.  Just FYI you can do the same thing with dogs and a MFT type bench easily and very little expense.
 
Can't say I follow everything I'm more visual with videos. But it seems clever. Are these just shelf pin holes? Is this a use case for something like the Mafell DDF40 and its jig setup?

 
DynaGlide said:
Can't say I follow everything I'm more visual with videos. But it seems clever. Are these just shelf pin holes? Is this a use case for something like the Mafell DDF40 and its jig setup?

Matt its current purpose is solely line boring for shelves/drawers. Shelves can be forgiving as the spacing of line bores front/rear isn't critical, but my experience with doors/drawer slides has been frustrating. In the case of this closet, I'm using it as the opportunity to create/adjust MY 32mm standard.

I think I can modify it for boring cup holes in doors simply by creating new spacer/stops @ 16m from the pins.

I've spent some time reviewing the KISS systems and liked it over Blum et al, it was more understandable to me. Balanced/unhanded panels & doors/drawer fronts, increments of 32mm (-X for the doors/drawers), drawer stacks based on a formula, I could get my mind around it. And set up cut lists in Excel.

This closet may be my last hurrah in terms of major 32mm cabinet projects, so figuring this out was mostly getting a monkey off my back. And it uses stuff I had laying around, so I could justify the economics. I'll be using the super tracks for other stuff still, one of them attaches to my tablesaw fence so I can attach the Jessum clear cut guides. (Danged stuff went and got expensive recently...)

Once I get the rules installed, I'll make a short video when time permits. I'm curious how long it will take to set up from scratch, shouldn't be more than a few minutes.

RMW
 
afish said:
Very creative,  I too loved the LR32 but hated those set back arms.  Putting on/off for every panel drove me nuts.  Just FYI you can do the same thing with dogs and a MFT type bench easily and very little expense.

I'd like to see that setup. While I have a ton of 20mm dogs floating around I'll admit I haven't pulled out my MFT in years. I do have some half-baked 20mm/96mm worksurfaces, as well as the Bora version I recently picked up to use with the Centipede. Whenever I get around to kickoff of this project I'll clean up things so we'll have multiple workstations. This time of year, when I'm limited to indoor workspace, it's a little challenging to work on cabinet scale projects.

RMW
 
DynaGlide said:
Can't say I follow everything I'm more visual with videos. But it seems clever. Are these just shelf pin holes? Is this a use case for something like the Mafell DDF40 and its jig setup?
Seconded, this is screaming for an addition of a vertical mount option for the panels and use as a doweling jig.

Planning something similar but less industrial to be built-into a side of a workbench.
 
Richard/RMW said:
DynaGlide said:
Can't say I follow everything I'm more visual with videos. But it seems clever. Are these just shelf pin holes? Is this a use case for something like the Mafell DDF40 and its jig setup?

Matt its current purpose is solely line boring for shelves/drawers. Shelves can be forgiving as the spacing of line bores front/rear isn't critical, but my experience with doors/drawer slides has been frustrating. In the case of this closet, I'm using it as the opportunity to create/adjust MY 32mm standard.

I think I can modify it for boring cup holes in doors simply by creating new spacer/stops @ 16m from the pins.

I've spent some time reviewing the KISS systems and liked it over Blum et al, it was more understandable to me. Balanced/unhanded panels & doors/drawer fronts, increments of 32mm (-X for the doors/drawers), drawer stacks based on a formula, I could get my mind around it. And set up cut lists in Excel.

This closet may be my last hurrah in terms of major 32mm cabinet projects, so figuring this out was mostly getting a monkey off my back. And it uses stuff I had laying around, so I could justify the economics. I'll be using the super tracks for other stuff still, one of them attaches to my tablesaw fence so I can attach the Jessum clear cut guides. (Danged stuff went and got expensive recently...)

Once I get the rules installed, I'll make a short video when time permits. I'm curious how long it will take to set up from scratch, shouldn't be more than a few minutes.

RMW

Thanks Richard. I've signed up to do a closet for my wife this year so this is all of interest to me. I won't go anywhere near unbalanced panels especially with something of this scope. I made one test box in unbalanced a few years back and I messed that up and it only had two sides. That was enough to convince me to not use unbalanced.

I've kind of accepted I won't have a system like yours and everything will be custom for my needs. Which kind of defeats the purpose of 32mm. We'll see if that changes when I get into designing the closet.

Matt
 
DynaGlide said:
Can't say I follow everything I'm more visual with videos. But it seems clever. Are these just shelf pin holes? Is this a use case for something like the Mafell DDF40 and its jig setup?

His fixture basically does away with those pesky LR32 edge setback bars and allows batch processing of the shelf pin holes. I cant remember how big the holes are in the LR32 rail.  I thought they were closer to .25".  Its a nice set up but would be difficult and pricy for most with the extrusion, brackets, 3d printed parts etc.  If you have never used the LR32 system (which is great) but the achilleas heel of the system is the edge setback bars.  since they reference off the front edge they are in the way of the router.  So, it requires you to put them on/off the rail for each setback position on every panel.  So when you have more than 5 panels it gets really old really fast.  Plus they arnt quick attach and require tightening/loosening little thumb screws that arnt easy to access or grab. 

I did a similar setup a couple years ago using MFT bench.  The only thing you need is a couple tall dogs, some anchor dogs and some DIY adjustable stops.  Basically you just use the LR32 setback bars one time. quick instruction:

1. Place LR32 rail and setback bars on gable using the setback desired.  For example 37mm
2. Place 2 tall dogs on either side (top/bottom sides) of gable but inset of the LR32 rail
3. Gently but the rail up to the the tall dogs making sure the LR32 set back arm pins are still in contact with front edge.
4. Slide the adjustable stops up to the back of the gable and tighten down.
5. You can now remove the PITA set back bars and batch process all panels for the first row of holes

I used to drill all front rows then repeat steps 1-5 for the rear holes then drill them all at once.  If you want to drill both front and rear holes at the same time.  You can cut a spacer the distance of the hole spacing and place it between the adjustable stops and the rear of the gable.  This will push the gable forward and allow drilling the rear holes without changing anything.  This proved to be an extremely fast and easy way to drill the 5mm shelf holes. Never had any issues with this.

THE PIC shows the setup with the set back bars in place. These are only used once to locate the rear adjustable stops. Then arnt needed again.  Basically this pic shows what it should look like at the end of set #4
 

Attachments

  • lr32 4.jpg
    lr32 4.jpg
    211.4 KB · Views: 365
[member=73094]afish[/member]
Highly recommend you check the TSO PG system. It is great for placing the rail using the back edge as a reference in a serial fashion. And as one or both sides can be a GRS it also allows to "fix" the rail also "vertically" in reference to the rail holes.

Then one just needs a line mark for a center of first hole on the first cabinet side. Everything after is a preset series production.

IMO the OF1010 + LR32 (just the plate) + TSC55 + TSO PG (with 2x GRS) is the best combo on the market ref total capability for the money.
 
afish said:
His fixture basically does away with those pesky LR32 edge setback bars and allows batch processing of the shelf pin holes. I cant remember how big the holes are in the LR32 rail.  I thought they were closer to .25".  Its a nice set up but would be difficult and pricy for most with the extrusion, brackets, 3d printed parts etc.  If you have never used the LR32 system (which is great) but the achilleas heel of the system is the edge setback bars.  since they reference off the front edge they are in the way of the router.  So, it requires you to put them on/off the rail for each setback position on every panel.  So when you have more than 5 panels it gets really old really fast.  Plus they arnt quick attach and require tightening/loosening little thumb screws that arnt easy to access or grab. 

[member=73094]afish[/member] I ditched those bars and rolled my own a couple years back. Reply #8: https://www.festoolownersgroup.com/home-improvement-other-projects/home-office-remodel/msg612293/#msg612293

Between the vacuum clamps on the guide rail and the custom bars it goes pretty quick.

Matt
 
Yes, but from what I can tell you still need to put the set back rails on/off for each panel, no?  With the MFT system you dont even need to clamp anything.  The end stops keep the rail from moving side to side and the natural front to back pressure that comes from pressing the router is more than enough with the anti slip strips.  You would have to be very uncoordinated to mess it up and even then if you want you can throw a clamp along the back of the panel.  I used to drill panels that weren't cut on tru 32 using just one end stop too and never had a panel move.  As long as you drill from the end with the end stop the tension you apply keeps the end stop tight.  I like your ingenuity but Im pretty confident if you tried it you wouldnt go back.  I have yet to see anything simpler, easier, and more cost effective for batch processing LR32 holes. Provided one already has some type of MFT bench.     
 
Another goal I had was boring the 2-3 rows of holes from the same side without moving the panel. The tracks are 30" so even holes close to the rear edge of a panel are still bored standing at the front. Drop track over pins, bore series, move to next pins, repeat. Shouldn't take longer than 2 minutes per panel, swap out the next panel and repeat.

Again, given my actual requirements it's probably overkill. The fun was in designing & simplifying it so my lovey assisant gets to help with the project.

RMW 
 
DynaGlide said:
Can't say I follow everything I'm more visual with videos. But it seems clever. Are these just shelf pin holes? Is this a use case for something like the Mafell DDF40 and its jig setup?

Yes and way easier to do with their template guide.
 
JimH2 said:
DynaGlide said:
Can't say I follow everything I'm more visual with videos. But it seems clever. Are these just shelf pin holes? Is this a use case for something like the Mafell DDF40 and its jig setup?

Yes and way easier to do with their template guide.

Not sure I understand your point, I don't possess the Mafell nor any templete guide. I do have the LR32 and the rest of the hardware I used.

RMW
 
[member=8712]Richard/RMW[/member]

I was just asking a question, he confirmed. I should probably come up with a jig of some sort like has been posted in this thread before I tackle a closet. Doing line boring of more than a few panels is one of my least favorite 'woodworking' tasks. It's fun at first but quickly turns into something I put off doing.

My last project (the office) I was careless setting up the 1010 and it shifted on me on the LR-32 baseplate. I think I was holding the plate when I tightened the collet on the router. I didn't catch it until a few panels in and it threw the front to back alignment of shelf pins off by 1mm. I saved it with cam shaped shelf pins.

I own the new version of the Woodpeckers shelf pin jig and have yet to use it. For strictly shelf pin holes I'm wondering if it would be more straightforward to use.

Matt

 
I cant imagine anything being faster and easier and more full proof than the LR32 once you figure out the tricks to maximize efficiency and the quirks.  Possibly the DDF40 could give it a run for it money but Im not even sure about that. I could litterally fly through the panels on the MFT once set up which was also super easy. I like Richards system too but it needs a fair amount of pricy extrusion and 3d printed parts plus some metal fabrication.

That sucks about the router moving and is a prime example of why I preach having dedicated routers and another reason Im not a fan of Festool routers I would rather have 6 dewalt routers than one or two festool ones.  That Dewalt router you see in my pick was dedicated to only the LR32 it never came off the LR32 base plate.  Before I ordered the CNC I was about to order a second LR32 base plate to mount another router for doing only the hinge cup holes.  That way I wouldnt even need to swap the bits. I have picked up several used plunge routers lightly used for under 150 the dw621 was my fav. because of the built in dust extraction even though the trigger takes some getting used to. 

 
I like your set up Richard and think it will work well. Could be a really good alternative for some but really unnecessary for those that have an MFT/3. I like afish's set up on the mft but even that seems really over thought compared to how I usually do it. I put a holey rail in the flip up bracket on the MFT/3. If I am doing taller panels like oversized upper cabinets I set it up on the long length of the mft. Then I square the fence to the rail. I set up my first panel and position it against the fence and use the LR32 system depth brackets to set the panel in relation to the rail. Set a fence stop to the back side of the panel to hold that position, and make it repeatable. Then take the brackets off, I am done with them now. I then put the LR32 end stop on the rail and loosen the screws holding the rail and slide the rail in the flip up bracket until the end stop buts against the work piece against the fence, then tighten the rail down.

This allows me to bore the piece, flip up the rail, put the next piece in against the stop and flip the rail back down. Rinse and repeat. I usually set a few stops on the fence for both the front set of holes and back as well as any mid panel holes. It goes very fast.

I do about half of my work in a large industrial shop of one of my customers. There we have a large Felder line boring machine that can do 8 ft panels. Operated by foot pedal it is very fast. I can do a typical kitchen of 20 cases in under an hour. In my smaller shop with the MFT set up I can do the same amount of boring in about an hour and half to two hours. But my MFT system can fold up and sit  in a corner and I can take it anywhere. The Felder we move with a forklift.

Like it or not any hardware you buy even in the US is based on 32 mm systems rather it is hinges or drawer slides. So designing within it will make your life so much easier. The best thing you can do for yourself is make you panel heights an even 32mm length. It will usually change your heights by less then an inch but will save you from having to reference top and bottom when boring, that is the biggest chance of easy error and it is really unnecessary in most cases.

I will snap a photo of my method set up the next time I have it out.
 
[member=32538]MaineShop[/member]

Are you using only one LR-32 end stop on the rail when doing this?
 
yes he is.  The other end is butting to the fence from what I gather.  It sounds like a sound method. Not sure if its simpler than the other. Biggest issue I see is having to make sure the rail is perfectly square to the fence or you could run into issues with the 5mm holes not being parallel to the front edge so one would need to be careful with that especially when doing upper cabinets where they are only 12"ish wide.  It could be easy to get out of square.  Also what happens when doing the rear set of holes?  In my mind the panel is mostly past the end of the fence so you would only have an inch or two to square off the fence unless you have the fence extended to the right of the rail. 

Once you make the adjustable stops which also comes in handy for stops when cutting.  Since they pop in and out of the MFT without any tools they can act similar to flip stops so they come in handy for many things. If they are in the way just lift them out and you can easily come back to that measurement later by placing it back.  Either way once those are made there is virtually no set up time and no fence to square or worry about being or staying square.  Many people have issues getting square cuts with a MFT and hinge unless its the dashboard so.  Using the set back arms to set the rear adjustable stops guarantees parellel hole placement as long as your set back arms are adjusted correctly. It also works for taller panels.  Not sure if maine shop system would work for 42" uppers. 
 
A very interesting approach Richard... [smile]

I could see using the same technique but with MFS 1000 rails instead because they're already engraved with distance markings.

I don't have a printer so I'd have to fabricate the spacer/locator bars from wood or aluminum. Wooden locators would take about 1 hour while aluminum locators would take about 3-4 hours. It'd all depend upon how many of these panels I was making.

I made a bunch of HVAC vents using a similar method to your suggestion and it's really nice and fast working off of hard stops. Better yet, all of the parts turn out the same.  [big grin]
 
Back
Top