LS 130 question

kmdwoodwork

Member
Joined
Mar 25, 2013
Messages
81
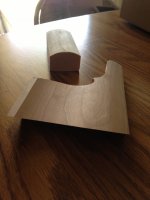
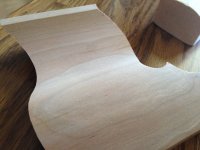
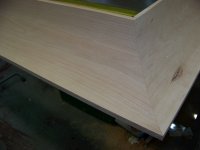
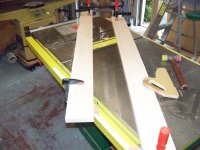
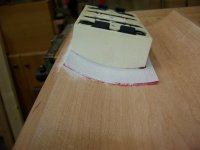
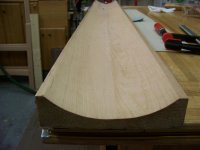
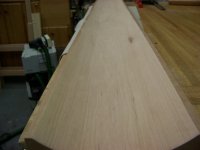
I have to make about 40' of cherry cove molding which will have a cove about 5" wide and 1 1/4" deep. Because of the size i am using a tablesaw to make it and the test piece needed a lot of hand sanding to get rid of the blade marks.

My question is will the diy pad conform to that shape easily and is it a lot faster and more accurate than hand sanding. I don't have own a ls130 so it is a large outlay of cash for a small job but if you guys tell me it works well i will pick one up.
 
This may not directly answer your question, but i have found that using a profile that is "close" the the shape you need, and then using an interface pad (or even 2) will get the job done.  I really like my LS and have used it many times on resanding treads, risers, handrails, and newel posts.
 
Hi,

  Though one of the available radius pads would work you might need to be careful not to sand "tracks" into the cove because your radius is much larger than the available pads. The contact area would  be pretty narrow. Plus it would take quite a few passes to cover the width. I say passes because  you pretty much need to just move along in a straight line with the LS130.  The radius you have made is much bigger than the available pads.  If you make your own it would be a better fit for the large radius and should cover the cove in two pass widths. It will certainly make it way faster than hand sanding.  You can even put an interface on the DIY pad if need be for an even closer fit  if you don't get the radius quite perfect.

Seth
 
I'm not an expert in the area, but cutting a cove by passing it through your table saw and an angle in a guide jig could be both very effective and very clean. I've seen this performed by experts ... I am not one of those experts!

Getting an even result over that length is going to be a challenge [sad]
 
SRSemenza said:
Hi,

   Though one of the available radius pads would work you might need to be careful not to sand "tracks" into the cove because your radius is much larger than the available pads. The contact area would  be pretty narrow. Plus it would take quite a few passes to cover the width. I say passes because  you pretty much need to just move along in a straight line with the LS130.  The radius you have made is much bigger than the available pads.  If you make your own it would be a better fit for the large radius and should cover the cove in two pass widths. It will certainly make it way faster than hand sanding.  You can even put an interface on the DIY pad if need be for an even closer fit  if you don't get the radius quite perfect.

Seth

Sanding tracks is my concern using any available pads, i was hoping to be able to do it in two passes like you stated. Is the diy pad difficult to shape and will the interface pad keep a crisp edge coming out of the cove?

My other thought was to use two interface pads with my ro90, i only have one and it would not conform to the radius and i want to try to keep the radius as consistent as possible among the pieces. On the piece i hand sanded the miter was a bit off because of that.
 
Kev said:
I'm not an expert in the area, but cutting a cove by passing it through your table saw and an angle in a guide jig could be both very effective and very clean. I've seen this performed by experts ... I am not one of those experts!

Getting an even result over that length is going to be a challenge [sad]

I made the test piece using that method and it works well and was even along the 10' length but it was not very clean and it tested my patience hand sanding it.
 
kmdwoodwork said:
SRSemenza said:
Hi,

   Though one of the available radius pads would work you might need to be careful not to sand "tracks" into the cove because your radius is much larger than the available pads. The contact area would  be pretty narrow. Plus it would take quite a few passes to cover the width. I say passes because  you pretty much need to just move along in a straight line with the LS130.  The radius you have made is much bigger than the available pads.  If you make your own it would be a better fit for the large radius and should cover the cove in two pass widths. It will certainly make it way faster than hand sanding.  You can even put an interface on the DIY pad if need be for an even closer fit  if you don't get the radius quite perfect.

Seth

Sanding tracks is my concern using any available pads, i was hoping to be able to do it in two passes like you stated. Is the diy pad difficult to shape and will the interface pad keep a crisp edge coming out of the cove?

My other thought was to use two interface pads with my ro90, i only have one and it would not conform to the radius and i want to try to keep the radius as consistent as possible among the pieces. On the piece i hand sanded the miter was a bit off because of that.

The DIY is a hard block of foam type material with no give. So it should do pretty well at keeping the edge / ends crisp. You probably won't need the interface pad and if so it could be removed for  the ends.  It is easy to shape and form.  Pretty sure it would be a lot better than the RO90 with multiple interface pads. The directions use a "sand in" method to make the shape, which I have not used  yet to make a profile. The ones I made were easily done just by cutting with hand tools and my router table. But the sand in method is probably what you would use to make the cove profile. 

Seth
 
I would/have use a hand scraper after the table saw. Then I would make close mate to your cove and glue sand paper to it.
I did this making box lids. I know it's not 40' .
The scraper will save you time.
Good luck,
Rick

PS: I own a ls130 also.
 
If your coves have a lot of blade marks to clean, you need to switch to a flat-top blade.  What you are likely seeing are the "bat ears" of an ATB blade and that's a lot of sanding.

I use a Forrest WW2 #1 grind (#1 grind is a flat top).  TCG blades have a flat raker.  If you have a dado stack, you can just put the outer blades on (so... 1/4" dado :) and run that though your approach angle may change since most dados are 8" not 10".

I have large coves on bracket feet on my bench right now. I shaped the bead part with a hand plane, but the cove was only lightly sanded with the sanding block you see in the background.  Drew the profile on a scrap of Beech and hand planed it in.  A 10-minute affair.  The sanding was literally maybe 10 passes with that block; I don't even think that many.  I sanded with P180 only so a couple passes with P80 then P120 then P180 would likely go even faster.

If you already have the coves cut in your final stock, you could re-run them with a flat-top blade raised just a hair so it cuts off the bat ears.

[attachthumb=1]

[attachthumb=2]

BTW, I made a small bombé-style box a couple years ago that has a very similar profile. I didn't have a flat-top blade so I just ran it "it'll be okay, I'll sand in no time".  Took awhile in hard maple... used the RO-90 and interface pad.  I bought the #1 grind blade the next day.
 

Attachments

  • 2014-04-22 14.35.26.jpeg
    2014-04-22 14.35.26.jpeg
    1.5 MB · Views: 292
  • 2014-04-22 14.35.52.jpeg
    2014-04-22 14.35.52.jpeg
    2.2 MB · Views: 252
Thanks for all the replies.

I will give the dado blade a shot to see if it works better than the Woodworker 2 blade , What PaulMarcel described is what the cut looks like after i ran it.

It is good to hear that the diy block is hard so it should keep the profile consistent.

After 25 years in construction and woodworking i have a special hatred for hand sanding and especially hand scrapers because both really make my abused hands hurt after only a couple of minutes which is the reason i was looking at the ls130 and like most people here i have a bit of a tool addiction.

I will put some thought to the ideas posted here before i decide what i do and will post the method i chose and a picture of the molding.

Thank you for the help.
 
[attachimg=1]
[attachimg=2]
[attachimg=3]
[attachimg=4]
[attachimg=5]

Well after a couple of months of delays i finally made the moldings. The diy pad worked excellent and the ls 130 made the job much faster, it saved me about 4 hours of sanding compared to doing it by hand. I made the pad about half of the profile because i ended up making a 6 1/4" cove and i had a small hump in the middle because i was not completely centered on the blade. The best thing about using this sander is that i was able to keep the profile consistent along the entire length which i know i could not have done by hand sanding, if i uploaded the pictures right you can see in the final picture the joints lined up perfectly, the picture was taken before final sanding. I ended up using an old dewalt rip blade because the pitch was building up quick on my ww2 blade so before sanding the wood was pretty rough, i started at 40 grit and went up to 150 grit.

I would like to thank everyone that commented and Tom at Tool Home for setting me up with a custom paper assortment.
 

Attachments

  • kmdwoodwork custom molding 5.JPG
    kmdwoodwork custom molding 5.JPG
    901.6 KB · Views: 481
I had 4 other pictures to show the progress but only one came up, if someone can help me with that i would appreciate it.
 
Keith,

Nice job, that kind of sanding is the reason I bought the LS130.  I haven't had a project to use it on yet but, I can see the utility over hand sanding a profile.

Jack
 
kmdwoodwork said:
I had 4 other pictures to show the progress but only one came up, if someone can help me with that i would appreciate it.

I did a partial fix but not all of your pictures are actually attached.

Seth
 
Keith,

I'm curious if you tried the single dado "flat" tooth blade and if that eliminated the saw marks better?  I made some cove moulding on my table saw years ago and spent quite a bit of time removing the saw marks......
 
[attachimg=1]

[attachimg=2]

[attachimg=3]

[attachimg=4]

[attachimg=5]

I think i got the pictures right this time.

If i did the first one shows the table saw layout.
The second shows the forming of the pad.
Third shows the molding before sanding.
Fourth shows the molding after sanding.
The last is the same picture as above.

The frame that i made is at the finishers and i should be installing it next week, i will be putting pictures of the completed unit in another thread i started around the same time about the Reversica tv unit which this frame is going around.
 

Attachments

  • kmdwoodwork custom molding 1.JPG
    kmdwoodwork custom molding 1.JPG
    1.6 MB · Views: 376
  • kmdwoodwork custom molding 2.JPG
    kmdwoodwork custom molding 2.JPG
    934.1 KB · Views: 352
  • kmdwoodwork custom molding 3.JPG
    kmdwoodwork custom molding 3.JPG
    1.1 MB · Views: 369
  • kmdwoodwork custom molding 4.JPG
    kmdwoodwork custom molding 4.JPG
    905.3 KB · Views: 328
  • kmdwoodwork custom molding 5.JPG
    kmdwoodwork custom molding 5.JPG
    901.6 KB · Views: 355
jacko9 said:
Keith,

Nice job, that kind of sanding is the reason I bought the LS130.  I haven't had a project to use it on yet but, I can see the utility over hand sanding a profile.

Jack

Thanks, it worked better than i expected, each length ended up being about 8' long and it only took 20 minutes per length to sand so the time saved just about payed for the sander and the quality of the finished product and of course the dust collection were far better than hand sanding.
 
Baremeg55 said:
Keith,

I'm curious if you tried the single dado "flat" tooth blade and if that eliminated the saw marks better?  I made some cove moulding on my table saw years ago and spent quite a bit of time removing the saw marks......

I tried my 8" dado and it was not much smoother and the profile was too deep for the width so i went with a 10" blade, if you look at the pictures i finally figured out how to upload you can see it was rough but not too bad.
 
Back
Top