ear3
Member
I've been really busy this summer, but haven't had the chance to post about any of the projects, so thought I'd share this small one I just completed.
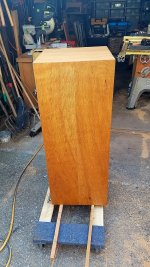
One of the artists I work with had a request from one of the collectors who bought one of their artworks for a better than usual display method, so I was commissioned to build a 16x16x40 pedestal out of solid mahogany.
I've made a bunch of pedestals in the past, but they've mostly been utilitarian jobs constructed from MDF or plywood, which allowed a lot of room for imprecision that could be covered up later with filler and paint. Not so with this project.
Given the dimensions, I had to edge join two boards to form the appropriate size panels. I made sure to make each panel from a single board, so there would be consistency on each side of the pedestal. That was the impetus behind the panel flatteners I posted about earlier -- I had to ensure the panels came out as flat as possible, both because of the miter cuts I would eventually put on them and because my planing capacity ends at 13"
http://festoolownersgroup.com/various-woodworking-crafts-topics/diy-panel-clamps/
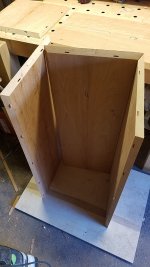
The panel clamps worked well enough that I was able to do all the rip miter cuts on my table saw without worry about any bowing in the board that might throw off the angle. I also did the top on the table saw, and then finished up the mitre cuts on the top side of the 4 verticals on the MFT, ending up with these 5 pieces:
View attachment 1
View attachment 2
View attachment 3
I added 4mm Domino mortises to strengthen the joint -- also put them in on the top just in case, but it turns out I didn't need them.
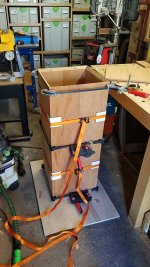
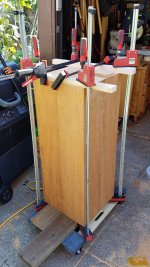
Strap clamped the assembly:
View attachment 4
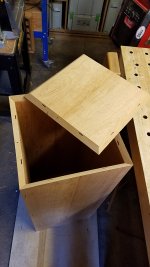
The mitre cuts were spot on, so even without clamping the top sat pretty flush just on its own, with just a small gap:
View attachment 5
Which was eliminated after it was clamped up:
View attachment 6
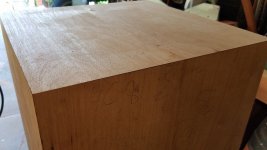
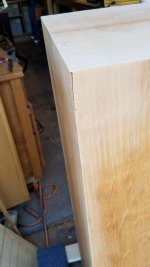
I did end up somehow with a gap on one of the sides -- not sure how this developed since I didn't notice it in the dry fit.
View attachment 7
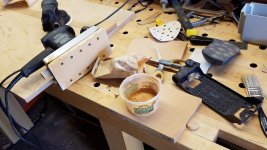
I'm worried I might have clamped the top up too soon, and so the pressure from the vertical clamps caused a slight separation. In any case, I just mixed up some filler from some fine mahogany sawdust I created with a sander and one of the turbo bags I never use
View attachment 8
View attachment 9
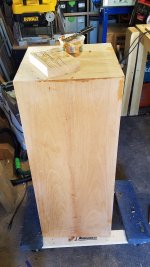
Note to self -- use a little less glue on the filler next time, as it came out a bit darker than I wanted owing to the added yellow coloration of the glue itself.
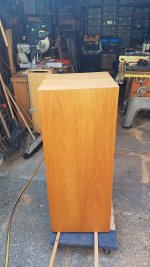
After sanding it up to 220 I applied two coats of surfix. Very happy with the results:
View attachment 17
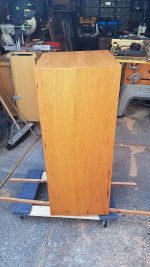
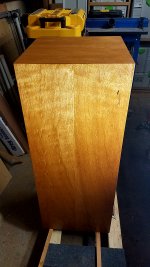
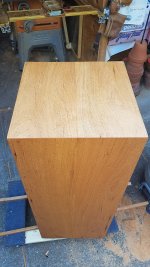
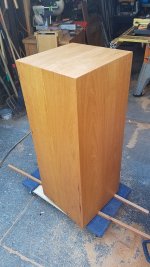
The little twist I added was to make every side a different grain pattern, so the collector would have a variety of options for the display side.
View attachment 10
View attachment 11
View attachment 12
View attachment 13
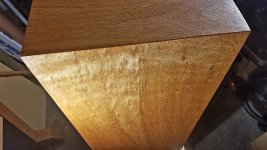
I'm partial to the first side with wavy/interlocked grain, which exhibits a fair amount of chatoyance under the light, and where that lighter colored S form in the middle does a pretty good job crossing the panel seam
View attachment 14
View attachment 15
The only thing I wish I had done better is to create a waterfall effect running from the top to one of the faces.
View attachment 16
This would have meant doing one of the panels from a 10 ft.+ board, and gluing up an approximately 5 foot panel, which I would then cut the top out of. I was reticent to do this however, as I had only made 2 panel flatteners, and I was worried there would be some bowing in the middle of such a long panel during glue up.
The most difficult and nerve-racking part of the project was actually taking care of the mitred edges prior to glue up. Once you cut them they are super fragile, and my shop being the size it is, it is very easy to bang wood on something as you're moving it around.
Incidentally, there was a bit of sticker shock when I submitted the invoice, and I got a good reminder of why it's important to have stuff in writing on projects, even when you're dealing with friends. When I was initially commissioned to do the pedestal, I had suggested via text that we do it from veneered ply, which is the normal procedure for these sorts of things, and that solid mahogany would significantly increase both the materials and labor cost (since I would have to manufacture the panels). But I got a response that the collector was very specific about wanting solid mahogany. So after I submitted the invoice I got a call from one of the artists, who said they didn't think it was going to be so expensive, and that they were thinking it was just going to be made out of plywood. I reminded them of our specific conversation about materials at the beginning, and that they should consult our text exchange. This fortunately provided incontrovertible evidence, and so the invoice was paid.
One of the artists I work with had a request from one of the collectors who bought one of their artworks for a better than usual display method, so I was commissioned to build a 16x16x40 pedestal out of solid mahogany.
I've made a bunch of pedestals in the past, but they've mostly been utilitarian jobs constructed from MDF or plywood, which allowed a lot of room for imprecision that could be covered up later with filler and paint. Not so with this project.
Given the dimensions, I had to edge join two boards to form the appropriate size panels. I made sure to make each panel from a single board, so there would be consistency on each side of the pedestal. That was the impetus behind the panel flatteners I posted about earlier -- I had to ensure the panels came out as flat as possible, both because of the miter cuts I would eventually put on them and because my planing capacity ends at 13"
http://festoolownersgroup.com/various-woodworking-crafts-topics/diy-panel-clamps/
The panel clamps worked well enough that I was able to do all the rip miter cuts on my table saw without worry about any bowing in the board that might throw off the angle. I also did the top on the table saw, and then finished up the mitre cuts on the top side of the 4 verticals on the MFT, ending up with these 5 pieces:
View attachment 1
View attachment 2
View attachment 3
I added 4mm Domino mortises to strengthen the joint -- also put them in on the top just in case, but it turns out I didn't need them.
Strap clamped the assembly:
View attachment 4
The mitre cuts were spot on, so even without clamping the top sat pretty flush just on its own, with just a small gap:
View attachment 5
Which was eliminated after it was clamped up:
View attachment 6
I did end up somehow with a gap on one of the sides -- not sure how this developed since I didn't notice it in the dry fit.
View attachment 7
I'm worried I might have clamped the top up too soon, and so the pressure from the vertical clamps caused a slight separation. In any case, I just mixed up some filler from some fine mahogany sawdust I created with a sander and one of the turbo bags I never use
View attachment 8
View attachment 9
Note to self -- use a little less glue on the filler next time, as it came out a bit darker than I wanted owing to the added yellow coloration of the glue itself.
After sanding it up to 220 I applied two coats of surfix. Very happy with the results:
View attachment 17
The little twist I added was to make every side a different grain pattern, so the collector would have a variety of options for the display side.
View attachment 10
View attachment 11
View attachment 12
View attachment 13
I'm partial to the first side with wavy/interlocked grain, which exhibits a fair amount of chatoyance under the light, and where that lighter colored S form in the middle does a pretty good job crossing the panel seam
View attachment 14
View attachment 15
The only thing I wish I had done better is to create a waterfall effect running from the top to one of the faces.
View attachment 16
This would have meant doing one of the panels from a 10 ft.+ board, and gluing up an approximately 5 foot panel, which I would then cut the top out of. I was reticent to do this however, as I had only made 2 panel flatteners, and I was worried there would be some bowing in the middle of such a long panel during glue up.
The most difficult and nerve-racking part of the project was actually taking care of the mitred edges prior to glue up. Once you cut them they are super fragile, and my shop being the size it is, it is very easy to bang wood on something as you're moving it around.
Incidentally, there was a bit of sticker shock when I submitted the invoice, and I got a good reminder of why it's important to have stuff in writing on projects, even when you're dealing with friends. When I was initially commissioned to do the pedestal, I had suggested via text that we do it from veneered ply, which is the normal procedure for these sorts of things, and that solid mahogany would significantly increase both the materials and labor cost (since I would have to manufacture the panels). But I got a response that the collector was very specific about wanting solid mahogany. So after I submitted the invoice I got a call from one of the artists, who said they didn't think it was going to be so expensive, and that they were thinking it was just going to be made out of plywood. I reminded them of our specific conversation about materials at the beginning, and that they should consult our text exchange. This fortunately provided incontrovertible evidence, and so the invoice was paid.
Attachments
-
 20170820_075540.jpg260.7 KB · Views: 158
 -
 20170820_074923.jpg1.2 MB · Views: 153
 -
 20170820_074608.jpg1.2 MB · Views: 137
 -
 20170820_091758.jpg308.9 KB · Views: 142
 -
 20170820_102437.jpg157.4 KB · Views: 137
 -
 20170820_105919.jpg282.3 KB · Views: 140
 -
 20170820_122538.jpg164.8 KB · Views: 137
 -
 20170820_121813(0).jpg236.7 KB · Views: 123
 -
 20170820_124350.jpg257.7 KB · Views: 138
 -
 20170821_091241.jpg380.7 KB · Views: 135
 -
 20170821_091255.jpg326.1 KB · Views: 142
 -
 20170821_091305.jpg312.5 KB · Views: 118
 -
 20170821_091333.jpg339.3 KB · Views: 119
 -
 20170821_001928.jpg263 KB · Views: 131
 -
 20170821_002200.jpg802.6 KB · Views: 159
 -
 20170821_092139.jpg298.3 KB · Views: 159
 -
 20170821_092205.jpg303.2 KB · Views: 152