ear3
Member
EDIT: After working with this sander for a couple of weeks on a reclaimed oak project, I'm confident in the results detailed in the series of posts below...
Just a caveat up front -- I only just got this sander, and my experience with it is basically limited to the tests seen below, but I thought that since: 1) there is relatively little practical information online about this sander and how it performs; and 2) there are certainly people on the FOG interested in taking on work with reclaimed wood who might benefit from seeing how this sander performs (and who don't have access to the NAINA Rustofix) -- it would be good to write up my initial impressions.
I recently got a commission to do some surfaces and shelving using reclaimed materials. So to be able to process the materials myself, I decided to invest in the Makita Wheel sander.
It's not cheap (about $470 for the unit, and the different wheels are between $140 and $170), and it only has a couple of highly specialized tasks it can do, but those things can't really be done efficiently by any other power tool.
You're basically good to go with the machine right out of the box. The only adjustment you have to make is to the height of the front roller, which they recommend setting at 2mm off the work surface, so that it stops you from pressing too hard on the wheel while sanding:
View attachment 2
The machine requires surprisingly little pressure during operation however to be effective, and I didn't find myself needing to press anywhere close to the limit set by the roller.
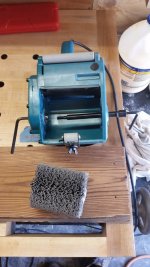
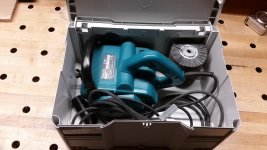
It comes standard with a 100 grit nylon brush, which is easily removed with the two hex wrenches supplied with the kit if you want to change out for the more aggressive 80 grit nylon brush, or the even more abrasive wire wheel (all extra brushes you have to purchase):
View attachment 1
I purchased the additional 80 grit brush, because I also wanted to test out its capabilities texturing wood, which is the only other task it does besides cleaning timber.
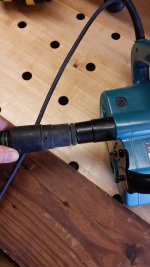
The dust collection on the machine is amazing -- I'd put it up there with Festool sanders. The dust attachment doesn't fit either of the Festool hoses, however:
View attachment 3
View attachment 4
Luckily, you can dispense with the dust port and attach the 27mm hose right to the machine, with which it makes a solid friction fit. My only gripe here is that the dust port is on the right, which is a bit awkward for right handed use (works great if you're a lefty though). The sander operates so easily, though, that I felt comfortable changing my grip to left handed while running it to minimize hose interference.
I've systainerized mine for storage purposes. As you can see, it fits comfortably in an empty Sys-3, with plenty of room for spare brushes:
View attachment 5
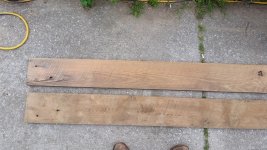
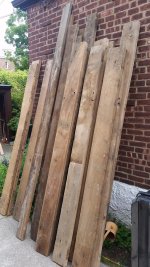
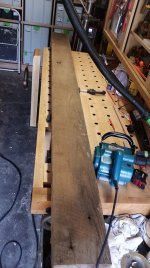
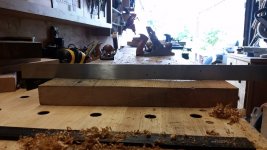
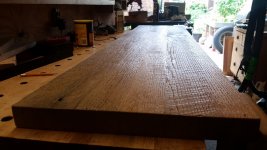
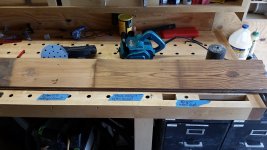
Now for some tests...When I did my shop renovation two years ago, I took out a bunch of fir planks from the back loft I deconstructed, most of which I saved for some unspecified future purpose. They go back to the original house construction, which means from the late 30s/early 40s. These things are DIRTY, the kind of wood where you are compelled to go wash your hands after handling them.
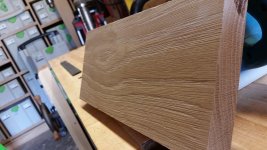
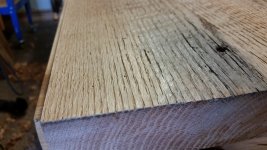
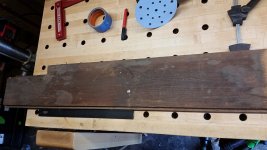
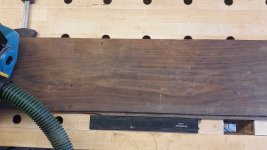
Here's side one of the first board straight from the woodstack, prepped for treatment with the stock 100 nylon brush:
View attachment 6
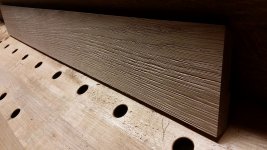
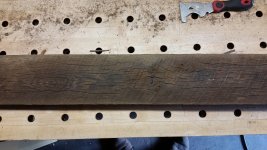
And a close-up:
View attachment 7
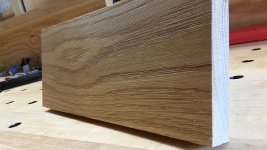
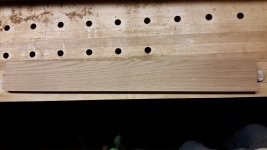
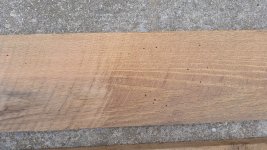
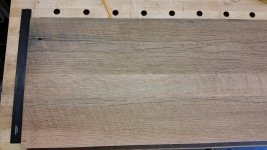
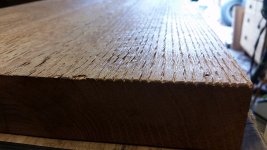
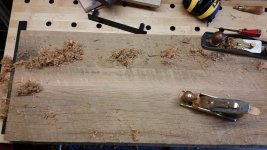
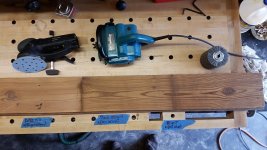
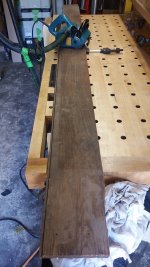
Here's the board after the treatment with the 100 grit brush:
View attachment 8
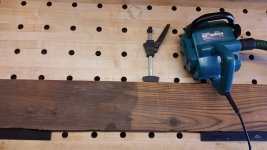
Pretty dramatic change, right? You can mark the contrast even better with this shot I took halfway finished:
View attachment 9
It didn't take long at all. I didn't time it, but I was only passing the brush over the same area 3 or 4 times, and we're talking quick passes, not a slow creep. And the dust collection, as already mentioned, is incredible. I didn't notice any ambient dust, and didn't feel any need to wear a dust mask.
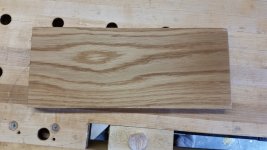
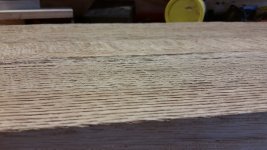
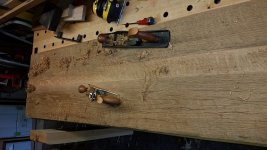
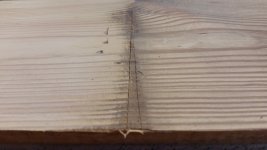
I switched over to the 80 grit nylon brush to do the other side of the board, but after reviewing the pictures, I noticed that that side started out much lighter, so I thought it wouldn't be a fair comparison. So I took down a fresh board and selected out a particularly gross part of it, with what looks like mold or water stains:
View attachment 12
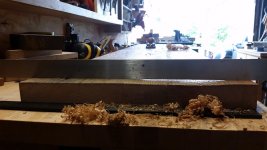
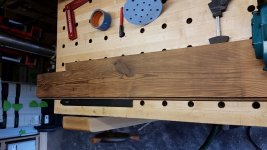
No problem for the 80 grit brush, which cleaned this up in about 30 seconds:
View attachment 13
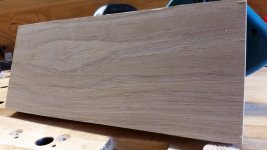
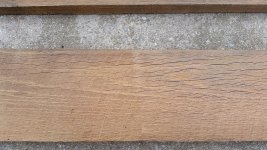
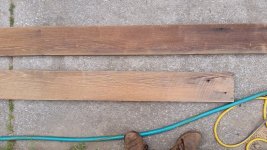
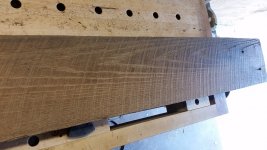
I bet some of you are probably thinking to yourselves right now -- why would I spend that kind of money on yet another sander when I could just attack that thing with my Rotex and be done with it? Well, I was thinking the same thing after those initial tests, so I decided to run a side by side comparison on the same face of yet another board. Here are the results:
View attachment 10
View attachment 11
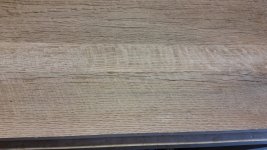
Big difference. The Rotex cleans the board alright, but it effaces much of the character of the wood, lightening the rings dramatically, which you cans see especially in the close-up:
View attachment 14
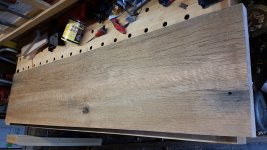
You can also see some subtle differences between the 80 and 100 grit brushes . The 80 leaves a somewhat "dirtier" darker finish, whereas the 100 has a slightly brighter hue, though still with plenty of character. Neither one is necessarily better than the other, it just depends on the specific look you're going for I suppose. Both surfaces were left smooth (with a slight edge, of course, to the 100), and more importantly, CLEAN.
Next up, some tests with raising the grain...
Just a caveat up front -- I only just got this sander, and my experience with it is basically limited to the tests seen below, but I thought that since: 1) there is relatively little practical information online about this sander and how it performs; and 2) there are certainly people on the FOG interested in taking on work with reclaimed wood who might benefit from seeing how this sander performs (and who don't have access to the NAINA Rustofix) -- it would be good to write up my initial impressions.
I recently got a commission to do some surfaces and shelving using reclaimed materials. So to be able to process the materials myself, I decided to invest in the Makita Wheel sander.
It's not cheap (about $470 for the unit, and the different wheels are between $140 and $170), and it only has a couple of highly specialized tasks it can do, but those things can't really be done efficiently by any other power tool.
You're basically good to go with the machine right out of the box. The only adjustment you have to make is to the height of the front roller, which they recommend setting at 2mm off the work surface, so that it stops you from pressing too hard on the wheel while sanding:
View attachment 2
The machine requires surprisingly little pressure during operation however to be effective, and I didn't find myself needing to press anywhere close to the limit set by the roller.
It comes standard with a 100 grit nylon brush, which is easily removed with the two hex wrenches supplied with the kit if you want to change out for the more aggressive 80 grit nylon brush, or the even more abrasive wire wheel (all extra brushes you have to purchase):
View attachment 1
I purchased the additional 80 grit brush, because I also wanted to test out its capabilities texturing wood, which is the only other task it does besides cleaning timber.
The dust collection on the machine is amazing -- I'd put it up there with Festool sanders. The dust attachment doesn't fit either of the Festool hoses, however:
View attachment 3
View attachment 4
Luckily, you can dispense with the dust port and attach the 27mm hose right to the machine, with which it makes a solid friction fit. My only gripe here is that the dust port is on the right, which is a bit awkward for right handed use (works great if you're a lefty though). The sander operates so easily, though, that I felt comfortable changing my grip to left handed while running it to minimize hose interference.
I've systainerized mine for storage purposes. As you can see, it fits comfortably in an empty Sys-3, with plenty of room for spare brushes:
View attachment 5
Now for some tests...When I did my shop renovation two years ago, I took out a bunch of fir planks from the back loft I deconstructed, most of which I saved for some unspecified future purpose. They go back to the original house construction, which means from the late 30s/early 40s. These things are DIRTY, the kind of wood where you are compelled to go wash your hands after handling them.
Here's side one of the first board straight from the woodstack, prepped for treatment with the stock 100 nylon brush:
View attachment 6
And a close-up:
View attachment 7
Here's the board after the treatment with the 100 grit brush:
View attachment 8
Pretty dramatic change, right? You can mark the contrast even better with this shot I took halfway finished:
View attachment 9
It didn't take long at all. I didn't time it, but I was only passing the brush over the same area 3 or 4 times, and we're talking quick passes, not a slow creep. And the dust collection, as already mentioned, is incredible. I didn't notice any ambient dust, and didn't feel any need to wear a dust mask.
I switched over to the 80 grit nylon brush to do the other side of the board, but after reviewing the pictures, I noticed that that side started out much lighter, so I thought it wouldn't be a fair comparison. So I took down a fresh board and selected out a particularly gross part of it, with what looks like mold or water stains:
View attachment 12
No problem for the 80 grit brush, which cleaned this up in about 30 seconds:
View attachment 13
I bet some of you are probably thinking to yourselves right now -- why would I spend that kind of money on yet another sander when I could just attack that thing with my Rotex and be done with it? Well, I was thinking the same thing after those initial tests, so I decided to run a side by side comparison on the same face of yet another board. Here are the results:
View attachment 10
View attachment 11
Big difference. The Rotex cleans the board alright, but it effaces much of the character of the wood, lightening the rings dramatically, which you cans see especially in the close-up:
View attachment 14
You can also see some subtle differences between the 80 and 100 grit brushes . The 80 leaves a somewhat "dirtier" darker finish, whereas the 100 has a slightly brighter hue, though still with plenty of character. Neither one is necessarily better than the other, it just depends on the specific look you're going for I suppose. Both surfaces were left smooth (with a slight edge, of course, to the 100), and more importantly, CLEAN.
Next up, some tests with raising the grain...
Attachments
-
 20170624_154145.jpg208.4 KB · Views: 1,205
 -
 20170624_155428.jpg125.2 KB · Views: 2,372
 -
 20170624_155948.jpg201.3 KB · Views: 1,502
 -
 20170624_155521.jpg183.9 KB · Views: 1,126
 -
 20170624_155342.jpg196.6 KB · Views: 1,547
 -
 20170624_155220.jpg221.9 KB · Views: 2,077
 -
 20170624_151129.jpg158.1 KB · Views: 2,201
 -
 20170624_151355.jpg239.6 KB · Views: 2,411
 -
 20170624_150801.jpg179.2 KB · Views: 1,522
 -
 20170624_150809.jpg233.6 KB · Views: 2,254
 -
 20170624_204732.jpg182.8 KB · Views: 1,863
 -
 20170624_152309.jpg155.9 KB · Views: 908
 -
 20170624_152152.jpg200.5 KB · Views: 987
 -
 20170624_152003.jpg176.2 KB · Views: 1,244