Max spacing of Domino connectors

subagon

Member
Joined
Dec 30, 2019
Messages
4
I have a corner butt connection and I'll be using Domino connectors (KV D8, used by the DF 500) to join them. The material is 18m baltic birch plywood and the length of the joint is > 3 feet (1m). All the video examples I've seen all are dealing with joints around 12 inches (300mm) and use two Domino connectors one near each edge of the joint and a single wood 8mm Domino in the middle. I want to know what is the maximum distance I can place the Domino connectors, the KV D8's. I assume I would continue to place 8mm Dominos between each pair of Domino connectors.
 
[member=72011]subagon[/member] -  What is this for? Does this corner connection need to hold a load? Like in a cabinet box?  or is just a means of connecting an end panel to a static top for something like a desk?  These two situation would likely dictate very different requirements. 
 
From the Supplemental User's Manual:
[quote author="Rick Christopherson"]
Domino Tenon Placement Guidelines
There are no steadfast rules on where tenons should be placed, especially when they are used for alignment purposes. For edge joining boards, a typical placement might be 6 to 8 inches apart.
However, when tenons are used to strengthen a joint, you might be tempted to place the tenons too close together. This can actually weaken the joint by removing too much of the substrate material.
► A wide mortise weakens the substrate, so it is better to have several narrow mortises with uncut space in between than it is to have a single wide mortise with several tenons side-by-side.
► When placing several tenons close together, leave at least twice the tenon thickness between mortise holes. As a general rule, this means the minimum tenon spacing should be about 10 mm to 20 mm, but they can be spaced much wider.
► When creating stacked mortises for extra thick lumber, an extension of the “1/3 rule” mentioned above still applies. Specifically, the distance between mortises and the distance between a mortise and the wood surface should all be equal to (or larger than) the thickness of the tenon.
[/quote]

The strength of the joint is dependent on the directional forces.  Generally speaking, if you are dealing with a sheer force then much of the strength will come from the additional dominos.

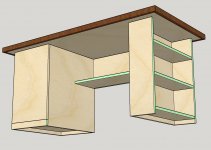
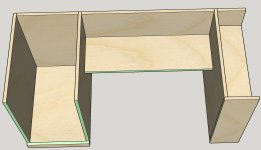
You would have to explain a little more about what you are building for anyone to recommend what domino spacing would work best, but like the Supplemental Manual suggests 6-8 inches is about the maximum spacing.

The picture attached is from the Festool website.

Hope this helps!
 

Attachments

  • 3157fff3-c3a4-11e7-80e4-005056b31774_800_533.jpg
    3157fff3-c3a4-11e7-80e4-005056b31774_800_533.jpg
    24.7 KB · Views: 939
The project is a desk for my daughter. I need to use knockdown connectors to get the desk into its final location. Here's a picture.

[attachimg=1]

Everything will comprise of 4 pieces.

1) The desktop ~60"x30".
2) The cabinet-like competent on the left. ~ 24"x16" footprint.
3) A shelf under the desktop to hold a small PC. ~ 31" long, 10" deep, and 10" tall.
4) A shallow bookshelf is seen on the right. ~ 24"x8" footprint.

Another picture with the desktop and drawer fronts removed.

[attachimg=2]
 

Attachments

  • Untitled.jpg
    Untitled.jpg
    371.7 KB · Views: 3,598
  • Untitled.jpg
    Untitled.jpg
    360.4 KB · Views: 3,554
To start I should state clearly it is personal preference as to spacing, dominos are relatively low cost compared to connectors, so my approach has been to add dominos for strength and alignment with connectors to tighten joints.  I also prefer to hide connectors where possible.  All suggestions presume straight boards if wood warping is an issue you may want to add dominos to straighten and connectors to close gaps.

That said this is how I would do it, note horizontal dominos (on vertical edges) I always use tight width, vertical dominos can be a combination of tight and loose widths for ease of assembly.

Left compartment:
  • I would have the back run the full 16" and butt joint the sides.
  • Connecting the bottom shelf to the sides - 2 connectors placed about an inch from each corner (4 total) down the long sides with 2 dominos each side to support the middle (4 total), the distance between supports about 6"
  • Connecting bottom shelf to back, 1 connector in middle and 2 dominos, spaced equally from the corners
  • Connecting sides to back, for each side, 2 connectors spaced in about an inch from each the top and bottom (so one is hidden under bottom self, with 3 dominos equally spaced between
  • Connecting the left compartment to the desktop:
    • Left (outside) panel, connectors on inside to hide, 2 connectors, about an inch from each edge with 2 dominos equally spaced between
    • Right side panel, can be same as left or all four as dominosl
    • Back panel, 3 dominos

Right compartment:
  • Back and Front, full width 8" and butt joint side
  • Connecting side to the front and back, for each, 2 connectors spaced in about an inch from each top and bottom (so one is hidden under bottom self, with 3 dominos equally spaced between
  • For each shelf, connectors on the bottom side, on each end of the shelf - 1 connector an inch in from the outside edge and 1 domino an inch from the inside edge, back of shelf 1 connector centred and 1 domino each side of connector equally spaced between the connector and the end of the shelf
  • Connecting the right compartment to the desktop:
    • Right panel, connectors on the inside of shelf to hide, 2 connectors, about an inch from each edge with 2 dominos equally spaced between
    • One each of front and back, on inside of shelf, 1 connector an inch from the outer edge and 1 domino an inch from the inner edge

Center shelf:
  • On each end of the bottom of the shelf to side compartment, 1 connector, under shelf, an inch from the front/outer edge with 1 domino an inch from the back edge, (depending on weight requirements possibly an additional domino in middle)
  • On each end of the back of the shelf to side compartment, 1 connector, an inch from the bottom edge with 1 domino an inch from the top edge
  • Connecting the back to the bottom of the shelf, 1 connector centred, 4 dominos one an inch from each end and another equally spaced between first domino and middle connetor
  • Connecting the back to the desktop, 3 connectors, one 9 inches from each end and 1 in the center, 2 dominos one 3 inches from each end (just for alignment)

Hopefully, that is not too confusing!

I used a similar approach in constructing the desk seen in the attached picture.  In has been broken down and reassembled several times and it is as sturdy now as it was new.

Hope this helps!
 

Attachments

  • IMG_2568.jpeg
    IMG_2568.jpeg
    168.7 KB · Views: 533
Back
Top