Metabo

Darren 1964

Member
Joined
Aug 24, 2025
Messages
6
Hi Guys
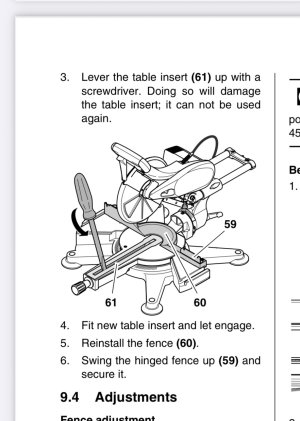
Just signed up on here, trying to get some help on how to remove the table insert on a Metabo kgs 303 plus. Manual says it can be taken out but has to be broken to remove it so couldn’t be reused if needed. Trying to upgrade to zero clearance insert. Any help on this would be appreciated.
Regards to all
Darren
 
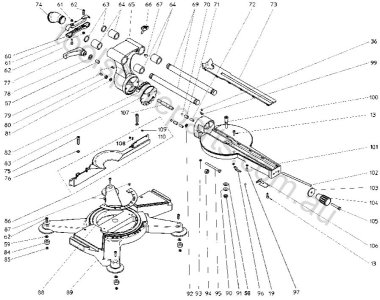
Unless I'm mistaken the drawing seems to indicate it's slid in place from the rear of the table, which is a horrible design if so.

I notice also the flared sides at the rear of the insert.
 

Attachments

  • 303.JPG
    303.JPG
    121.4 KB · Views: 27
Hi guys, thanks for your input, according to the manual that comes with the saw the insert is levered out with a screwdriver… never seen such a bad design in all my days.
Have got some fast caps on order for now
 
Levered out, wow? That's insane as the drawing looks like it has 6 tabs along the bottom of each side?

Always me wonder how designs like this get the go ahead. Reminds me of the faulty heater in my old ute, to get to the heater and pipes you had to remove the engine! 30 seconds to fix a stuck valve, $1500 labour to pull the engine out and put it back again!
 
Yep, that looks like it'll break the tabs in the drawing I attached, great design!

I'd try taking the fence (part 60) off and seeing if you can remove it from the rear intact?
 
It's hard to believe in this day & age that this type of design would ever make it to production. 😵‍💫 😵‍💫 😵‍💫

Rather reminds me of the 69-70 Mustang with a 428 engine. To change 4 spark plugs, Ford recommended removing the RH engine mount and jacking up the engine to gain access. Reassemble and repeat for the other 4 spark plugs on the LH side.😤😤😤
I think designers who come up with these sorts of design fails really need to be taken outside and slapped around with a tuna!
 
Levered out, wow? That's insane as the drawing looks like it has 6 tabs along the bottom of each side?

Always me wonder how designs like this get the go ahead. Reminds me of the faulty heater in my old ute, to get to the heater and pipes you had to remove the engine! 30 seconds to fix a stuck valve, $1500 labour to pull the engine out and put it back again!
Yeah, that has kind of a manufacturing thing that has landed on a lot of companies, over the years. It was/is especially common in the automotive sector. Many of the things that are hard to service, on the fully assembled car, are done that way because of the assembly line process (order of operations) Anything that saves them time on the assembly line, is the way they do it. Time is money. They don't care if it slows the repair/maintenance process, even for their own technicians, as a part of warranty work. Every car gets assembled; only a small proportion get warranty work. It works out, in their favor.
 
Hi Guys
Thanks for all your replies and thoughts on this, very much appreciated.
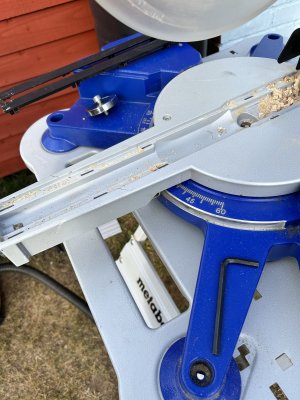
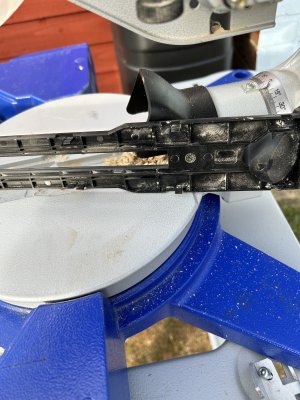
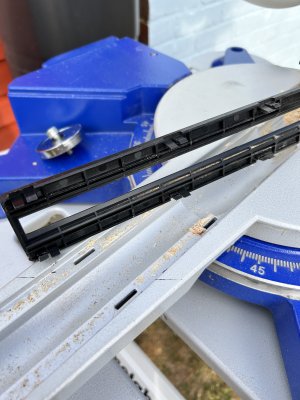
Just thought I would give you an update on what has happened… after hours of gentle manipulation and patience I managed to get the insert out without breaking anything. Had to remove the fence to do it but I done it.
Have attached a couple of pictures.
Now to make a new insert,
The old insert had a gap of 11mm… that’s huge… why it was made that wide I will never know.
Regards Darren
 

Attachments

  • IMG_3129.jpeg
    IMG_3129.jpeg
    2 MB · Views: 7
  • IMG_3131.jpeg
    IMG_3131.jpeg
    2.1 MB · Views: 7
  • IMG_3130.jpeg
    IMG_3130.jpeg
    1.6 MB · Views: 11
That's good you got it out, stupid design but what can you do!

If the saws out of warranty, I'd strongly consider drilling and tapping some holes on the insert support ledges so you can just drop new inserts in from the top and screw them in like pretty much all saws do.
 
Was thinking of using self taping screws through the slots that are already there or do you think fresh drilled and tapped would be the better option?
 
Self tapping screws might last for a few changes, but absolutely drilled and tapped would last far longer and give a superior result that will take many re-insertions.

And it's so much neater than the rough job self tappers do.
 
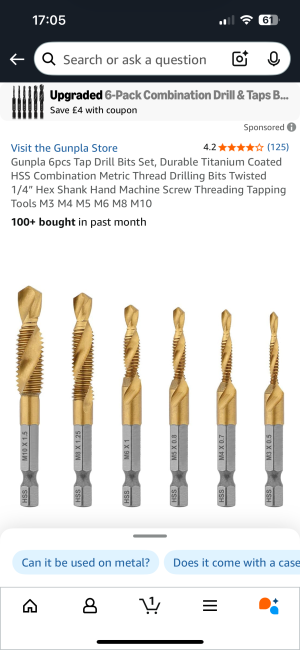
Yeah I think I’m inclined to agree with you there. Has anyone used these drill tap things before…. Never seen them before or used them.
 

Attachments

  • IMG_3136.png
    IMG_3136.png
    872.2 KB · Views: 9
I have some sets like that and they work fine. They aren't my preferred method, but in thin stock like the saw they'll be more than adequate. Just go slow so the threadcutter engages cleanly.

Depending on the material, in thicker stock I like to cut, back out a bit, cut, etc to stop the swarf from ruining the threads.
 
Back
Top