So, I just did a quick test with a dial indicator and I have about .005" total deflection combined for both push and pull. For some reason I have more deflection pulling the fence toward me .004" and I get .001" pushing away for me. That's measuring in the middle of the table where I get about .001" just pushing down on the MDF so some of that .005 is the MDF top bowing. Regardless, you will be pushing away most of the time and I can deal with one thou of deflection. Im not sure how much force im applying since I dont have a scale to measure it but im applying as much force as my hand can comfortably tolerate I would guess more than 30# less than 50#. I will also say you cannot feel the .005" deflection it feels solid as a rock. I pushed and pulled each way 5 or 6 times and each time it returned to within .0005" of zero Thats with no clamping or screwing the dogs in from underneath just sitting the dogs into the holes. Im not sure if there is a better way, thats within CNC repeatable tolerances.
You are using an out of date browser. It may not display this or other websites correctly.
You should upgrade or use an alternative browser.
You should upgrade or use an alternative browser.
MFT/3 Fence and Square ... TSO GRS-16 PE?
- Thread starter Bugsysiegals
- Start date
Bugsysiegals
Member
- Joined
- Mar 19, 2016
- Messages
- 893
My brother stopped by for Thanksgiving whom I seldom get to see so that was a real delight. We deep fried a Turkey and all I can say is I might be deep frying Turkey for the rest of my life!! The crispy skin and flavor was nothing short of amazing and sooo much better than baking a Turkey.
Ok, as promised, I’ve uploaded the video of me showing my MFT fence and how much deflection it has in worst case scenario which is minimal IMO but let me know what you guys think and whether the TSO can produce reliable consistent results, if I should stay with my fence for my eye issues and get the TSO triangle to more accurately align the guide rail, etc., etc.
Ok, as promised, I’ve uploaded the video of me showing my MFT fence and how much deflection it has in worst case scenario which is minimal IMO but let me know what you guys think and whether the TSO can produce reliable consistent results, if I should stay with my fence for my eye issues and get the TSO triangle to more accurately align the guide rail, etc., etc.
Bugsysiegals
Member
- Joined
- Mar 19, 2016
- Messages
- 893
Can you see my video linked? It doesn’t show on my phone for some reason.
About the Turkey, if I could bag the skin and preserve it, it would sell better than beef jerky... it was seriously good and the meat was super moist. I’m not sure what my wife marinated it with but we deep fried at 325-350 for 3.5 minutes per pound or 50 minutes for 14 lbs in this case.
About the Turkey, if I could bag the skin and preserve it, it would sell better than beef jerky... it was seriously good and the meat was super moist. I’m not sure what my wife marinated it with but we deep fried at 325-350 for 3.5 minutes per pound or 50 minutes for 14 lbs in this case.
GoingMyWay
Member
You need to use the full youtube.com URL in order for the video to embed correctly:
Bugsysiegals
Member
- Joined
- Mar 19, 2016
- Messages
- 893
I've gone to YouTube and clicked the "shareable link" option and then pasted it into the post. If this isn't the full link then how do I obtain it? It seems I've done this method in the past without any issues? BTW, thanks for sharing the video for me!!
GoingMyWay
Member
Using the shareable, shortened URL (youtu.be) seems to be the problem. The forum software should be, but unfortunately isn't able to properly convert that URL. I copied the full URL (youtube.com) from a browser window.
It was no trouble at all!
It was no trouble at all!
Bugsysiegals
Member
- Joined
- Mar 19, 2016
- Messages
- 893
That’s interesting as I also copied the URL from the browser after it wasn’t showing the video but that linked appeared the same on my iPhone. Strange but anyways now I know ... thanks again!!
I had to watch with no sound but will watch with sound tomorrow. I like the fence better than what I was picturing in my head but there is still more deflection there then I would want. Also running the fence under the rail helps A LOT. I had to cut my 8020 down to slide under which made a noticeable difference in helping keep the sheet squarely pressed against the fence. the smaller the part the more it helps. I tried at first with it like yours and didnt like it. Made a big difference.
Bugsysiegals
Member
- Joined
- Mar 19, 2016
- Messages
- 893
There’s definitely ability to move the rail backwards but I’m pushing much harder than the rail would see from holding a panel firmly to the fence. Even still, I pushed it very hard and couldn’t detect the board deflecting at the splinter strip. I’m sure I could make the brackets a bit thicker behind the fence to further reduce any movement but not sure how it would turn out trying to cut the fence to have some bit fit under the guide rail especially thin enough to cut the 3/8” BB panels. At least there’s plenty of options and people who kindly share them so many different things to try if one isn’t satisfied!!
Bugsysiegals said:There’s definitely ability to move the rail backwards but I’m pushing much harder than the rail would see from holding a panel firmly to the fence. Even still, I pushed it very hard and couldn’t detect the board deflecting at the splinter strip. I’m sure I could make the brackets a bit thicker behind the fence to further reduce any movement but not sure how it would turn out trying to cut the fence to have some bit fit under the guide rail especially thin enough to cut the 3/8” BB panels. At least there’s plenty of options and people who kindly share them so many different things to try if one isn’t satisfied!!
I watched your video, and it appears you have a lot of movement in the reference points, specifically the rail brackets and the fence. However, as you noted, the force required to move the fence is likely more than you would use in practice, but it is still there. I doubt you will gain any stability by using the TSO Guide Rails in your setup.
How much flex does the edge of the MFT rail have where your fence is mounted? By fixing the extrusion to the work surface with four dogs, I can't budge the fence. Granted, you will lose a bit of cutting width by using the dog holes instead of the MFT rail, but are you normally cutting boards that wide?
Like others, I used the aluminum extrusion for the fence, with a lip to fit under the guide rail. In my case, the thinnest material I can cut like this is 12mm, but if I need to cut thinner material, I'll layer it on a sacrificial board to increase the height to the point where the fence will fit under the rail.

Bugsysiegals
Member
- Joined
- Mar 19, 2016
- Messages
- 893
I’m surprised you also doubt the stability of the TSO guide rail ... I see so many people who are claiming they’re highly accurate and even a test to within .001” on a 5 cut square. Most don’t mention using it on the MFT but several have with positive feedback .. I’d assume it would function the same? Have you seen many people with issues or complaints about the TSO guide rails?
The MFT extrusion seems firm ... it’s the mount itself which can bend if pushed really hard. Even though it doesn’t see that force in reality, I’d be much more comfortable if it was solid. Whether I stick with Incra or switch to 8020, it seems both could be mounted with the dogs and t-slot ... which dogs are you using for the fences for where can I order them?
I’ve only cut 4 cabinets on the MFT so far and the only pieces that wide have been the backs which are solid as these are mobile cabinets on casters for the shop. Worst case on the rare occasion I can move a large panel to the floor on foam board like I do when breaking down full 4x8 sheets.
Nice fence! How did you rip and cross cut it so cleanly?
I just watched again with sound this time. The video helped visualize not only possible issues but also how and why you use it the way you do. Here are my main takeaways.
1. It is used as table saw outfeed so fast and accurate on and off is required.
2. Fence needs to extend under the track
3. Maintain Incra fence if possible
4. beef up or swap festool track hinge for RAD hinge or slop stop
5. Eliminate as much deflection as possible everywhere only then can you focus on square.
#1. The 3d brackets are nice in theory but since they have both unacceptable deflection issues and could be made easier to remove and install I think a totally new and better way to attach the fence is required. I notice it looks like there is slots in the bottom of the fence. Can a anchor dog be attached in the slot and then be placed in a 20mm hole? We need to not only locate the rail squarely each time but also accurately each time left-right so the scale isnt off and maintains repeatability.
#2. This makes a huge difference in cut stability. You are going to lose some length of the fence so keep that in mind not sure if you use the full length now. I dont have a band saw so I just used a aluminum blade in my miter saw and adjusted my depth stop to leave about 1/2" just under actually but you will want to look at the end of the incra fence to make sure you are leaving enough aluminum behind to maintain some structural integrity as Im not familiar with it. Just under 1/2" seems like the sweet spot as the other posted mentioned strong enough to maintain rigidity and thin enough to handle most cutting tasks and if need you can always pack up with some scrap if needed for cutting really thin sheets. Make a bunch of cuts in the extrusion so it looks like you are making a heat sink. Then bend the fins back and forth to break them off and clean up with a grinder and file. If you noticed I used a wider piece of 8020 for this to help aid in maintaining a strong straight one piece design even after notching the 8020 You dont really need a high fence shorter and wider is better and I used the heavy wall for this reason as well.
#3. I do understand your vision problems and how the incra track helps. So, I get keeping it if possible. However I did like being able to attach a Joining plate to the top of the 8020 for doing repeatable cuts like a flip stop. So its not the end of the world if you have to ditch the incra. Maybe you could repurpose it to the miter saw if you do.
#4. I couldnt tell from the video how much of an issue the festtol tack hinge is causing. I only know from hearing from others its not greatest and has some sloppiness problems. Im pretty sure the right angle design one is better. No matter which you choose you need to make sure that it is raising and lowering 90° to the table if it isnt then the fence will be out of square depending on height. I had guides on both sides of the bracket so when I did move it up and down there was no side to side movement and stayed square.
#5. Have you considered selling the MFT and possibly going to a bigger MFT type table? Instead of fighting the current system. You should be able to build something that spans over the top of your current 8020 cart which is real nice BTW. but Im thinking bigger so you can have more flexibility on a fence system without losing any cross cut capacity. In addition to more rigidity and ability to cut full sheets on a bench instead of the floor It doesnt have to be a full 4x8 since you seem to have some space limitations. Im thinking max out the size that you can comfortably in the space you have then if needed make a folding MFT to help a family member check out the chestnut folding mft design. They fold up pretty compact and look like a nice option or keep the MFT3 as an additional support but I dont know about the height difference between the table saw and MFT3 with the chestnut type you can make it whatever height you want.
edit: just watched again looks like the cart is on castors so bigger MFT bench that is self supporting and the 8020 cart can simply roll under it. Id slap a MFT type top on it to for an extra assembly table. So when needed you can roll it out from under and do some glue ups or clamping on it.
1. It is used as table saw outfeed so fast and accurate on and off is required.
2. Fence needs to extend under the track
3. Maintain Incra fence if possible
4. beef up or swap festool track hinge for RAD hinge or slop stop
5. Eliminate as much deflection as possible everywhere only then can you focus on square.
#1. The 3d brackets are nice in theory but since they have both unacceptable deflection issues and could be made easier to remove and install I think a totally new and better way to attach the fence is required. I notice it looks like there is slots in the bottom of the fence. Can a anchor dog be attached in the slot and then be placed in a 20mm hole? We need to not only locate the rail squarely each time but also accurately each time left-right so the scale isnt off and maintains repeatability.
#2. This makes a huge difference in cut stability. You are going to lose some length of the fence so keep that in mind not sure if you use the full length now. I dont have a band saw so I just used a aluminum blade in my miter saw and adjusted my depth stop to leave about 1/2" just under actually but you will want to look at the end of the incra fence to make sure you are leaving enough aluminum behind to maintain some structural integrity as Im not familiar with it. Just under 1/2" seems like the sweet spot as the other posted mentioned strong enough to maintain rigidity and thin enough to handle most cutting tasks and if need you can always pack up with some scrap if needed for cutting really thin sheets. Make a bunch of cuts in the extrusion so it looks like you are making a heat sink. Then bend the fins back and forth to break them off and clean up with a grinder and file. If you noticed I used a wider piece of 8020 for this to help aid in maintaining a strong straight one piece design even after notching the 8020 You dont really need a high fence shorter and wider is better and I used the heavy wall for this reason as well.
#3. I do understand your vision problems and how the incra track helps. So, I get keeping it if possible. However I did like being able to attach a Joining plate to the top of the 8020 for doing repeatable cuts like a flip stop. So its not the end of the world if you have to ditch the incra. Maybe you could repurpose it to the miter saw if you do.
#4. I couldnt tell from the video how much of an issue the festtol tack hinge is causing. I only know from hearing from others its not greatest and has some sloppiness problems. Im pretty sure the right angle design one is better. No matter which you choose you need to make sure that it is raising and lowering 90° to the table if it isnt then the fence will be out of square depending on height. I had guides on both sides of the bracket so when I did move it up and down there was no side to side movement and stayed square.
#5. Have you considered selling the MFT and possibly going to a bigger MFT type table? Instead of fighting the current system. You should be able to build something that spans over the top of your current 8020 cart which is real nice BTW. but Im thinking bigger so you can have more flexibility on a fence system without losing any cross cut capacity. In addition to more rigidity and ability to cut full sheets on a bench instead of the floor
It doesnt have to be a full 4x8 since you seem to have some space limitations. Im thinking max out the size that you can comfortably in the space you have then if needed make a folding MFT to help a family member check out the chestnut folding mft design. They fold up pretty compact and look like a nice option or keep the MFT3 as an additional support but I dont know about the height difference between the table saw and MFT3 with the chestnut type you can make it whatever height you want. edit: just watched again looks like the cart is on castors so bigger MFT bench that is self supporting and the 8020 cart can simply roll under it. Id slap a MFT type top on it to for an extra assembly table. So when needed you can roll it out from under and do some glue ups or clamping on it.
I also just remembered after looking at my pics again. The anchor dogs have a small 45° shoulder on them. I did have the holes I used to set the fence in chamfered to accept them fully However I sold the UJK chamfer tool with the Parf guide MKII when I sold it so the holes the anchor dogs are in are not chamfered. Since I cut down the bench I just tossed the 8020 in a random set of holes for the pics and deflection test and didnt think about it in my haste. In the photos and you can see about 30-40 thousands of a gap between the bottom of the angle bracket and the MDF top. Im confident that if the holes where chamfered that .005" of movement I was getting would be decreased even more or eliminated completely. As Im sure there is some rocking motion happening and not having the bracket flat to the bench is weakening the rigidity somewhat.
Bugsysiegals said:I’m surprised you also doubt the stability of the TSO guide rail ..
. I see so many people who are claiming they’re highly accurate and even a test to within .001” on a 5 cut square. Most don’t mention using it on the MFT but several have with positive feedback .. I’d assume it would function the same? Have you seen many people with issues or complaints about the TSO guide rails?
I should have stated my comments differently. My experience with the TSO Guide Rail has been great, but I have only used it away from my MFT-style table. The first time I used it, with the FS 1400/2, was to cut the ends of the 19mm Valchromat board that became the top for my workbench. After making the cuts, I measured the diagonal dimensions of the 1x2 meter top with my tape measure, and I couldn't see any difference between the two diagonals.
I have no complaints at all when using the FS and TSO as a stand-alone guide, but I would never use it on a workbench if I had the means to fit a more secure fence that is aligned with my FS rail.
Bugsysiegals
Member
- Joined
- Mar 19, 2016
- Messages
- 893
afish said:#1. The 3d brackets are nice in theory but since they have both unacceptable deflection issues and could be made easier to remove and install I think a totally new and better way to attach the fence is required. I notice it looks like there is slots in the bottom of the fence. Can a anchor dog be attached in the slot and then be placed in a 20mm hole? We need to not only locate the rail squarely each time but also accurately each time left-right so the scale isnt off and maintains repeatability.
Where can I find these anchor dogs? Do they have any slop/play in them? Do they sit above the table or flush with the table?
I see these which are flush and perhaps what you use ... Parf Anchor Dogs or something like this TSO Dogs.
afish said:#2. This makes a huge difference in cut stability. You are going to lose some length of the fence so keep that in mind not sure if you use the full length now. I dont have a band saw so I just used a aluminum blade in my miter saw and adjusted my depth stop to leave about 1/2" just under actually but you will want to look at the end of the incra fence to make sure you are leaving enough aluminum behind to maintain some structural integrity as Im not familiar with it. Just under 1/2" seems like the sweet spot as the other posted mentioned strong enough to maintain rigidity and thin enough to handle most cutting tasks and if need you can always pack up with some scrap if needed for cutting really thin sheets. Make a bunch of cuts in the extrusion so it looks like you are making a heat sink. Then bend the fins back and forth to break them off and clean up with a grinder and file. If you noticed I used a wider piece of 8020 for this to help aid in maintaining a strong straight one piece design even after notching the 8020 You dont really need a high fence shorter and wider is better and I used the heavy wall for this reason as well.
I may have a solution where I don't need to chop up any fences but it depends how snug these anchor dogs or some other dogs fit. I've 2 Super Parf Dogs, 2 UJK Guide Rail Clips, and the chamfer tool. I set the SPD's vertically in the first/last holes, pull the guide rail snug to them, and tighten down the hinge in the rear, the alignment pin in the front, and then remove the SPD's ... I've not left the SFD's in and used the UJK clips because I'd lose crosscut capacity but maybe this would be more accurate than the stock MFT adjustable brackets?
Next, assuming the MFT holes are accurately positioned, the SPD's when fitted in a chamfered hole remain accurate, and there's some low profile dogs which sit just above the table and can be fitted snug and accurately, it seems I could drop several of them horizontally in the last row of holes to be the fence. Because of the positioning of my guide rail, I could even fit one under the guide rail close to the splinter strip. For repeatable cuts, I would mount my Incra parallel guide T-Track to the top of these dogs using the threaded hole in the dogs and slot in the bottom of the T-Track. The T-Track piece is up front so the T-Track would be recessed and wouldn't touch the panel but I could set end stops which would touch the edge of the panel. If the dogs which sit above the table aren't snug but the anchor dogs which sit flush are, I could either cut the larger Incra fence or switch to the lower profile T-Track which is only slightly taller than the larger fence cut would be.
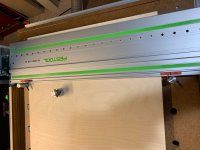
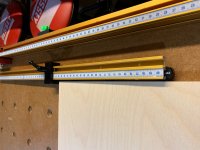
Here's pics of what I'm talking about. FWIW - I've a picture of my modified Incra parallel guide for precise repeatability but if I mounted the track to the dogs I'd have to revert to the stock Seneca end stops which I've also shown.
View attachment 1 View attachment 2 View attachment 3 View attachment 4
afish said:#4. I couldnt tell from the video how much of an issue the festtol tack hinge is causing. I only know from hearing from others its not greatest and has some sloppiness problems. Im pretty sure the right angle design one is better. No matter which you choose you need to make sure that it is raising and lowering 90° to the table if it isnt then the fence will be out of square depending on height. I had guides on both sides of the bracket so when I did move it up and down there was no side to side movement and stayed square.
I don't think it's a huge issue as I pull it snug against the SPD's and then lock it down.
afish said:#5. Have you considered selling the MFT and possibly going to a bigger MFT type table? Instead of fighting the current system. You should be able to build something that sits on top of your current 8020 cart which is real nice BTW. but Im thinking bigger so you can have more flexibility on a fence system without losing any cross cut capacity. In addition to more rigidity and ability to cut full sheets on a bench instead of the floor
edit: just watched again looks like the cart is on castors so bigger MFT bench that is self supporting and the 8020 cart can simply roll under it. Id slap a MFT type top on it to for an extra assembly table. So when needed you can roll it out from under and do some glue ups or clamping on it.
I'd not considered selling the MFT but that's not a bad idea! It's on casters and while only 4040 extrusion it is fairly sturdy but I'm not opposed to something stronger. FYI - when I break down full sheets, I either lay it across my table saw and outfeed table (5x5 BB) or in the garage (4x8 plywood).
Attachments


Yes the Parf anchor dogs you linked to are the ones. No slop see my other posts using just 2 my 8020 rail is rock solid. Only deflecting .001" when getting pushed on. Holes drilled with parf 20mm bit. going out for walk so will look at rest when I return
Bugsysiegals
Member
- Joined
- Mar 19, 2016
- Messages
- 893
afish said:Yes the Parf anchor dogs you linked to are the ones. No slop see my other posts using just 2 my 8020 rail is rock solid. Only deflecting .001" when getting pushed on. Holes drilled with parf 20mm bit. going out for walk so will look at rest when I return
Thanks for the quick reply, I ordered 3 pairs of the anchor dogs which I hope will be plenty, should fit well with the chamfered edges, and should be useful regardless which direction I go with this...
Yes they are handy. I also make adjustable stops with them and some scraps of BB similar to the TSO TDS ones but I just put a single 8mm grove and a cheap 8mm star knob from amazon. Works really good with the LR32 system. As far as dogs go I dont use them for squaring or cutting unless I have a set of holes dedicated to the anchor dogs that I have verified with the 5 cut test. Dogs rarely sit square in all directions even the supers which I also have. So I dont trust them the taller the dog the worse it gets. That's part of the issue too whenever you have any variances nothing is consistent, that's why I said you need to lock everything down as tight as possible first then concentrate on squaring. I know its all little amounts when looked at separately seem insignificant but once you start adding everything up it creates problems as you found out with your drawer bottoms. Then on top of that by the time you are done cutting up the job and routed dados, drilled shelf pins the panels can be flipped in such a way that the sum of all those small errors are now doubled when its time to assemble. I stand by my earlier suggestions lock everything down tightly no play on anything, extend the fence "solidly" under the track, and you should start to see much better and consistent results.
As far as the MFT I would seriously consider selling it and building a larger more permanent MFT outfeed table and putting another MFT type table on top of your sys cart and store it under the outfeed. so you can have a seperate table to assemble on and a separate cutting station. Im not sure about the hole size on a MFT either there seems to be some variances between hole sizes depending on what made the hole I can say that the 20mm UJK bit is a perfect match for the anchor dogs and so is the ujk chamfer tool.
As far as the MFT I would seriously consider selling it and building a larger more permanent MFT outfeed table and putting another MFT type table on top of your sys cart and store it under the outfeed. so you can have a seperate table to assemble on and a separate cutting station. Im not sure about the hole size on a MFT either there seems to be some variances between hole sizes depending on what made the hole I can say that the 20mm UJK bit is a perfect match for the anchor dogs and so is the ujk chamfer tool.
Similar threads
- Replies
- 58
- Views
- 3K
- Replies
- 12
- Views
- 3K
- Replies
- 0
- Views
- 259