MFT 3 - Should I Buy One?

In terms of getting the MFT square - I have a Woodpeckers 1281 square which seems to be what was used in the older videos before the massive MFT one time square was produced but does anyone have any tips on the set up of the MFT and getting it square?

Bij far the easiest way to getting it square is using dogs (Parf, Qwas, …). The procedure has been explained on FOG and YouTube often.
 
Bert Vanderveen said:
In terms of getting the MFT square - I have a Woodpeckers 1281 square which seems to be what was used in the older videos before the massive MFT one time square was produced but does anyone have any tips on the set up of the MFT and getting it square?

Bij far the easiest way to getting it square is using dogs (Parf, Qwas, …). The procedure has been explained on FOG and YouTube often.

i will have a search - many thanks
 
pettyconstruction said:
I think the selling point of a mft is PORTABILITY ,if not moving it, I think there is better methods.

What are these better methods ?
I am interested in a table too and do not need portability.

Thanks
 
wolfhound said:
pettyconstruction said:
I think the selling point of a mft is PORTABILITY ,if not moving it, I think there is better methods.

What are these better methods ?
I am interested in a table too and do not need portability.

Thanks

I suspect he refers to a solid traditional work bench or the paulk style work benches that seem popular in the US (from the threads i have read)
 
Petey83 said:
Bert Vanderveen said:
In terms of getting the MFT square - I have a Woodpeckers 1281 square which seems to be what was used in the older videos before the massive MFT one time square was produced but does anyone have any tips on the set up of the MFT and getting it square?

Bij far the easiest way to getting it square is using dogs (Parf, Qwas, …). The procedure has been explained on FOG and YouTube often.

i will have a search - many thanks

There are many ways to square the MFT fence to the guide rail. If you want the guide rail square to the MFT holes then, yes, the dogs would get that done for you. However, I was reminded in a recent Festool class that, over time the dog holes do exhibit some wear and most dogs have a tiny bit of slop when inserted; not a lot but some. That will only increase over time with heavy use especially. I use a good square (Woodpeckers 1281 certainly is a good one) and make sure the guide rail is square to the fence especially when I'm doing final crosscuts to the required length. That is the quickest and most direct way for me to square it up. And square the fence to the rail. That way you don't have to move the rail stops each time. All of my final crosscuts are perfect since I have followed this procedure. I started out using dogs (and own a couple of sets) to square it but found that the one I use now is much quicker and the result is much more accurate. It may just be that this process is the one that have practiced and it is now second nature. I would recommend picking one methods and just sticking with that.
 
So Axminster were good on their word and my MFT 3 arrived this morning. Set up was straight forward and pretty quick for a first time doing it. Squaring up with my woodpecker 1281 was simple enough and a few test cuts proved it was bang on 90.

Despite some initial concern that it would not be a big enough step up from my current keter bench/MFT top set up to justify the price i am happy to report i am 100% glad i bought it. The working height is better, the clamping options have increased and even the flip up track means less bending down and faffing!

I did order the cross braces with it and although not necessary they have made it noticeably more stable and rigid. I would say if you are just cutting or routing on it then don't bother but if its your main working bench they are worth getting.

Next step is to get some stick back tape measure to put on the rear fence in order to help set up quick cuts.

all in all i am very happy with it!!
 
Get a couple more flags stops will come in handy when making multiple cuts of different length, and can be used as a story stick to.
 
"Next step is to get some stick back tape measure to put on the rear fence in order to help set up quick cuts."

Have others found this to be a useful concept? My concern is that, because the fence can be moved on its track and the fence and guide rail will need to be squared again at some point (for me a number of times) in the future, the tape won't really serve the intended purpose which, I assume, is to avoid having to measure and mark when doing individual cuts. The stop serves to permit repetitive cuts of the exactly the same length so I've used that but never mounted a tape on mine.
 
My thinking is to calibrate it from the cut line on the track and have a black Mel on the non cutting side of the track so I know where to align it for a zero when I want to use it.
 
grbmds said:
"Next step is to get some stick back tape measure to put on the rear fence in order to help set up quick cuts."

Have others found this to be a useful concept? My concern is that, because the fence can be moved on its track and the fence and guide rail will need to be squared again at some point (for me a number of times) in the future, the tape won't really serve the intended purpose which, I assume, is to avoid having to measure and mark when doing individual cuts. The stop serves to permit repetitive cuts of the exactly the same length so I've used that but never mounted a tape on mine.

The easiest solution to this problem is to make a stopblock of known width that sits between the fence and the blade of your saw. Eg: your block is 100 mm, so the tape measure on the fence starts at 100… Set up is easy: plunge the saw down and butt up block and fence.
 
Petey83 said:
My thinking is to calibrate it from the cut line on the track and have a black Mel on the non cutting side of the track so I know where to align it for a zero when I want to use it.

Before you rush out and spend money take a look at the first few seconds of this video (or the entire thing) and you might find some free ideas for you:

Peter
 
grbmds said:
"Next step is to get some stick back tape measure to put on the rear fence in order to help set up quick cuts."

Have others found this to be a useful concept? My concern is that, because the fence can be moved on its track and the fence and guide rail will need to be squared again at some point (for me a number of times) in the future, the tape won't really serve the intended purpose which, I assume, is to avoid having to measure and mark when doing individual cuts. The stop serves to permit repetitive cuts of the exactly the same length so I've used that but never mounted a tape on mine.

A tape on the fence should still be useful whenever the fence is set 90 degrees to the GuideRail.

I don't use the fence that came with my MFTs, but the fence system I do have is calibrated off the back side of the GuideRail . I set my fence 2" away for clearance using a 1-2-3 block and need no further recalibration. There is no reason you cannot do the same or similar with the stock MFT/3 fence.
 
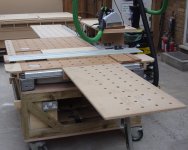
It all depends on what you are going to do with it.  It's not a pound on it work bench, and it's not a true mobile base.    When we moved a couple of years ago,  I could not take my heavy duty shop with me.  So I took a hard look at what I though I would be doing over the next 5+ years and retooled.  My answer was was remodeling & handling sheet goods,  lots of sheet goods.  So I bought the TS55 REQ + an MFT3 with all the standards options, plus 8 dogs and 4 festool clamps.  It's been perfect for what I needed.  I've adapted all my other power tools to use a short power cord plug, and a regular 10' 1.25" hose on a 5hp vacuum.  It works.  Rebuilt lots of cabinets, book cases, and closet systems since. 

If I keep doing this type of custom cabinetry with sheet goods, I'll start to broaden my tool set with other Festool items as this set of tools are perfect for doing 32mm style Euro Cabinets.  If I start to do more rough carpentry, I may build a set of Ron Paulk work benches, or build a massive workbench if I decide to do pieces that will appear in Fine Woodworking.     

It really depends on what you will be doing.   

As a hint,  still on my wish list is a CT26 dust extractor.  The hole rail LR32 base place, and sidestops arrived for Christmas.   
 
>>>In terms of getting the MFT square - I have a Woodpeckers 1281 square which seems to be what was used in the older videos before the massive MFT one time square was produced but does anyone have any tips on the set up of the MFT and getting it square?
 
A Slop Stop for the guide rail is a wise investment, using 2 MFT protractors keeps the fence exactly where you set it and far better than just 1 protractor and the fence clip that comes with the MFT set. I also leave 4 bench dogs behind the fence to make absolutely sure.

It has remained dead square accurate since I first set it up about 18 months ago, it never leaves my workshop so I'm not having to continually set it up over and over again.

A hardwood fence is a brilliant addition to the MFT, it serves as a kerf marker for both the TS55 and the OF1010 as well as a zero clearance, no breakout, improved dust extraction as well as a fence for the right hand side of the guide rail. I also use it to set the depth of cut on my router when I cut rebates and dados in to cabinet sides.

I also highly recommend removing the legs and building a substantial solid base to eliminate wobble. A measurement scale on the fence is very useful too and costs about £8.50. Extra flag stops make the routing of multiple dados in cabinet sides very accurate and really quick to process.

The Festool MFT/3 with the many accessories available allow many possibilities for modifications to personal requirements. I think the MFT/3 is brilliant and an essential component in the Festool range.


Attachments

  • SDC12653.JPG
    SDC12653.JPG
    1.5 MB · Views: 286
Petey83 said:
Been toying with the idea of investing for a while now.

As it currently stands i use a Keter work bench with a MFT style CNC top attached.The set up uses the  supplied quick clamps that hold onto some thick strips i have attached to the bottom of the worktop using pocket holes. All the 20mm holes are usable for parf dogs / clamping elements but the row closest to the under rails cannot be used with things like quick clamps as they are obstructed. The other 2 draw backs are that I cannot access the holes from under the bench and having the keter underneath can make clamping work and rails down for crucial cuts a bit of a fiddly job.

The big plus side is it was way cheaper and takes 30 seconds to set up which given i have to carry all my stuff round to the garden from the house and set up every time (I am a hobbyist) is a blessing. But i can't help but wonder if i then loose that time at later stages when setting up cuts etc.

I was planning on buying another keter for my Kapex to sit on for now until i have some workshop space when i move house next year (hopefully), but now i wonder if i should just stump up and buy the MFT 3 and use my existing keter for the Kapex

I have just bought the parallel guides for making repetitive cuts in sheet goods for projects like cupboard carcasses but am wondering if the MFT will make it faster to do repetitive cuts on smaller pieces for things like rail and styles.

This is the only Festool product i have ever been in doubt about so would love some views and opinions from people.
Why not just make one like I did. Get yourself a pair of the dewalt saw horses around £150 then I just made an mft top myself. It's the best bench I've ever had ,saved me so much time on the bookcase job I'm on.

87582fa49d6c52aebe7a3711cc5a1634.jpg


EDIT I see you bought an mft in the end
 
Woodwork Wizard said:
...
I also highly recommend removing the legs and building a substantial solid base to eliminate wobble.
...

alternatively...
The clamps are good and the concept is good.
If one is going to pull the legs off, or needs a larger surface, then I would make your own.

Being able to put it away is why I have one.
So it is hard to recommend without provisos or knowing the exact requirements
It needs to fulfill. For small things itnis great, and for glueing clamping smallish things.
For large things or planing it is not great. (in my experience)
 
joiner1970 said:
Petey83 said:
Been toying with the idea of investing for a while now.

As it currently stands i use a Keter work bench with a MFT style CNC top attached.The set up uses the  supplied quick clamps that hold onto some thick strips i have attached to the bottom of the worktop using pocket holes. All the 20mm holes are usable for parf dogs / clamping elements but the row closest to the under rails cannot be used with things like quick clamps as they are obstructed. The other 2 draw backs are that I cannot access the holes from under the bench and having the keter underneath can make clamping work and rails down for crucial cuts a bit of a fiddly job.

The big plus side is it was way cheaper and takes 30 seconds to set up which given i have to carry all my stuff round to the garden from the house and set up every time (I am a hobbyist) is a blessing. But i can't help but wonder if i then loose that time at later stages when setting up cuts etc.

I was planning on buying another keter for my Kapex to sit on for now until i have some workshop space when i move house next year (hopefully), but now i wonder if i should just stump up and buy the MFT 3 and use my existing keter for the Kapex

I have just bought the parallel guides for making repetitive cuts in sheet goods for projects like cupboard carcasses but am wondering if the MFT will make it faster to do repetitive cuts on smaller pieces for things like rail and styles.

This is the only Festool product i have ever been in doubt about so would love some views and opinions from people.
Why not just make one like I did. Get yourself a pair of the dewalt saw horses around £150 then I just made an mft top myself. It's the best bench I've ever had ,saved me so much time on the bookcase job I'm on.

87582fa49d6c52aebe7a3711cc5a1634.jpg


EDIT I see you bought an mft in the end

If the world smiles at us and I can have Jobby connect this summer, I'll set up my MFT and let ya have a go at it. Once ya get your lunch clamps on it you'll be getting one, I promise ya
 
Had another little play with it today and I'm pretty happy. Think I'll invest in one of those plywood squares for speed of set up as mine has to be totally disassembled for storage due to limited space.

It's bigger and more solid compared to the keter and top combo set up I had and just the extra height makes it more pleasant to use.
 
Heres my set up with the 2 protractors/ Angle stops


Attachments

  • IMG_1016.JPG
    IMG_1016.JPG
    481.1 KB · Views: 303
  • IMG_1015.JPG
    IMG_1015.JPG
    618.6 KB · Views: 280
Back
Top