MFT 90* Square

Joined
Oct 25, 2013
Messages
431
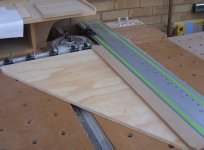
It's a big triangle of 18mm ply with a strip of 12mm MDF glued and pinned to one side. Because the MDF gives it an overall height of 30mm it butts up against the guide rail, making checking for square very easy without lowering the height of the guide rail.

Adjusting the height of the guide rail brackets to cut different thicknesses of sheet goods may alter the accuracy of the MFT so this device will be useful for that issue too.


Attachments

  • SDC12852.JPG
    SDC12852.JPG
    2.4 MB · Views: 2,392
What was your method for determining absolute square on the plywood?  Not questioning, I just found myself questioning everything that I ever held to be true and square in my shop the other day after I determined by measuring corner to corner, that the large rafter square that I have and my drafting square are both out of square.
 
I used the 5 square cut method, measured with digital calipers, corrected the guide rail/error to within something so tiny it really makes no difference, then cut the triangle on the MFT. I do realise that you do need to have your MFT already set accurately to accomplish this, but now I can check it whenever I adjust the guide rail height, remove the rail or just want to make sure the guide rail is at 90*.

 
You best come to Jobby connect this summer, maybe we can get you to demo how you make some of your jigs.

Good stuff buddy
 
You can also use phenolic plywood for this purpose.

Pretty sure you already know about Euro Color Ply phenolic plywoods, in case not, here are some more info:

Euro Color Ply is an ideal material for the furniture and joinery industries. Its features provide smooth and superior surfaces that are ready for use. The panels are rigid and often used for making jigs and tooling as they are extremely durable.

Size: 2' x 4' (24" x 48")
Thickness: 3/4" (19mm)
Color: Green, Light Brown, Dark Brown, Black, Red, White
Number of Plys: 14 Plys

Advantages:
Environmentally friendly, durable, easily workable, hygienic, odour free, easy-to-clean, wear-resistant, weather- and water-proof, resists commonly used chemicals. Riga Form for shuttering can be re-used many times.

Characteristics of Overlay:
Surface with an overlay is smooth, glossy and hard. It resists abrasion, it is weather and moisture proof and resists commonly used chemicals, dilute acids and alkalis. The surface is easy to clean with water or steam.

Applications:
  • Jigs and tooling
  • Desks, table tops, shelves
  • Fittings for kitchens, offices, shops
  • Garden furniture
  • Signs, billboards

Click here to order!


Anderson Plywood's Layout Square for MFT Table is also made from the same material:

 
Good news! Our Layout Square is now available on Amazon.com, and it ships free for Amazon Prime users!
You may use the link in our signature line.
 
I know this is an old thread but - how do you move the guide rail when it's locked height-wise (black things down)? Doesn't that lock it to the track and it can't be moved?

I have had trouble perfectly squaring mine because after doing so I have to change the height.

I wish Festool would have designed something that could move while locked height-wise (and then locked from sliding w/ the same black knob).

Matt
 
Try useing 2 protractors/angle stops on the fence and do away with that little black do hickey festool provides for securing the fence.

I hace no issues when raising or lowering the rail or even banging the fence every now and then.
 
Thanks [member=10147]jobsworth[/member] . You're talking about the guide rail right? I am talking about the guide rail - the thing the saw rides on. Not the fence at the back of MFT. Not sure how the protractor head would work for the guide rail - maybe I am missing a secret :)
 
Ive never had to re adjust the rail after raising the height.

Once I got the fence and rail set to 90 it stays at 90.

Do you have a slop stop on your rail? That seems to help.

Im trying to figure out what the issue is.
 
In theory you just square the rail to the fence while the rail is laying on the table and then raise the rail to the work height and go. In practice significantly changing the height of the rail often does change the angle slightly.

As designed the MFT requires you to leave the rail where it is and adjust the fence so there is no need to be able to move the rail after the height is locked.

Some people prioritize keeping the fence parallel to the holes. This is contrary to the design of the MFT and will cause unnecessary difficulty in making adjustments.

As designed, the holes in the MFT are for clamps not precision positioning. While they are set out in a regular pattern and “pretty close” to precise they may or may not be “good enough” for your intended use if that is other than passing clamps through.

As designed, you set the rail snug on the work and lock the height clamps front and back. Then you adjust the fence to the angle (relative to the rail) that you need. The difficulty here is that rail is often too far above the fence to use any readily available reference tool to see if the angle is right. It would be nice if Anderson made a square that is twice as thick (and not all cuts need to be square) but as Roger Savaterri says, “good cutting hygiene requires that you test the cut” and then make adjustments. You may have used the best reference tool in the world (with the rail set to 1/4” height so you had good registration of the tool to the fence and rail) but the actual cut might still be off.

For me using the MFT as designed makes the most sense. My oldest table is 15 years old and it has only two kerf cuts, one on top and one on the bottom (the original top).
 
Michael Kellough said:
As designed, the holes in the MFT are for clamps not precision positioning. While they are set out in a regular pattern and “pretty close” to precise they may or may not be “good enough” for your intended use if that is other than passing clamps through.

This was confirmed by a Woodpeckers designer recently when he took 3 Festool MFT tops and measured the dog hole pattern on their in-house vision system.
 
Michael Kellough said:
In theory you just square the rail to the fence while the rail is laying on the table and then raise the rail to the work height and go. In practice significantly changing the height of the rail often does change the angle slightly.

As designed the MFT requires you to leave the rail where it is and adjust the fence so there is no need to be able to move the rail after the height is locked.

Some people prioritize keeping the fence parallel to the holes. This is contrary to the design of the MFT and will cause unnec
essary difficulty in making adjustments.

As designed, the holes in the MFT are for clamps not precision positioning. While they are set out in a regular pattern and “pretty close” to precise they may or may not be “good enough” for your intended use if that is other than passing clamps through.

As designed, you set the rail snug on the work and lock the height clamps front and back. Then you adjust the fence to the he angle (relative to the rail) that you need. The difficulty here is that rail is often too far above the fence to use any readily available reference tool to see if the angle is right. It would be nice if Anderson made a square that is twice as thick (and not all cuts need to be square) but as Roger Savaterri says, “good cutting hygiene requires that you test the cut” and then make adjustments. You may have used the best reference tool in the world (with the rail set to 1/4” height so you had good registration of the tool to the fence and rail) but the actual cut might still not be off.

For me using the MFT as designed makes the most sense. My oldest table is 15 years old and it has only two kerf cuts, one on top and one on the bottom (the original top).

All above procedures. In addition, I lock the rail at the right height, and use a pair of 1-2-3 parallel setup block between rail and my known square to adjust the fence. When cutting height has to be changed, check with setup block again, it takes less than a couple of minutes.

The setup block is 1" x 2" x 3", and they are precision grounded and hardened. 0.0003" flatness and 0.0002/inch squareness was the spec.

 
JZ Bowmannz said:
The setup block is 1" x 2" x 3", and they are precision grounded and hardened. 0.0003" flatness and 0.0002/inch squareness was the spec.

Do you have a picture of that block? Any more info?
 
mwbrewster said:
JZ Bowmannz said:
The setup block is 1" x 2" x 3", and they are precision grounded and hardened. 0.0003" flatness and 0.0002/inch squareness was the spec.

Do you have a picture of that block? Any more info?


Attachments

  • 1233.480.jpg
    1233.480.jpg
    100.7 KB · Views: 390
1-2-3 = great tip!

Now I want to get an extra set and clean the grease off and replace with wax for use at the MFT.

Should have added that if you go to the bother of really squaring (4 cut method) the rail and fence at a particular height that you often use, then you should label and preserve the piece that results. You can carefully add a pair of riser blocks so the rail side meets the rail (instead of sliding under).
 
How do you do auto complete for people's names with a space in it..? I type in Michael trying to tag Michael K but it doesn't work because of the space. Maybe I'm doing something wrong.

Anyways he hit the nail on the head. It's good to know that the holes aren't perfectly square! I didn't know that!

Matt
 
mattbyington said:
How do you do auto complete for people's names with a space in it..? I type in Michael trying to tag Michael K but it doesn't work because of the space. Maybe I'm doing something wrong.

Anyways he hit the nail on the head. It's good to know that the holes aren't perfectly square! I didn't know that!

Matt

Like that?
[member=297]Michael Kellough[/member] You hit the nail!

highlite his name from his posts and copy + type @ + paste  [tongue]
 
Back
Top