MFT Rip Fence

Why not just hinge the Icra Jig to the base that fits the MFT and turn it into a highly accurate flip-stop?

John ???
 
Wow, I hadn't seen this post for a while,

I have now used this setup for cutting 25 sets of drawer sides (4 in each set), and about 20 mdf panels.

I have not had even one kickback.  I believe the riving knife prevents it.

That said I did learn not to try to cross cut dimensional lumber with this setup.  Doing that you are virtually guaranteed a kickback. 

It works beautifully for ripping and dimensioning sheet goods.

As for the left side right side issue, The Parallel guides extensions are made specifically for ripping thin strips to the right of the blade, so I don't see any issue with that at all.

 
Corwin said:
you can also choose to use a rectangular piece of MDF or plywood against your MFT's fence to transfer that square alignment between the fence and the rail to a parallel alignment between the MDF's right-hand edge and the rail.  Better yet, give this rectangular piece of MDF its own fence that runs down the middle such that it is both square with the edge against the MFT's fence and parallel with the rail.  Now this rectangular piece of MDF (or plywood) with its own fence has become a jig that can then be positioned along the MFT's fence to locate the jig's fence -- this works great for cutting material that is narrower than the width of the guide rail, as you can place the piece you want to rip against the right side of the jig's fence and use another piece of material the same thickness on the left side of the jig's fence to support the guide rail. 

hi everybody,
it's my first post and i've read this post to help me to make a jig for accurate and repetitive cut (crosscut and rip ; i've a simple homemade mft)
after reading, i should use hold down clamp (on the fence, eg a piece of wood/plywood... with square edge) to fix the offcut

but i saw the corwin's post :
i don't quite understand your description ; corwin, do you have pictures or sketch to illustrate your words ?

ps : don't hesitate to correct my english mistakes
 
Corwin said:
First off, [welcome] to the FOG.

and, when needed for narrower rips, a similar thickness scrap can be placed on the left side of the T-track to support the guide rail.

This really is a simple jig.  I hope this attempt to describe it was more successful -- if not, let me know.
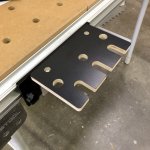
thanks for the reply
it's clear now
but do you fix your pieces when you saw (for example with narrower rips) ? perhaps with hold down clamp...hence the T-track

and the track saw, do you fix too : with the F clamp ? the mft system ? or you put simply on the piece and have confidence in the rubber ?
 
Corwin said:
As shown, the guide rail is installed on the MFT guide rail brackets and the guide rail is resting directly on the jig.
Hope this answers your questions. 
yes thanks corwin
According to Ekat online, brackets in the festool's words are "support unit"
But i've no MFT, only a far clone ; i get these ideas to try to improve my saw's skills
 
I'm glad this thread was not hastily removed, good info here aside from the panicking, thanks, folks!
 
I have been thinking about this problem for a couple of days now and let me see if I can describe my thoughts.

It seems that everyone in this thread has an incra jig so we will start with that. The incra jig has to have a base on it big enough to clamp to, and a fence. Next a sub fence about as long as the piece you want to cut and as thick as as your workpiece, and wider than the rail is made and attached to the incra jig fence with screws hot melt glue or double stick tape. Next the jig is placed on the left side of the rail with the sub fence under the rail and protruding past the cut line slightly. The jig should be zeroed out fully extended, then eye ball the sub fence edge parallel to the rail, but you don't have to go nuts. The jig is then clamped down to the table and the saw is used to cut off the slight over hang under the sub fence. The jig is now zeroed and calibrated. Set the incra jig to the width you want and cut  to your hearts content. Your small piece is safe under the fence, the rail is supported by the stock and the sub fence. If you make the sub fence wider than you need you can use it again, just set it up and cut off another little sliver and it is zeroed and recalibrated again.

I will try this tomorrow and take some photos if anyone thinks ti is needed.
 
I am personally somewhat terrified of kickback having had a couple near-misses over the years.

I have been pondering this a bit and it caused me to go review one of the EZSmart videos of Dino's cutting bench system. He uses 2 stops on the offcut side and does not seem to have any issues.

http://www.youtube.com/user/eurekazone#p/a/u/0/pGb99e5IYro

Is the real safety issue using a fence rather than stops?
 
Boatman said:
I will try this tomorrow and take some photos if anyone thinks ti is needed.
hi
yes some photos, it's a good idea

else (see the link), an idea to fix the piece (fence at left with a T-slot) with the veritas bench blade

 
it's not dangerous, cus the rip fence does not apply pressur to the piece.. It is just som sort of guide..
The riving knife of the ts55 also makes sure that the blade can't get stuck between the guide and
the saw..

Me personally, i don't see any problem with kickback issue's or whatever.. It just a smart little thing
you can add to the MFT system..

ciao
 
manu31 said:
Boatman said:
I will try this tomorrow and take some photos if anyone thinks ti is needed.
hi
yes some photos, it's a good idea

else (see the link), an idea to fix the piece (fence at left with a T-slot) with the veritas bench blade


My incra-jig with fence is clamped to the table and I used QWAS dogs to align the fence to the holes. The incra-jig was fully extended and zeroed.


Another view of the clamps


Just another view of the dogs registering the fence


A subfence wider than the saw rail is attached to the incra-jig with double stick tape or hot-melt glue, but I use tape.


The rail is lowered to show the overhang.


the overhang is cut off with the saw and the subfence is now zeroed to the saw blade.


A quarter inch rip that I made.


As you can see, whatever the incra-jig is set to is what you will cut
 
I have used the incra positioner (aluminum one) in a similar fashion before.  The only difference with Boatman's jig is that the aluminum fence is taller and therefore you have to provide a spacer between the edge of the guiderail and the incra fence otherwise the TS will hit the fence.  I have the pics, but unfortunately the FOG and my laptop are in a hate hate relationship when trying to load pictures.
 
Boatman said:

As you can see, whatever the incra-jig is set to is what you will cut
ok thanks, i understand
so, you don't fix your pieces when you rip ; there are stuck in the corner (mft's fence and subfence) ; and nothing move ?
 
10 years have passed since the original posting and surprisingly there's still no solution from Festool or other vendors.  A right-side fence would be very useful for repeatable cuts of thin strips.  (For example, 1 or 2 cm width.)  I don't need a 24 inch fence hanging off the right side.  A 6 inch fence would be sufficient.  The closest solution I can find is the following:https://precisiondogs.us/products/precision-fence-plate

Unfortunately, it doesn't have flag stops.
 
Sorry. I didn't realize my multiple attachments didn't post. Here's another try.

The fence has a base bar that fits under your guide rail for thin stock. The platform with holes and slots accepts rail dogs. You use rail dogs in your rail and drop them into the slots, which sets a cut line off the table so you're not slicing up your top, and the platform supports offcuts. The carbon fiber parallel guides are table mounted and also fit the platforms.


Attachments

  • IMG-2913.jpg
    IMG-2913.jpg
    1.7 MB · Views: 394
RightAngleDesign said:
Uploads continue to fail here. Please message me directly if you're interested in seeing all the photos. Thanks.

Have you tried shrinking your file size?  I know there are limits.  I ran into them myself earlier this week.  If you can, maybe go down to a size like 1024 x 1024.  That might help.
 
markchamness said:
10 years have passed since the original posting and surprisingly there's still no solution from Festool or other vendors.  A right-side fence would be very useful for repeatable cuts of thin strips.  (For example, 1 or 2 cm width.)  I don't need a 24 inch fence hanging off the right side.  A 6 inch fence would be sufficient.  The closest solution I can find is the following:https://precisiondogs.us/products/precision-fence-plate

Unfortunately, it doesn't have flag stops.

What about this?
https://benchdogs.co.uk/collections/imperial-fence-systems/products/right-hand-side-support-fence
 
Back
Top