MFT3 Extensions using side profile

Stone Message

Magazine/Blog Author
Member
Joined
Apr 13, 2011
Messages
4,550
Hi Everyone

I have seen several threads where people have been talking about extending the MFT3 or adding an out feed table to it.

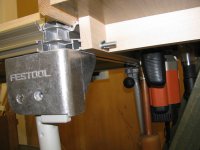
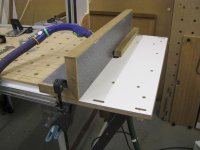
Soon after I bought mine I added a router table which I used for about 3 years without any problems. In order to make this I took advantage of the "V" grove in the side profile of the MFT3 and also the channel just below which I used for securing bolts. Here are a couple of pictures of that setup:

View attachment 1

View attachment 2

When I saw the recent discussion I decided to add a piece in my latest "Workshop Notes" video. Here is the link and the piece starts at about the 1 minute 30 second point:


Peter
 

Attachments

  • IMG_3619.JPG
    IMG_3619.JPG
    725.7 KB · Views: 672
  • FOG 3620.jpg
    FOG 3620.jpg
    505.3 KB · Views: 634
Peter,
Nice Video,
i have drawn up a bracket similar to yours that would allow a T track like woodpecks Super track to be used across the CMS to allow the use of decent feather boards with the router or as a fence when using the saw. I am not sure if there would be a market for such a bracket but i am going to get a few prototypes knocked up in China in the coming weeks to see if they work as I think.
 
Mr_Mod said:
Peter,
Nice Video,
i have drawn up a bracket similar to yours that would allow a T track like woodpecks Super track to be used across the CMS to allow the use of decent feather boards with the router or as a fence when using the saw. I am not sure if there would be a market for such a bracket but i am going to get a few prototypes knocked up in China in the coming weeks to see if they work as I think.

I had played with the idea to create a simple plastic extrusion that could be used for any application and may revisit that - if I can find the emails from 3 years ago!

Good luck with your idea.

Peter
 
Interesting and informative video. I particularly like the bandsaw sections.

The MFT extensions were useful as well.

My MFS kit has still not arrived so  I'm jealous that you already have one in your possession!

I like the scale of your workshop equipment in the shop, easy to handle and move around in a small space.

Thanks !
 
PreferrablyWood said:
Interesting and informative video. I particularly like the bandsaw sections.

The MFT extensions were useful as well.

My MFS kit has still not arrived so  I'm jealous that you already have one in your possession!

I like the scale of your workshop equipment in the shop, easy to handle and move around in a small space.

Thanks !

You might not want this MFS as it has been used a bit, probably at demos or in the training room, but it functions perfectly.

I am delaying making the video as I have some other items on the way to make the video a little more interesting !

Cheers.

Peter
 
Thanks for sharing this Peter!  Very timely as I am trying to finish up an extension myself.  How would you suggest to make the v groove?  Would I use my router?  If so, what bit would I use?  Or do you recommend another method?  I only have power hand tools.  Or, if a plane of some sort would be best, I would be willing to purchase a plane.

Thanks!
 
Patrick Cox said:
Thanks for sharing this Peter!  Very timely as I am trying to finish up an extension myself.  How would you suggest to make the v groove?  Would I use my router?  If so, what bit would I use?  Or do you recommend another method?  I only have power hand tools.  Or, if a plane of some sort would be best, I would be willing to purchase a plane.

Thanks!

Hi Patrick

You can manage with your hand held router.

You need to create 3 parts - the "V" groove piece, a piece shaped to fit in the lower channel and a flat piece that goes against the vertical face of the aluminium extrusion.

The "V" groove piece should start as a rectangular section 31 mm x 20 mm. If you want to err on the safe side make the 31 mm side 32 mm and adjust after the "V" is on. The piece of wood will be difficult to hold for hand routing so make it 100 mm longer than required and use the ends for screwing it to your bench top. Screw the piece to your bench top with the 31 mm face against the bench top. Fit a 45 deg bearing guided chamfering cutter to your router and make one side of the "V" and then turn the wood over and do the other side.

With the piece of wood described the "V" slopes do not meet at a point but end up 5.5 mm apart - practice this until you get it right.

The piece for the lower channel is made from a piece of wood 14 mm thick and wide enough to fix to your bench top by screws again. Using whatever cutters you have cut a pair of rebates on opposing sides across the 14 mm face. The rebates should be 3 mm x 3 mm. Then cut the piece to end up with a piece 14 mm x 12 mm overall and check that it fits in the groove of the MFT3. Adjust as necessary.

The flat piece needs to be about 75 mm wide and as thick (and long) as your requirements dictate.

Put the "V" piece in place and the rebated piece in the groove. Check that the large flat piece can be glued to the other two pieces. You can use thin strips of cardboard behind the rebated piece to force it towards the large flat piece whilst it is being glued.

Now I realise why it is so much easier to follow a video !

Good luck.

Peter
 
Which of these bits would you go with Peter?

i-QDD2Jsq-X2.png


Thanks!
 
Peter, I noticed you were using the Festool CMS router table, what happened to your Axminster UJK table?
 
bobfog said:
Peter, I noticed you were using the Festool CMS router table, what happened to your Axminster UJK table?

Space is a premium with all of the film equipment and I had to make some choices. The X-Carve has taken up a huge amount of room but I will not part with it as it is my only CNC capability. So I had to make a choice about duplicate kit. The UJK table was excellent and perfect with its cast iron top but I could not afford the space and the CMS-OF does all that I need and in an easy to move and small package.

Peter
 
IMPORTANT UPDATE for those using my description above for Patrick...

The 20 mm width for the piece used for the "V" does not make it flush on the outside vertical face of the MFT3 extrusion. There is a gap of what looks like 3 mm.

Do not worry if you have already made up the parts, just make a spacer piece of the correct thickness to bring that outside edge of the "V" piece in line with the plane of the outer face of the MFT3 extrusion.

As I said, it would be easier to make a video than describe it accurately in words.

Peter
 
Peter Parfitt said:
bobfog said:
Peter, I noticed you were using the Festool CMS router table, what happened to your Axminster UJK table?

Space is a premium with all of the film equipment and I had to make some choices. The X-Carve has taken up a huge amount of room but I will not part with it as it is my only CNC capability. So I had to make a choice about duplicate kit. The UJK table was excellent and perfect with its cast iron top but I could not afford the space and the CMS-OF does all that I need and in an easy to move and small package.

Peter

Thanks Peter. I understand your point and in some ways am quite pleased. I'm also stuck for space and have been debating between the UJK and more compact Trend router table. The Trend makes more sense, but I had a nagging feeling that I'd be missing out on something by not having the cast iron UJK based on how highly you spoke of it. But if a smaller non UJK is good enough for you, I'm sure the well reviewed Trend will be good enough for me!
 
Back
Top