MFT3 table not cutting square--not even close

paulhtremblay

Member
Joined
Jun 4, 2014
Messages
148
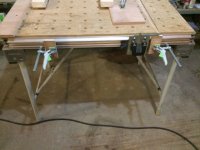
I finished several 5-cut tests using my MFT3 guide rails and stop ruler, and was consistently 2mm off over 1000 mm.

Before doing these tests, I did one 5 cut test without the stop ruler. Instead, I used the rails dogs to align the guide rail on the MFT3 holes. This test came out nearly perfect--I couldn't really measure any difference in the final piece of wood.

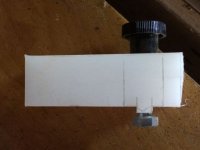
For the tests using the stop ruler, I checked the squareness of my fence using multiple squares, themselves all tested by drawing a line, flipping the square, and drawing another line. Also, after each test, I re-aligned my fence, thinking I had made a mistake. The piece of wood started out so big, I couldn't fit it under the guide rail, by the end, the test piece was only 250 mm.

My first test with the stop ruler was only 1/2 mm off over 2000 mm. After that, the tests came out terribly inaccurate. It seems the smaller piece of wood causes deflection in the stop ruler--though this is just a guess on my part. 
 
Have you set the fence (stop ruler) end stop to keep the free end from flexing?

I set the miter gauge as close to the fence as I can get it then lock it down. I set the free end device on the far end of the fence. To tighten the free end device I snug it down to the fence then use the lever to tighten the device to the V-groove. I've also moved the fence holding part of the device out to the farthest hole.

Tom
 
tjbnwi said:
Have you set the fence (stop ruler) end stop to keep the free end from flexing?

I set the miter gauge as close to the fence as I can get it then lock it down. I set the free end device on the far end of the fence. To tighten the free end device I snug it down to the fence then use the lever to tighten the device to the V-groove. I've also moved the fence holding part of the device out to the farthest hole.

Tom

Yes, I used the fence stop.

I did another set of tests. This time I used Qwas dogs to set up my guide rail and stop ruler. When I finished both sets of tests, I checked the guide and stop ruler with the Qwas dogs, and both pieces were aligned with the holes. I could hear the metal of the dogs scraping against the Festool aluminum.

For the first test, I had a rather large piece of MDF. The final cut was off by .5 mm over 2400. The second test involved a smaller piece (because I had cut down the first one so much). This one was off 2 mm over about 1400 mm.

 
I had to move the front feather key (the stop in the channel) on mine. When I make n adjustment, I loosen the bolts on the hinge that hold the rail, set the rail on the pin then tighten the bolts. I found if I don't do it this way I torque the rail. Get a Slop Stop also.

Once you get it set it should stay set, even when you move it.

My MFT when tested with a 5 cut is out 0.0000" in 24 ". I do check the cut off piece with a caliper.

Tom
 
Did 10 more tests (50 cuts). The best result was the first, with .5 mm over 1500 mm. Some tests were as bad as 3mm over 1000 mm. It seems to help to cut with one hand and hold the board against the fence with the other.

The tests are consistent in showing that the track cuts a bit less than 90 degrees. They are not consistent in how much. If I got a consistent amount, I guess I could move either the guide (by the back feather), or the fence. The problem is, how would keep this setup when I need to use the MFT3 for something else, in which case I would have to take off the guide and fence?

I will do some more tests tomorrow, with just the dogs as my guides, and then with some bigger pieces of wood. If I can get consistent results, I should be able to adjust the fence--I will just have to figure out how to repeat my results.
 
The not consistent is baffling. Unless the rail or fence is shifting the cut should be off the same amount every time.

Please don't be insulted----Is everything on the rail and fence tight? Is the rail snug to one side of the front guide pin?

I'll think on it.

Tom
 
I guess I'm not quite as much of a perfectionist so don't measure the mm off over a specified distance. I have used more than 1 of my squares to test squareness of the MFT miter head, in relation to the rail and then the final piece after cutting and don't find enough off of square that it is noticed when assembling drawers, mitered picture frames, and face frame joints. I'm puzzled with all the trouble reported here. If I were having this problem, I'd start from scratch and follow one of the several excellent processes out there for squaring up the head and rail on the MFT. I've used a couple of different ones and also used the concept provided in a day long class I took at a woodworking store. The most success I've had is starting with a pair of dogs to get the miter fence square to the holes in the table and the rest just seems to follow after that. I do this periodically after using the table and rail for awhile as I usually manage to bump the guide rail at some point in time, thus throwing is a little out of square.
 
Tom,

  Are you saying your set up has "Zero" out of square in your cuts?? I have to say I have never heard of many tools that are that accurate. There are so many variables in cutting a piece of wood that I find that a bit hard to understand.

  I think you can get a fairly accurate cut out of the MFT but it does take some playing with and fairly constant checking for me to feel comfortable. I do think the easiest set up is using the dogs. Loosen everything up and start from scratch with an accurate square and go from there. Also remember wood can move even when trapped well under the rail.

 
grbmds said:
If I were having this problem, I'd start from scratch and follow one of the several excellent processes out there for squaring up the head and rail on the MFT. I've used a couple of different ones and also used the concept provided in a day long class I took at a woodworking store. The most success I've had is starting with a pair of dogs to get the miter fence square to the holes in the table and the rest just seems to follow after that. I do this periodically after using the table and rail for awhile as I usually manage to bump the guide rail at some point in time, thus throwing is a little out of square.

Have already started from scratch--again and again and again, including moving the feather keys. I have used two different sets of dogs to square the rails and have used several different squares, themselves tested. Everything is tight. For the last tests, I used precision dogs on the guide rails, and qwas dogs on the fence. I think something is shifting during cutting, and it is shifting in the same direction. As the board gets smaller, the error seems to increase, so I think the smaller board is moving; a larger board should be easier to keep in place.

Should the board be trapped by the guide rail? I know the guide rail, when not on the MFT3 table, traps the wood, but there is a bit more room between rail and board for my cuts. Should I hold the board against the fence? 
 
The board should be trapped. The grip strips hold everything in place. I hold it sometimes, other times not.

Yes, I spent the time to get my MFT to zero out of square. My Kapex is also zero out. Both at their maximum capacity.

Tom
 
paulhtremblay said:
. As the board gets smaller, the error seems to increase, so I think the smaller board is moving; a larger board should be easier to keep in place.

I think a picture of your set up will help.
Tim
 
How square is your square you are using for setting the table up?

99% of the time that is the problem.
 
paulhtremblay said:
grbmds said:
If I were having this problem, I'd start from scratch and follow one of the several excellent processes out there for squaring up the head and rail on the MFT. I've used a couple of different ones and also used the concept provided in a day long class I took at a woodworking store. The most success I've had is starting with a pair of dogs to get the miter fence square to the holes in the table and the rest just seems to follow after that. I do this periodically after using the table and rail for awhile as I usually manage to bump the guide rail at some point in time, thus throwing is a little out of square.

Have already started from scratch--again and again and again, including moving the feather keys. I have used two different sets of dogs to square the rails and have used several different squares, themselves tested. Everything is tight. For the last tests, I used precision dogs on the guide rails, and qwas dogs on the fence. I think something is shifting during cutting, and it is shifting in the same direction. As the board gets smaller, the error seems to increase, so I think the smaller board is moving; a larger board should be easier to keep in place.

Should the board be trapped by the guide rail? I know the guide rail, when not on the MFT3 table, traps the wood, but there is a bit more room between rail and board for my cuts. Should I hold the board against the fence?

Is the Guide Rail sitting tightly on the wood? Or is the Guide Rail maybe sitting on top of the fence itself? If the guide rail isn't adjusted up or down so that it lays flat and snugly on top of the wood you are cutting, the wood will move. I assume that you already know this, but I think the problem is the wood is moving since the differences are inconsistent. One thing I did so that the soft strips on the bottom of the guide rail will sit tightly on even narrower pieces is to put 2 extra strips on the bottom. You can buy an extra roll at Festool stores. This is a little assist for holding even wider pieces solidly without movement also.

One more thing to check is the key on the end of the guide rail which is toward you. Is that key adjusted up or down so that it fits without movement side to side when you put sideways stress on the rail?
 
Now that I got a little sleep----

What thickness is the test piece? Anything less than 1/2" is lower than the fence on the MFT. The guide rail will not capture/trap the piece.Less than 1/2" I place a backer piece on the MFT, it's a 2' square piece of 1/4" plywood, set the right edge just to the left of the kerf.

Adjust the hinge and free end supports so the rail hold the work piece. I place the work piece on the table, lower the rail, release the hinged support (front support is released), hand pressure on the rail near the fence, lock the hinged support. Slide the work piece towards the free end, hand pressure on the rail, raise the rail support squarely to engage the pin in rail slot. Lock the rail. A Slop Stop really helps in this situation.

The reason I highlighted squarely is I had issue with raising the free end on a slight angle. It caused the rail to be placed out of square, Now when I raise the support I keep it tight against the left side of the bracket. If I doing a lot of repeat cutting, I will add a stiffener to the right tongue of the support. Easy as a clamp in the profile c-channel and block of wood. I fond the dropping the rail and saw on the support a couple hundred times can cause the support to camber.

NEW2-the beauty of the 5 cut method is all of the external variables have been removed from the process. It's the table, wood and saw, nothing else. I believe it took me 5 process to get it to zero. I a past life one of the machine I had to calibrate had a tolerance of 0.0005" in 36", in the X, Y and Z axis's. Used to set the blade on the 6' sheer that cut 28 ga. stainless steel at 0.001" at the end, 0.0035" in the center, the back to 0.001" at the other end. There is an adjustment stud every 4", each one was set with a feeler gauge by hand to get achieve curve. The motion of the machine straightened the blade. If you didn't get it right the blades could crash or the sheered piece would have a razor sharp burr on it.

Tom

 
tjbnwi said:
What thickness is the test piece? Anything less than 1/2" is lower than the fence on the MFT. The guide rail will not capture/trap the piece.Less than 1/2" I place a backer piece on the MFT, it's a 2' square piece of 1/4" plywood, set the right edge just to the left of the kerf.

I'm not sure I understand this comment. You're absolutely right when the fence itself is under the guide rail. However, if you are cross-cutting longer pieces or the pieces are wide enough, I don't find I need to have any part of the fence under the guide rail. The guide rail can then sit directly on top of the wood and holds it in place just as with a thicker piece. Correct? If the piece is narrow or short, then, for sure, you'd want the extra support of the fence behind the wood and positioned under the rail.

You are right about the Slop Stop, though. It seemed like a lot of money for a small piece of plastic, but I found it was worth every penny.

R
 
tjbnwi said:
Now that I got a little sleep----

What thickness is the test piece? Anything less than 1/2" is lower than the fence on the MFT. The guide rail will not capture/trap the piece.Less than 1/2" I place a backer piece on the MFT, it's a 2' square piece of 1/4" plywood, set the right edge just to the left of the kerf.

Adjust the hinge and free end supports so the rail hold the work piece. I place the work piece on the table, lower the rail, release the hinged support (front support is released), hand pressure on the rail near the fence, lock the hinged support. Slide the work piece towards the free end, hand pressure on the rail, raise the rail support squarely to engage the pin in rail slot. Lock the rail. A Slop Stop really helps in this situation.

The reason I highlighted squarely is I had issue with raising the free end on a slight angle. It caused the rail to be placed out of square, Now when I raise the support I keep it tight against the left side of the bracket. If I doing a lot of repeat cutting, I will add a stiffener to the right tongue of the support. Easy as a clamp in the profile c-channel and block of wood. I fond the dropping the rail and saw on the support a couple hundred times can cause the support to camber.

Tom

There seems like there is some good info here, but I can't follow it all. I set the height of the guide rail in 2 or 3 steps. First I set the height by the fence; then I set the height at the front of the table; finally, I re-set the height by the fence.

I think I get what you mean by locking the front squarely in the tongue. I will try your method tonight. I don't understand where I can place a clamp. There is certainly some play in the tongue, and will look into buying a slop stop.

My MDF is 3/4'' (19 mm).

How did you possibly get 0'' inches of error over 24''? I have seen the fence on a sled for a table saw adjusted to very strict tolerance, but that is done by first by cutting a board five times, finding the difference in the front and back of the cut off piece, and finally moving the fence that distance. You can't make this final move on the MFT3, unless  you moved a feather key.

I think with my smaller pieces of wood (less than 12''), the wood is moving when I cut it.

One important issue not discussed is where to start and stop the saw. For the start, I am positioning the TS55 half-way on the piece. Less than that, and I think the rail would bend and cause deflection, but moving the saw too far forward will not start the cut. I completely cut through the board, letting the back thumb screw go past the wood.
 
paulhtremblay said:
Should the board be trapped by the guide rail? I know the guide rail, when not on the MFT3 table, traps the wood, but there is a bit more room between rail and board for my cuts. Should I hold the board against the fence?

Oops! pushed the wrong button.
I am wondering if you are saying yo do not hold the board against the fence.
If set up properly, the fence is the constant. it should not e movable.
All other parts can be moved at one point in the set up.
If the fence is set and locked properly, it should not move no matter what you do from that point on.
The rail is movable until the point it is set in place to make your cut.  If the rail is supported properly at both ends, it should be repeatable.  If the saw is set up properly, it will follow as directed by the rail.
It all starts with the fence.  I always hold the wood against the fence.  The smaller the wood, the more important to hold against the fence.
Tinker
 
"One important issue not discussed is where to start and stop the saw. For the start, I am positioning the TS55 half-way on the piece. Less than that, and I think the rail would bend and cause deflection, but moving the saw too far forward will not start the cut. I completely cut through the board, letting the back thumb screw go past the wood."

I'm not sure what others would say, but I always start the saw off the wood, start it, and plunge set depth, then move forward. The only time I would not do that is if I were plunge-cutting in the middle of a piece where you want just a partial cut of the board. While the saw is made to do these plunge-cuts, directions and videos showing technique for the TS55 show starting off the wood and stopping the saw after the cut is complete for ripping or cross-cutting a board."

The Slop Stop definitely helps keep the guide rail in place.

It is harder to keep boards from moving when you are ripping small boards that are less than 12" wide. I've found that putting extra soft rubber strips on along the length of the guide rail help stabilize and hold narrower boards. I saw that at a 1-day class I took at a Festool dealer where the basic saw and router techniques were demonstrated. The extra strips keep the rail more even and add a lot of holding power. (These are the black rubber strips on the underside of the rail.)
 
paulhtremblay said:
tjbnwi said:
Now that I got a little sleep----

What thickness is the test piece? Anything less than 1/2" is lower than the fence on the MFT. The guide rail will not capture/trap the piece.Less than 1/2" I place a backer piece on the MFT, it's a 2' square piece of 1/4" plywood, set the right edge just to the left of the kerf.

Adjust the hinge and free end supports so the rail hold the work piece. I place the work piece on the table, lower the rail, release the hinged support (front support is released), hand pressure on the rail near the fence, lock the hinged support. Slide the work piece towards the free end, hand pressure on the rail, raise the rail support squarely to engage the pin in rail slot. Lock the rail. A Slop Stop really helps in this situation.

The reason I highlighted squarely is I had issue with raising the free end on a slight angle. It caused the rail to be placed out of square, Now when I raise the support I keep it tight against the left side of the bracket. If I doing a lot of repeat cutting, I will add a stiffener to the right tongue of the support. Easy as a clamp in the profile c-channel and block of wood. I fond the dropping the rail and saw on the support a couple hundred times can cause the support to camber.

Tom

There seems like there is some good info here, but I can't follow it all. I set the height of the guide rail in 2 or 3 steps. First I set the height by the fence; then I set the height at the front of the table; finally, I re-set the height by the fence.

I think I get what you mean by locking the front squarely in the tongue. I will try your method tonight. I don't understand where I can place a clamp. There is certainly some play in the tongue, and will look into buying a slop stop.

My MDF is 3/4'' (19 mm).

How did you possibly get 0'' inches of error over 24''? I have seen the fence on a sled for a table saw adjusted to very strict tolerance, but that is done by first by cutting a board five times, finding the difference in the front and back of the cut off piece, and finally moving the fence that distance. You can't make this final move on the MFT3, unless  you moved a feather key.

I think with my smaller pieces of wood (less than 12''), the wood is moving when I cut it.

One important issue not discussed is where to start and stop the saw. For the start, I am positioning the TS55 half-way on the piece. Less than that, and I think the rail would bend and cause deflection, but moving the saw too far forward will not start the cut. I completely cut through the board, letting the back thumb screw go past the wood.

Yep, moved the feather key. I use a back up feather key to gauge my setting off of. Set the extra key against the existing key, if I have to move the existing key 0.002" to the left I loosen the existing key, insert a 0.002" feeler gauge between the two, back the original up to the feeler gauge and tighten it. If I have to move to the right I insert the gauge, bring the extra key to it and snug it down, remove the feeler gauge, loosen the existing butt it to the extra key, snug it down. Very easy process. I do own a set of teeter gauges that are 1/4" tall they fit the slot well.

I check and set my MFT and Kapex using the 5 cut method. Measure cut 5 with a caliper.

In this photo you can see where I clamp the additional support. Ignore the one on the left that is a reference block for Domino plunges. It got replace with an HDPE one in the other photos once I had time to fabricate it.

Tom
 

Attachments

  • IMG_2899.jpg
    IMG_2899.jpg
    50.6 KB · Views: 716
  • IMG_3018.jpg
    IMG_3018.jpg
    40 KB · Views: 649
  • IMG_3019.jpg
    IMG_3019.jpg
    32.1 KB · Views: 618
  • IMG_3020.jpg
    IMG_3020.jpg
    36.7 KB · Views: 589
Paul, if you don't mind where are you located? The USA is a fairly large place and not contiguous.

Tom
 
Back
Top