MFTC portable workshop

epicxt said:
I like this idea as well, although wheels on the narrow would make getting through doorways easier.

The table alone is 31" wide.  Your stuck with exterior doors at best.  All interior doors are 30" finished.

Timtool can correct me, but I think he designed it to be narrow for interior doors.  But there is no reason why one couldn't drag the MFTC-XL (Or I like to call it, MFTC-MFT/3 [wink]) through an interior door that is less than 30" wide.
 
No I kinda get what he is saying and was thinking the same thing myself. Sometimes its just easier to control rolling on 4 wheels, not as fast but in those moments it's nice to be able to do it.
 
A dutch guy has extended the MFTC into the MFTC-XL.

That Dutch guy will be me...  ::) A member of the Dutch Woodworking Forum brought your questions to my attention. So here I am...  [wink]

And, I don't know how to register CarolinaNomad in Dutch. Huh?  Maybe someone could post pics here.

That can be arranged ofcourse! I'll try to figure out how this works and post some pics here. Unfortunately my MFTC-XL is not finished yet (due to lack of time...) but I will keep you posted once I continue building it.
 
OK, here we go... Let's start by posting some of the renderings of my MFTC-XL
 

Attachments

  • Project 13017 MFTC_XL 01.jpg
    Project 13017 MFTC_XL 01.jpg
    480.8 KB · Views: 10,242
  • Project 13017 MFTC_XL 02.jpg
    Project 13017 MFTC_XL 02.jpg
    408.3 KB · Views: 8,184
At the moment the project has come to this point (see pictures below...). Next year I will continue building it. I will keep you posted...

PS: Merry Christmas and a happy 2014 !!!


Attachments

  • Project 13017 MFTC_XL 17.JPG
    Project 13017 MFTC_XL 17.JPG
    3.4 MB · Views: 10,706
  • Project 13017 MFTC_XL 18.JPG
    Project 13017 MFTC_XL 18.JPG
    3.3 MB · Views: 7,948
I forgot to tell: the MFTC-XL can hold 7 systainers:

1 systainer 4 **
2 systainers 2
4 systainers 1

** The space for the systainer 4 can also be filled with a systainer 3 (ofcourse...) but also with another two systainers 2 (for instance: the Festool DF-500 attached to the systainer 2 filled with the domino's).
 
Just when I thought people wouldn't be impressed on site anymore, when I setup my festool rigs.
This workbench is going to be a game changer for me. Very impressed.

Might be the New Years Resolution.
 
index.php


It's been a while since I saw the first post of this thread. This is a great design!
 
Bosquet said:
At the moment the project has come to this point (see pictures below...). Next year I will continue building it. I will keep you posted...

PS: Merry Christmas and a happy 2014 !!!

You beat me to the punch!!

I have a somewhat different desin that is kind of a rework of your design and the original MFTC. It will be an MFTC XL too! Hopefully I can get cracking on it during this christmas break.
 
Another picture, this time from the other side of the MFTC-XL


Attachments

  • Project 13017 MFTC_XL 19.jpg
    Project 13017 MFTC_XL 19.jpg
    56.7 KB · Views: 6,715
That is awesome and would definitely be a future build for me...at the very bottom some sys-mini's would look nice
 
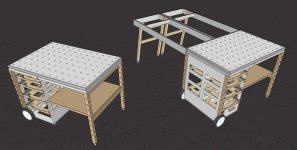
Built one from scraps, odds and sods and leftovers from jobs. The only expenditure was on drawer runners, which cost about £17, plus the usual glue, screws, doms, paint etc. Had to make some changes as I only had 10mm ply. I also had a cnc'ed top (made some time ago as a spare for the bench) which was 18mm, and a slightly different size to the one specified in the drawings.

Apart from the ply thickness, the main changes were to the wheels (mine are from an old concrete mixer that died, and are about 240mm dia), and the locking bar thing I added to stop the drawers opening (I couldn't find a sensible source for the catches suggested, and in any case I wanted something more positive).
mftc_2a.JPG


Made the top frame from solid rather than built up from ply. I haven't used T-track as it's bloody expensive in the UK, and I haven't made the extension tables anyway. Can always be added in the future.
mftc_1a.JPG


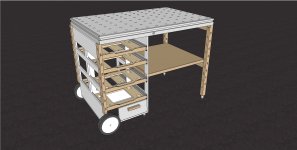
Solid rubber wheels. Still got concrete and mortar snots on from their previous use - must clean them up a bit sometime. This shot also shows the bottom of the locking bar, which slots into a bit of ply fixed to the underside of the cabinet.
mftc03.JPG


Detail of the top bit of the drawer lock (underside) - a bit of ply with a slot in it, a spacer and a couple of aluminium tabs to hook onto the cabinet top:
mftc04.JPG


Same again, but in place - it just slides onto the ply top
mftc05.JPG


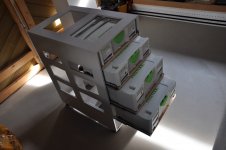
The batten to hold the drawers in place is just a length of beech, shown here removed. The bottom drawer is very useful
mftc06.JPG


Drawer bases made from 10mm ply are too thin, so I had to glue a bit of softwood on the sides so I had something reasonably solid to screw the runners onto.
mftc07.JPG


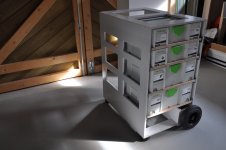
Making changes resulted in a few surprises - the original drawings are absolutely spot on of course, and changing a component size usually means that something else has to be changed to suit. I've used it on site a couple of times and it's very useful.

I think I'd like to put a couple of small locking castors on the front instead of the feet, and I'm not sure that the handle is up to the job, especially when I pull it up into the van (my version is probably a bit heavier than the standard because of the 18mm top). The skids are essential if you want to lift it into a van, and I feel happier removing the three sustainers first, mainly because I'm doubtful about the strength of the handle. It stands up ok in my VW T4, with a few inches headroom to spare.
 
Nice one Steve, i like the assembly of the worktop you did there. My first prototype was similar but for the final version i went for plywood because it could be made with basic tools easily.
Can i use the pics on my site?

Timothy
 
Back
Top