Mitered Corners

Birdhunter

Member
Joined
Jun 16, 2012
Messages
4,144
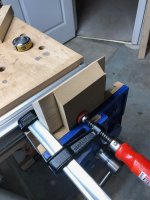
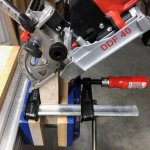
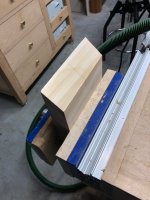
I’ve had miserable results trying to use either a Domino 500 or a Mafell DDF40 to join mitered corners. I’m looking for perfect joints as I am building high value jewelry boxes.

Just using the fence at 45 degrees doesn’t seem to produce what I’m looking for, perfect joints.

Has anyone devised a jig for doing this?

My fallback is running a spline down the joint. This gives perfect results, but leaves a ugly gap at the top of the corner that has to be covered up.
 
Assumption: all mitres are cut to 45 degrees or very very close.

1) Set and check the fence with the head of a combo square or a triangle for 45 degrees
2) Mortise the joints with the DJ
3) Sand or plane down the thickness of the dominoes to create room for the joint to be forced/clamped to a perfect mitre

This will work only if the mitres are themselves properly cut.
 
Perfect miters can be difficult. Sometimes you need a spline/tenon that is not rigid, like a good old biscuit. On smaller scale assemblies I usually just use tape to keep the joints tight and allow the thin stock to bend a little to accommodate the joint geometry.
 
May be obvious but it wasn't for me...the secret to making a mitered box or picture frame is that the opposite sides of the outside of the box/frame are exactly the same length.  I wrestled with unaligned miters that were perfect 45 degrees until I learned this fact.  I now always cut opposite sides together on same fence setting on my CSMS...even if they are not perfect to dimension they are both the same...that is what is key. 

I haven't made jewelry boxes but the geometry would have the same effect if side lengths were a bit off even with good miters.  That is, miters could be spot on, but not align when the whole box was set up. 

As for the domino, on picture frames I simply use a strap clamp to set up the frame and mark where I want my domino; I then undo the clamp, and plunge away on the tight setting--alignment is almost always perfect.  I suspect this is easier on a flat frame than it would be on a vertical box, though. 
 
hemlock said:
May be obvious but it wasn't for me...the secret to making a mitered box or picture frame is that the opposite sides of the outside of the box/frame are exactly the same length. 

That is a valid point not only for mitres but also for carcases. The trick to having pieces cut to identical lengths is to use a stop block. In the case of mitres, do not cut the stock to final length and then mitre the ends. Cut the stock to rough length (slightly over length), mitre one end of all pieces, then use a stop block to mitre the other end (to final length).

However, the mitres must still be cut as close to 45 degrees as possible, otherwise the last joint would be out of fit.

See an example of a tight, gap-less mitre joint on all four corners (I double-checked the Kapex for its square and mitre accuracy before crosscutting) - https://www.lumberjocks.com/projects/410939
 
How do you guys clamp your miter joints?  I built a simple box last week and it was too small for the corner clamps I have (the big Rockler plastic ones) and I could not get a good square clamp with F or parallel clamps. All of the corners were almost perfect to 45 and connected with the smallest dominoes.

I have clamped a waterfall table without issue, but boxes confound me.
 
[/quote]
The trick to having pieces cut to identical lengths is to use a stop block. In the case of mitres, do not cut the stock to final length and then mitre the ends. Cut the stock to rough length (slightly over length), mitre one end of all pieces, then use a stop block to mitre the other end (to final length).

However, the mitres must still be cut as close to 45 degrees as possible, otherwise the last joint would be out of fit.
[/quote]

Exactly!  I neglected to note the stop block...that is key!
 
If you want perfect mitered joints don't use any SCMS, do them on a table saw with a purpose made jig. Search the web and you will find these jigs. I use a DGL that goes to a 10th of a degree and mounts on the slider of my Felder K700SP. For gluing the corners the tape shown works for some but for other builds these works great (4 way speed clamp link) and the Dubuque corner clamps also make a nice addition.
http://www.leevalley.com/en/Wood/page.aspx?p=31162&cat=1,43838
 
Thanks for all the inputs.

I ended up cutting the miters on the 4 box sides with my SawStop Industrial saw canted over to 45 degrees. I got perfect 90 degree corners. The sides were cut to the same length on the SawStop using a stop block that used a MagSwitch embedded in a block of wood.

I made a 6" by 3" by 8" jig with a 45 degree miter cut on the 3"X6" end. I clamp the box sides to the jig to form a 90 degree angle. I set the Domino or DDF40 fence at 90 degrees. The fence lies on the jig's 45 degree face and the cut goes into the box side's miter.

I did two trial boxes and the sides came out perfect.
 
[member=70376]Mtpisgah[/member] Strap clamp, or merle band clamp
https://www.amazon.com/Bessey-VAS-23-2K-Vario-Angle/dp/B00NO6XHZC
https://www.mlcswoodworking.com/shopsite_sc/store/html/smarthtml/pages/merle_clamp.html

Make sure to wear gloves when using the Merle though.  It works really well but is definitely a cut hazard.

Mtpisgah said:
How do you guys clamp your miter joints?  I built a simple box last week and it was too small for the corner clamps I have (the big Rockler plastic ones) and I could not get a good square clamp with F or parallel clamps. All of the corners were almost perfect to 45 and connected with the smallest dominoes.

I have clamped a waterfall table without issue, but boxes confound me.
 
[member=15289]Birdhunter[/member] You have pics of your jig?

Birdhunter said:
Thanks for all the inputs.

I ended up cutting the miters on the 4 box sides with my SawStop Industrial saw canted over to 45 degrees. I got perfect 90 degree corners. The sides were cut to the same length on the SawStop using a stop block that used a MagSwitch embedded in a block of wood.

I made a 6" by 3" by 8" jig with a 45 degree miter cut on the 3"X6" end. I clamp the box sides to the jig to form a 90 degree angle. I set the Domino or DDF40 fence at 90 degrees. The fence lies on the jig's 45 degree face and the cut goes into the box side's miter.

I did two trial boxes and the sides came out perfect.
 
Here are some shots


Attachments

  • IMG_0384.jpg
    IMG_0384.jpg
    1.9 MB · Views: 440
  • IMG_0384.jpg
    IMG_0384.jpg
    1.9 MB · Views: 368
  • IMG_0386.jpg
    IMG_0386.jpg
    1.5 MB · Views: 463
  • IMG_0387.jpg
    IMG_0387.jpg
    1.9 MB · Views: 407
  • IMG_0383.jpg
    IMG_0383.jpg
    1.9 MB · Views: 367
[member=57948]ChuckM[/member] I will try the tape method. I have seen it on YouTube but never tried it.

If that does not work, I will try one of the clamps [member=37411]ear3[/member] recommended. I considered the Woodpecker corner clamps but they are too spendy right now.
 
I use clear packing tape on all my miter joints. I first tape the inside corners so I don’t have to deal with squeeze out. I lay the sides edge to edge with the sides aligned to a straight edge and the pointy edges of the miter up. I apply strips of packing tape across the joint and then flip the sides over so the open miter is up. I apply glue to the miter and close it up. I usually use rubber bands to apply a tad of pressure to the joint. Too much pressure will cause the joint to open slightly. Before the glue dries hard, I peel off the inside tape. Thus, no squeeze out to remove.

This technique works, for me, far better than any clamps I have tried.
 
A few additional tricks.

Remove a little of the interior of the joint with folded sandpaper to make room for glue and get rid of little bits of fiber that might hold the pieces of wood apart (especially if the clamping force is just from tape).

The corner brackets that come with commercial band clamps are too big for small stock. If much of the bracket extends past the joint then the stock will be pushed in, opening the outside of the miter.

You want to concentrate the clamping pressure on the joint only. To do that make a caul out of a split dowel. Double stick it to the sides of the joint. This works best with nylon band clamps but if you stick the caul on well enough you can use other kinds of clamps.
 
Birdhunter said:
I use clear packing tape on all my miter joints. I first tape the inside corners so I don’t have to deal with squeeze out. I lay the sides edge to edge with the sides aligned to a straight edge and the pointy edges of the miter up. I apply strips of packing tape across the joint and then flip the sides over so the open miter is up. I apply glue to the miter and close it up. I usually use rubber bands to apply a tad of pressure to the joint. Too much pressure will cause the joint to open slightly. Before the glue dries hard, I peel off the inside tape. Thus, no squeeze out to remove.

This technique works, for me, far better than any clamps I have tried.

I like the rubber band idea, enough pressure to hold the joint together but not enough to distort the box.
 
Back
Top