Miterfold Origami

afish

Member
Joined
May 25, 2020
Messages
1,514
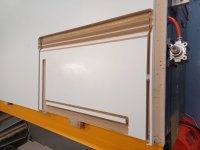
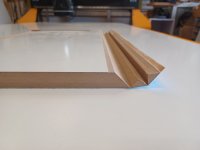
Running some finish panels and didn't want edge banding for the edge.  So, I came up with this. double miter fold but there was still a little exposed so I made the flap to extend the gloss laminate a little further. 
 

Attachments

  • 1.jpg
    1.jpg
    122.4 KB · Views: 245
  • 2.jpg
    2.jpg
    94.1 KB · Views: 249
  • 3.jpg
    3.jpg
    69.7 KB · Views: 248
Very slick. How many trial runs did you have to make before you got it?

It sort of reminds me of the folding drawer box dado blade video I watched some time ago.
 
That was the first one.  However I have done some miter folding in the past so I have already flushed out some of the bugs but I have never wrapped it around itself like that while keeping the front skin intact.  I didnt cut all the way through just kissed the the back side of the finish. This way there is no joint on the face at all.  I did make one pass with the V bit and saw I wasnt quite there yet so I dropped it another .005" and made a small adjustment on the subsequent units, as I bumped/shifted over the 2 smaller triangle pieces to lower the skin to sit more flush when it wraps around. Mathematically it was right but the tiny fibers/glue etc. just dont let it compress fully so I shrunk them ever so slightly. If you look real close you can see its slightly higher its still usable but the rest sit nice and flush. 
 
Pretty slick…do you heat up the folds or does it just fold up? It seems like it’d be brittle with fear of snapping off after all the extra work
 
No heat, just fold slowly. biggest thing is making sure you are fully through the substrate.  If not the pressure from trying to fold/compress any substrate will split the face. You want to just barely see a hair line of white at the bottom of the V groove.  It wont work with more brittle material like laminate and the margin of error is very small. However,  this stuff has some elasticity to it.
 
Its hard to get a close up pic on all that white but here is a pic of the finished panel installed.  the front edge is the double wrapped miter fold pictured earlier.  You can see the recessed led under cabinet light and plugmold (if you look really close in the back) its blurry because I was trying to get a close up on the miterfolded edge. The plan on the backsplash is going to be back painted seamless glass so the only thing that is going to be cut out for in the backsplash is the pot filler.  Otherwise no plugs or switches are in the backsplash to keep it as clean as possible. 

On a separate note this is my first go around with the plugmold and its a bit of a PITA.  There is very little room inside the channel and it takes special wire connectors to fit. there is no way you are going to fit wire nuts in there.  Problem is you cant just go buy these little connectors just anywhere.  Found some on Amazon but no prime so thats a bit of a hold up now.  So plan ahead if you will be cutting or splitting a section of the stuff. Plus the wire is all solid core and very stiff.  I would much rather see some stranded wire in this situation for a little flexibility. 
 

Attachments

  • 20220818_165205.jpg
    20220818_165205.jpg
    65.7 KB · Views: 135
Back
Top