Finally getting around to building this..hopefully I use the mitre saw a bit more now....lol
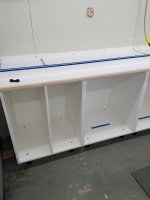
Cabinets are made of 3/4 inch panolam. 24 inches ID. First cabinet with mid panel is going to have 2 vertical pullouts that will hold blue bins for fasteners. The rest will have drawers except for the mitre saw cabinet which will have doors. Still pondering what I'm going to store in drawers so have not decided on depth of all the drawers yet. This was my first attempt at edging with hardwood (maple) as the panolam edges would chip pretty easily. I used 5mm dominos to attach the maple to the edges and finished with varathane. It took me a long time to decide on a fence/stop system. As I have read here, mitre saw fences can be an issue if the wood being cut is warped and can hold it away from the mitre saw fence if not careful. I thought about putting a t track in the top the length of the left top and making a stop so there was no fence in the way, but had already bought the kreg fence stuff a couple of years ago...Decided to mount the fence on t track back to front which allows me to keep the fence back a bit from the mitre saw fence, or move it back even more if I need to slide the left fence on the saw, or all the way back if I need the surface space for other things. There are hoies at the front of the t track that allow enough room to get the t bolts out to remove the fence all together if I want. I used Lee Valley adjustable legs for the cabinets...not sure I'd do that again as trying to level the cabinets was a challenge...this was my first time installing that many cabinets in a row, further complicated by a not so level floor, and some fairly proud 2 x 4's in the wall of my 70's home owner build garage.....but I got there....lol
Still lots to do, and trying to decide whether to try and improve dust collection by adding some sort of shroud behind the saw. It's pretty good now I use a dust cobra for my small tool collection, and it has a lot of suction, but still considering running a line to a shroud from my 2hp bigger collector...just not sure the bigger collector has enough suction to actually be effective.
Thanks to all that posted builds on your mitre saw stations. I've been reading for a long time, and have probably "borrowed" some of everyone's ideas or thoughts!!
Greg