Murphy Bed knock-down hardware - Domino Connectors?

smorgasbord

Member
Joined
Jan 7, 2022
Messages
1,058
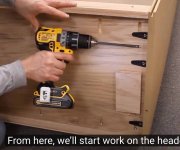
My seemingly never-ending Murphy Bed project is entering it's final stages.

A Murphy bed is a big thing, you assemble it in the room. And when you move, you disassemble and reassemble. I expect to maybe move once more in my lifetime, so not a biggie, but I want this to be strong and for someone after me to figure out what to do.

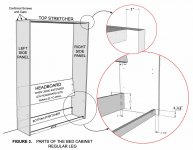
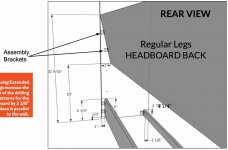
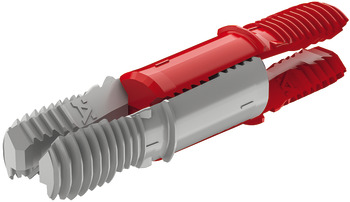
The Murphy Bed hardware kit comes with angle brackets and screws for attaching the top, front kick, back stretchers and headboard to the sides. That doesn't strike me as ideal. I had started down the path of unglued 6mm dominos and pocket screws, but am now rethinking the pocket screw aspect. Maybe I should be using Domino Connectors?

One maybe issue is that I only have a DF700. I do have the Seneca adapter so I can do 6mm and 8mm dominos just fine, which I think means I could use the DF500 connectors.

Question 1: Will I have a problem using with my DF700?

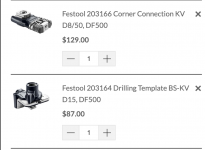
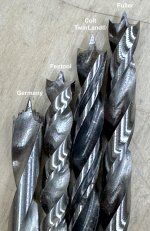
Question 2: Could I buy just the angle connectors (Festool 203166), the drilling guide (Festool 203164), and a 15mm drill bit? I really don't want to spend $435 for the whole kit, as I'd probably only use the angle connectors and don't have a Festool drill.

Question 3: Is this the right path, or should I just cheap out and get some the IKEA style connectors and use the drilling guide I already have? If so, any pointers to a good quality kit of connectors? Or, should I just stick with my domino and pocket screws plan - or something else?

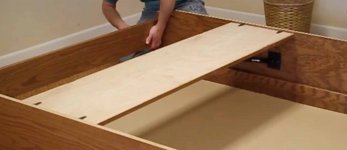
The Murphy bed design is such that neither pocket screws nor connectors will be visible in the finished product from normal viewing angles (most on the back, and the top I'd do from the outside top instead of the inside as is normally done with connectors).
 
I am making some wall mounted cabinets.  I will attach it to the wall.  It will be an added value to the buyer of my house when I sell it.  If the buyer does not want the built ins, there will be a removal fee for that and any scarring to the wall behind the built-in will be the responsibility of the buyer to correct.

A friend just sold his house.  Before selling, he had the house professionally inspected.  He made some of the corrections cited in the report, but not all. 

As part of the contract with the new buyer he had them state that they had read the inspection report.

At closing, they tried to get deductions for the needed repairs.  Nope.  They signed the binder and handed him a small deposit.  They could take the property as is at the stated price or lose their deposit.

He claimed that it saved him $8,000.00 to $10,000.00 in foundation work. 
 
Sorry, I'm still trying to map foundation work to my request on what connector system to use on my Murphy Bed.

I think you're trying to say that since it'll be attached to the wall that I should leave it as part of the house when it's sold, but even so (we might want to take it to a new place depending on the new place's layout), does that mean I should stick with pocket screws or just glue the thing up so it'll need to be destroyed to be removed, or something else?
 
The original reason I bought the 14mm Domino connector setup was for a TwinXL over Queen bunk bed for a client's seashore home. It made doing the full build in my shop easy, transportation to the client's home (by them) easy and reassembly (by them) easy, too. These things just work and with a few slightly shaved wood Dominos to maintain alignment and strength on wider components, it's a great system for beds.
 
Yeah, but this bed is mostly ¾" plywood, some with a ¼" solid wood overlay, so the DF700 connectors are too big.

My original intent was unglued dominos plus pocket screws. Maybe I should just stick to that? It's easy.
 
I've built two beds. One twin for my niece with the DF500 and 2 connectors/dominos.  The second one was a queen I built for my wife and I used the DF700 connectors.  The DF500 connectors did work, but are not nearly as sturdy as the DF700.  At the time I only had a DF500, so that motivated those connectors for me.

If nothing is going to be visible, I would consider the angles or another bed connector.  The one thing I really dislike about the DF500 connectors is that I managed to lose the wedge in the mortise if I unscrewed the posts for easier transport.  The DF700 connectors do not have that problem.

In either case most of the structural support is provided by one or more wooden dominos.  The connectors just keep the two mating pieces tightly held together.

If using the DF500 connectors, I would make sure you have at least 2 of the connectors and two wooden dominos at each joint.
 
smorgasbord said:
Yeah, but this bed is mostly ¾" plywood, some with a ¼" solid wood overlay, so the DF700 connectors are too big.

My original intent was unglued dominos plus pocket screws. Maybe I should just stick to that? It's easy.

Your other option with Festool connectors are the 8mm version. They can be used in .75"/19mm material, although they are a little bit more than 1/3 of the material thickness.

I personally would not be comfortable with the unglued Dominos and pocket screws. The latter is realy gets joint strength from glue and without the glue, things might not be adequate for a bed.
 
Maybe a diagram of how a Murphy bed is constructed, again of ¾" thick material, will help:

[attachimg=1]

and

[attachimg=2]

It's those angle brackets I'm not happy with. I can use them with the unglued Dominos, but I just don't like the brackets. Some kind of personal prejudice I guess.
 

Attachments

  • Bed.jpg
    Bed.jpg
    86.9 KB · Views: 322
  • BedRearView.jpg
    BedRearView.jpg
    60.8 KB · Views: 307
Jim_in_PA said:
Your other option with Festool connectors are the 8mm version. They can be used in .75"/19mm material, although they are a little bit more than 1/3 of the material thickness.

I personally would not be comfortable with the unglued Dominos and pocket screws. The latter is realy gets joint strength from glue and without the glue, things might not be adequate for a bed.

Yeah, in my first post I asked about the DF500 connectors, and then had 3 questions:
1) Can I use them with my DF700 and Seneca adapter?
2) If so, instead of buying the $435 kit, can I just buy the angle pieces, the drilling guide, and use by own 15mm bit?
3) Alternatives to the DF500 connectors.
 
smorgasbord said:
Jim_in_PA said:
Your other option with Festool connectors are the 8mm version. They can be used in .75"/19mm material, although they are a little bit more than 1/3 of the material thickness.

I personally would not be comfortable with the unglued Dominos and pocket screws. The latter is realy gets joint strength from glue and without the glue, things might not be adequate for a bed.

Yeah, in my first post I asked about the DF500 connectors, and then had 3 questions:
1) Can I use them with my DF700 and Seneca adapter?
2) If so, instead of buying the $435 kit, can I just buy the angle pieces, the drilling guide, and use by own 15mm bit?
3) Alternatives to the DF500 connectors.

So far as I'm aware the DF500 connectors use the 8mm cutter, so you could do that with the DF700 just fine I would think.

In my tests the slot on narrow setting for the DF700 was 0.5mm narrower than with the DF500 on narrow, but I couldn't really see that making any practical difference as it's within the realm of tolerance I suspect.
 
OK, cool. And I finally did find this older thread:https://www.festoolownersgroup.com/...s/can-i-use-xl-700-with-df-500-connector-set/

So the 30mm instead of 28mm depth isn't a problem.

I guess I'll just buy the connectors I need and the drilling guide and source a 15mm bit.

For the top stretcher attachment, I'm going to invert where the cam enters. It's usually on the inside, but that's visible to people lying on the bed, so I'm going to place them on the outside. The might affect some fence setting, but I'll experiment first.

Anything else?

Instead of buying the kit, I think I'm going to get:
[attachimg=1]

And now is it really worth $64 to get the Festool 15mm drill bit, or can I use a 15mm Forstner bit with a stop collar?
 

Attachments

  • Screenshot 2024-12-05 at 9.40.20 PM.png
    Screenshot 2024-12-05 at 9.40.20 PM.png
    91.2 KB · Views: 305
I think a bit of the right diameter should work fine as long as you make some test pieces to get the depth right and make sure you don't get off center when you are in the piece.  A forstner bit depending on the height of the cutting edge may not be ideal though as it would not contact the drilling guide all the way down, and you might end up wobbling.  I don't have a bit to try, but that is my main cause for concern using another drill bit.  if you can get a 15mm twist bit, that might be better than a forstner.

If you want to save, I expect you could entirely dispense with the guide and make your own jig that sets the distance just using some center lines to get it lined up. The guide conveniently centers you in the mortise the correct distance away; is designed to work with their drill bit to stop at the right depth, has a vacuum attachment to clear the chips as you are drilling; and a surface to clamp with a Festool quick clamp.

A block of wood with a hole in the right place; and some way to limit the depth would also be effective.

The hole goes through the plywood on top of the mortise, then you break into the mortise and have no resistance, and finally need to keep going a few mm for the mating piece to properly recess around the entire mortise.
 
smorgasbord said:
And now is it really worth $64 to get the Festool 15mm drill bit, or can I use a 15mm Forstner bit with a stop collar?

You should use the Festool fixture and boring drill for this particular thing...the precision is important and the matched set accomplishes that.

And yes, you can use the 8mm connector setup with the DF700, AFAIK...I asked about that awhile back at a "factory demo" when I still only owned the DF700.
 
cpw said:
If you want to save, I expect you could entirely dispense with the guide and make your own jig that sets the distance just using some center lines to get it lined up. The guide conveniently centers you in the mortise the correct distance away; is designed to work with their drill bit to stop at the right depth, has a vacuum attachment to clear the chips as you are drilling; and a surface to clamp with a Festool quick clamp.

A block of wood with a hole in the right place; and some way to limit the depth would also be effective.

The hole goes through the plywood on top of the mortise, then you break into the mortise and have no resistance, and finally need to keep going a few mm for the mating piece to properly recess around the entire mortise.

My thoughts exactly, I'd recommend purchasing both the drill guide (203164) and the drill (203165) and use them together as they really work well and will certainly speed up the job.

If you want to save $$ then make your own drill guide and find/modify your own drills. Using the Festool drill guide by itself really doesn't buy you much other than just being an expensive positioner. The real magic of the drill guide is maintaining the proper cutting depth with the proper Festool drill.

The drill bit, once it breaks through the mortise, MUST produce a pocket on the other side of the mortise that's maybe 1 mm deep. The pocket should also have a fairly flat bottom so choose the brand of brad point drill carefully. For this application, the Colt TwinLand drill would be your best option but the center point height should also be reduced to prevent it from breaking through the other side.

[attachimg=1]
 

Attachments

  • 13149 marked.jpg
    13149 marked.jpg
    591.9 KB · Views: 298
OK, since it's pretty universally recommended, I went ahead and ordered both the guide and the drill bit. Not worth it to me to mess around to save a few bucks since depth is critical.

Thanks for the video list, [member=74278]Packard[/member], but the first one for me showed knock-down hardware and confirmat screws. The second is from the vendor of the hardware I bought, but only covers removing the bed panel. After that you've still got a big box to deal with. You can see the angle brackets in that video, btw. I just don't think they'd be as strong the second time around, certainly not the third.

Here's a shot showing the angle brackets in place. The video doesn't say to remove them:
[attachimg=1]

Here's a shot of a different company's bed showing both pocket screws and KD hardware to remove:
[attachimg=2]

A CU of their KD hardware:
[attachimg=3]

And how their headboard is attached:
[attachimg=4]

On some designs, there are visible screw heads on the side panels that need to be removed. My design doesn't have visible hardware on the side panels.

The biggest problem for me will be aligning the domino holes since most of these joints aren't flush butt joints. The headboard in particular is just sort of there. Mine isn't angled and has a narrow top and bottom piece already (so it's cross-section is a "U"). I've already cut domino mortisers for the back stretcher (6mm though), which is in just a bit from a cutout for the baseboard. Took some careful measuring but not a big deal. I suspect I'll make a few practice joints in scrap and mark that up extensively so I know where the mortise locations will be. One of the great things about the DF500/DF700 is that the machine itself is square and balanced left/right so you can use the markings on the base and/or fence and/or support plate to align and figure it out.

thanks all!
 

Attachments

  • Showing Angle Brackets.jpg
    Showing Angle Brackets.jpg
    24.1 KB · Views: 263
  • pocket screws and KD Hdwe.jpg
    pocket screws and KD Hdwe.jpg
    59.8 KB · Views: 265
  • KD Hdwe1.jpg
    KD Hdwe1.jpg
    20.4 KB · Views: 260
  • KD Hdwe2.jpg
    KD Hdwe2.jpg
    27.6 KB · Views: 260
I use the Hafele spreading connectors.  They fit in 8mm dowel holes.  I drill for several dowels (which supply the structure) and fit 2 or 3 of the holes with the spreading connectors. 

I assembled on-site and used glue on the dowels, and basically the connectors functioned as clamps while the glue dries.

A $120.00 jig was required for the cross drilling.  You tighten an Allen screw to draw the sides together. 

I think I bought everything from Home Decor.

The cross drilled hole was larger than I would like, but is necessary in case the connector rotates slightly in the hole. 

Instead I bought about 100 Allen wrenches.  I drilled a hole just large enough to fit the wrench and I taped the wrench in place with masking tape to keep the locking screw aligned.  It worked perfectly. I think I spent $0.17 per wrench.

Hafele, like Blum, does not produce any junk.  These work as advertised.  However, if the dowels are a tight fit, the connector might not be able to draw the joint closed.  I used straight fluted dowels.  By rolling them on a hard surface under pressure with a flat file, I reduced the diameter for easy assembly.  Once the glue hits the flutes they expand back to their original size and larger.  So no compromise on strength.

These connectors a much cheaper than others. The connectors cost $0.64 each. The jig cost $116.00.  It was easy to use. Below the video, I show my opening order.  I have not used them all at this time.  Where their placement is not visible, I use Confirmats.

Much cheaper now @ $0.12 each.  If you use spiral fluted dowels, the assembly will be simpler.

ppic-00623072.jpg

https://www.homedecorhardware.com/hf-262-11-112.html


RlonG19.jpeg


[member=74278]Packard[/member]  “ I used straight fluted dowels.  By rolling them on a hard surface under pressure with a flat file, I reduced the diameter for easy assembly.”

Thanks for the tip! I didn’t know that one.
 
Packard said:
I use the Hafele spreading connectors.  They fit in 8mm dowel holes.  I drill for several dowels (which supply the structure) and fit 2 or 3 of the holes with the spreading connectors. 
I assembled on-site and used glue on the dowels, and basically the connectors functioned as clamps while the glue dries.
A $120.00 jig was required for the cross drilling.  You tighten an Allen screw to draw the sides together. 

While not suitable for this project of mine (I don't want it glued up and don't think these will be strong enough without that), thanks for the pointer and explanations. These do seem like a great way to clamp up lots of boxes cheaply, especially if you want to flat ship and assemble something like a whole kitchen on site.

 
Now a connector layout question:

The typical construction has the access holes on the inside of a cabinet. Since I'm essentially building a really big cabinet where people will sleep on the inside (looking up even), and not see the top outside of the cabinet, what changes to the layout/milling do I need to make to have the access holes on the outside?

For instance, the typical setting for ¾" is to choose 20mm (10mm to center) for the fence and reference from the outside edge or outside face depending on which piece is being milled. But a 10mm offset from the outside means about an 8mm offset from the inside. Should I be using a different fence setting, or does the system handle a 2mm deeper offset without issue?
 
Back
Top