David Rips
Member
- Joined
- Sep 29, 2013
- Messages
- 20
I have been greatly inspired by the many creative solutions I've seen in this blog for incorporating an MFT/3 into a workshop. As a result, I'm sharing my own design in hopes that it may inspire in turn. Like many of you, I'm a hobbyist, my shop is small and I'm concerned about saving space while maintaining functionality and flexibility. I also wanted to take advantage of the Incra LS positioner and Wonder Fence.
Attached are a few pictures to show the basic features. I've seen some truly beautiful pieces of shop furniture in FOG, and some fairly rudimentary solutions. I suppose mine fits in somewhere in the middle. This is probably the 3rd version of this workbench. I've modified it several times as I've learned from its use. Of course, I welcome your comments and suggestions.
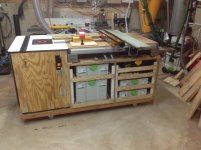
Picture 1: Setup for cross cutting using the LS fence. LS is mounted on 1/2" ply and secured with bench dogs and knobs from under the table.
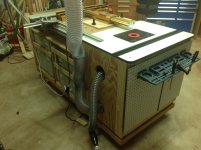
Picture 2: Back side of MFT/3 setup for cross cutting. More systainer storage on the back side along with router table dust collection.
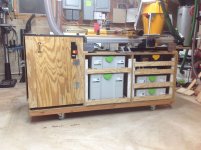
Picture 3: Front of MFT/3 showing systainer storage and router table. Router table is actually a separate unit on adjustable feet so I could level it absolutely with the top of the MFT.
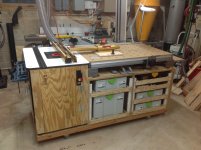
Picture 4: Setup for using the router table with the Incra LS. It takes me about 30 seconds to reverse the direction of the LS, using the same dogs to secure it but using different holes in the MFT/3 top, in order to switch uses.
Picture 5: Incra dust collection box and storage under the router.
Picture 6: Back side setup for router table use. DC connects to the Incra box under the table and the router fence.
Picture 7: End of the MFT/3. I built a sliding shelf, under the MFT/3 top, to have a place to put the TS55 when I'm not using it. The shelf also serves as an outfeed support by placing a stand on the shelf to equal the height of the table.
Attached are a few pictures to show the basic features. I've seen some truly beautiful pieces of shop furniture in FOG, and some fairly rudimentary solutions. I suppose mine fits in somewhere in the middle. This is probably the 3rd version of this workbench. I've modified it several times as I've learned from its use. Of course, I welcome your comments and suggestions.
Picture 1: Setup for cross cutting using the LS fence. LS is mounted on 1/2" ply and secured with bench dogs and knobs from under the table.
Picture 2: Back side of MFT/3 setup for cross cutting. More systainer storage on the back side along with router table dust collection.
Picture 3: Front of MFT/3 showing systainer storage and router table. Router table is actually a separate unit on adjustable feet so I could level it absolutely with the top of the MFT.
Picture 4: Setup for using the router table with the Incra LS. It takes me about 30 seconds to reverse the direction of the LS, using the same dogs to secure it but using different holes in the MFT/3 top, in order to switch uses.
Picture 5: Incra dust collection box and storage under the router.
Picture 6: Back side setup for router table use. DC connects to the Incra box under the table and the router fence.
Picture 7: End of the MFT/3. I built a sliding shelf, under the MFT/3 top, to have a place to put the TS55 when I'm not using it. The shelf also serves as an outfeed support by placing a stand on the shelf to equal the height of the table.