I have no idea how some 'ideas' pop into my head, but one item way high on my to-do list has been a sharpening station. Needless to say, we woodworkers must keep all of our edged tools sharp - as best we can - and having a functional sharpening station at our fingertips is a very good thing to have at our disposal. This has been wishful thinking for years because I have never had a bona-fide sharpening station.
That being said, after I un-crated my new Hammer and got it up and running, I was left with a lot of expensive knotty Austrian pine. That's when the 'idea' popped into my head. So, I drew it up and got to work. The result is shown in the following images. The only wooden items that did not come from the Hammer crate were the drawer bottoms (plywood) and the top (melamine) and bottom (construction plywood) members.
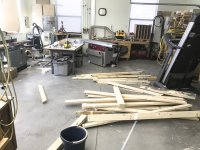
View attachment 1
This image shows the Hammer off of the pallet and the crate material studded with screws. What a chore!
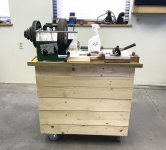
View attachment 2
This image shows the front of the cabinet.
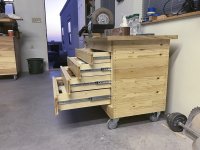
View attachment 3
This image shows the four drawers of the cabinet. I had three 14-inch slides and one 18-inch slide laying unused in the shop so that is what I used for the drawers. All of the drawers are 18-inches deep so obviously the top three do not pull out all of the way, but that is not a problem.
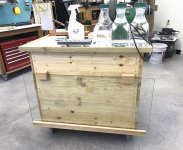
View attachment 4
This image shows the rear of the cabinet. I use this thick glass plate (found in a Chicago alley) when I use wet-dry sandpaper to flatten the backs of my plane irons. It has bounced around for years in a cardboard sleeve and now it finally has a home as do all of my sharpening gear.
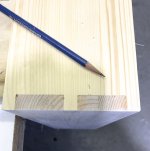
This project was a ton of work removing all of the screws, sorting out the best sections and so on, but I am extremely happy with the result. A lot of the drawer members had to be edge-glued (and biscuited) to get the height required. The following image shows the glued members joined together.
View attachment 5
Another thing that I added to this cabinet was nearly two 50lb bags of sand in the bottom. (This was noted in one of my previous threads) This has made a huge difference in keeping the cabinet firm when in use.
My dear grandparents raised me and one thing that they instilled in my DNA was that I should never waste ANYTHING if I can help it. I don't always meet that lofty goal, but in this case I think they would be proud of me.
Thanks for looking.
That being said, after I un-crated my new Hammer and got it up and running, I was left with a lot of expensive knotty Austrian pine. That's when the 'idea' popped into my head. So, I drew it up and got to work. The result is shown in the following images. The only wooden items that did not come from the Hammer crate were the drawer bottoms (plywood) and the top (melamine) and bottom (construction plywood) members.
View attachment 1
This image shows the Hammer off of the pallet and the crate material studded with screws. What a chore!
View attachment 2
This image shows the front of the cabinet.
View attachment 3
This image shows the four drawers of the cabinet. I had three 14-inch slides and one 18-inch slide laying unused in the shop so that is what I used for the drawers. All of the drawers are 18-inches deep so obviously the top three do not pull out all of the way, but that is not a problem.
View attachment 4
This image shows the rear of the cabinet. I use this thick glass plate (found in a Chicago alley) when I use wet-dry sandpaper to flatten the backs of my plane irons. It has bounced around for years in a cardboard sleeve and now it finally has a home as do all of my sharpening gear.
This project was a ton of work removing all of the screws, sorting out the best sections and so on, but I am extremely happy with the result. A lot of the drawer members had to be edge-glued (and biscuited) to get the height required. The following image shows the glued members joined together.
View attachment 5
Another thing that I added to this cabinet was nearly two 50lb bags of sand in the bottom. (This was noted in one of my previous threads) This has made a huge difference in keeping the cabinet firm when in use.
My dear grandparents raised me and one thing that they instilled in my DNA was that I should never waste ANYTHING if I can help it. I don't always meet that lofty goal, but in this case I think they would be proud of me.
Thanks for looking.