Steve1
Member
I normally post from my "office", but I also keep a second computer in my bedroom. I send mp3's over to it to listen to at night, and also use it for a weekly backup onto it. But it was in desperate need of a nicer desk.
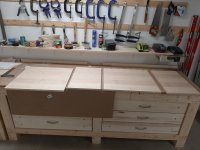
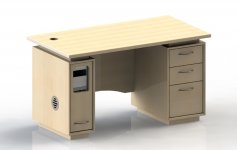
So I made a new desk. Solid maple. Finished first with General Finishes die-stain, 2 parts Cinnamon, 1 part Amber, 2 parts Reducer. Then 3 coats of General Finishes waterborne High Performance topcoat satin on most of it. 4 coats on the drawer fronts and 7 coats on the desk-top. Used my Graco Ultra airless with a 308 tip for the topcoat. I am still on the learning curve on the sprayer. Quite a bit of overspray. I also had some spitting, just as I was finishing up the spray job. The plan was 4 coats on the desk-top, gun started spitting on coat 4, ..... and on coat 5......and on coat 6. But coat 7 was pretty good. That thick topcoat on the top does look pretty nice. Slightly more "blotchy" than ideal -- I might try applying some sizing before finishing, next time.
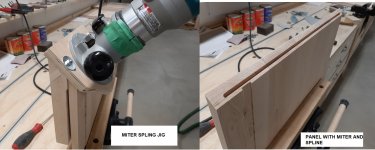
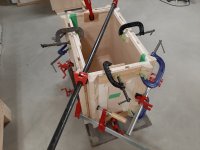
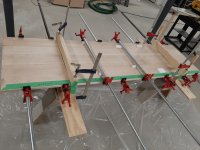
The two boxes are each made from one glue-up, so that I have the waterfall effect on the grain. I have blind splines on the miters to give the joint some extra strength. On the drawer box, however, I made a bit of a mistake, and the spline has the grain running at right angles to the panels.
The drawers are dovetailed birch with maple fronts. Blum undermount slides with soft-close.
I used the "low dollar" tools for cutting the miter spline and biscuits.
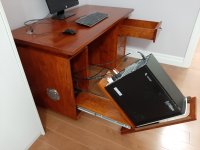
I wanted to hide the computer, so it resides in the LH box. I can slide it out, and tip it forward 45 degrees, so that I am not crawling on the floor when I need to connect cables to the back. I have a 4" vents on either side of that box, and the back is open, so it should have enough airflow.
So I made a new desk. Solid maple. Finished first with General Finishes die-stain, 2 parts Cinnamon, 1 part Amber, 2 parts Reducer. Then 3 coats of General Finishes waterborne High Performance topcoat satin on most of it. 4 coats on the drawer fronts and 7 coats on the desk-top. Used my Graco Ultra airless with a 308 tip for the topcoat. I am still on the learning curve on the sprayer. Quite a bit of overspray. I also had some spitting, just as I was finishing up the spray job. The plan was 4 coats on the desk-top, gun started spitting on coat 4, ..... and on coat 5......and on coat 6. But coat 7 was pretty good. That thick topcoat on the top does look pretty nice. Slightly more "blotchy" than ideal -- I might try applying some sizing before finishing, next time.
The two boxes are each made from one glue-up, so that I have the waterfall effect on the grain. I have blind splines on the miters to give the joint some extra strength. On the drawer box, however, I made a bit of a mistake, and the spline has the grain running at right angles to the panels.
The drawers are dovetailed birch with maple fronts. Blum undermount slides with soft-close.
I used the "low dollar" tools for cutting the miter spline and biscuits.
I wanted to hide the computer, so it resides in the LH box. I can slide it out, and tip it forward 45 degrees, so that I am not crawling on the floor when I need to connect cables to the back. I have a 4" vents on either side of that box, and the back is open, so it should have enough airflow.
Attachments
-
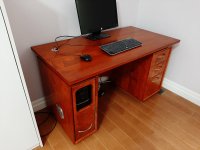 1 - Finished.jpg568.1 KB · Views: 464
 -
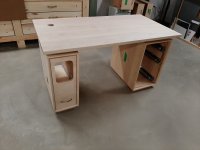 9 - Getting Close.jpg520.6 KB · Views: 302
 -
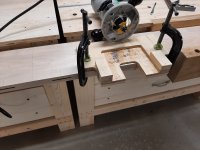 8 - Biscuit joiner.jpg610.7 KB · Views: 270
 -
 7 - Miter and spline jig.jpg395.9 KB · Views: 255
 -
 6 - RH Box Final glue-up.jpg618.6 KB · Views: 279
 -
 5 - RH Box separated.jpg568.2 KB · Views: 279
 -
 4 - RH Panel Glue Up.jpg627.7 KB · Views: 299
 -
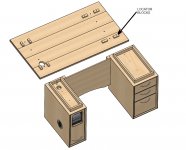
 3 - Design.jpg175.8 KB · Views: 319
 -
 2 - Drawers Open.jpg488.6 KB · Views: 392
") What program do you use to layout 3D design?
What program do you use to layout 3D design?