Discap said:
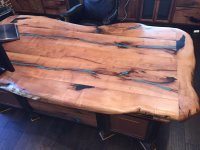
I use System 3 Epoxy from West Systems. Two part 5 minute. You can add dye to it for virtually any color. If you look at the top you can see several large black areas. These are the dye filled voids. The mixed epoxy is simply poured into the voids. Air bubbles form from the heat against the bare wood. I will typically use a brush to seal the edges and fill below full with first batch. Next batch bring it up proud of the surface. Then bring out the Rotex.
Since my last post, i have been looking into "how to's" about filling or repairing wood knots with epoxy along with different surface fillers for texture and/or color for the repairs. I have looked at the West Systems various epoxys and dyes. I have also looked at stone dusts, sands and powders for a more textured look.
Many moons ago, my father called me to assist him with a mural he was doing for Singer Company. He needed advice on the plaster base for the back ground for mounting various objects. He was using plaster of paris and having some problems with it setting too fast and too slow and too hard and too soft. Well, i am sure get the idea. He knew i had worked with real plaster in construction.
His biz was in NYC. I had given it a try working in the city for a three weeks trial soon after I got out of high school. After one week of being cooped up in his little shop, i gave him my two weeks notice. I would rather be outside facing all of the elements mother Nature cold throw at me than in a nice air-conditioned room no matter how interesting the work.
When he called for help with the mural, I already had my own masonry biz >>> and a motorcycle. Dad had rented a warehouse on Long Island outside of the big city. I could ride my bike to and from work with wind, rain, snow or whatever was the order of the day. That was more fun.
I had never worked with fast setting plaster paris before. My dad was using plaster parris and imbedding many small machine parts into epoxy which in turn were imbedded into the plaster parris. I don't remember how we imbedded everything, that was nearly 60 years ago (Hey, I'm only 39. I have just imbedded a whole lot of years into 39) I remember the small parts (sewing machine parts) were some pinned into the plaster, while other parts we enclosed some how into clear epoxy. My dad did the epoxy work. I don't remember how we stuck the epoxied parts to the plaster.
Anyhow, did you use any dust or sand crystals for the color, or just the dye? Does the dye/epoxy mix change color very much from the wet condition to the hardened condition?
The knots on my project were already in serious decay, so I very carefully chiseled them out. Thanks for the note about doing the application in two stages and using the brush against the bare wood. I have that thought filed safely away in my head. I will remember that when I refill those holes where the knots were.
Tinker