My small shop

travisj

Member
Joined
Jun 8, 2015
Messages
365
I have received a lot of inspiration from several of the shop and project threads here on the FOG.  I always wanted to give something back to the Forum since I have received so much.  I decided I would start a thread on my small shop and what I have done and will do to increase organization and productivity.  Maybe I will inspire someone else or something I have done can be improved upon by someone with a better skillset. 

As for a brief background.  I am a hobbyist.  I have twin 10 year old girls that keep me pretty busy, meaning my shop time is limited.  About two years ago my parents decided to move back to their hometown about an hour North of the Twin Cities (Minnesota) and my wife and I decided to buy the house I grew up in (bigger house, better school district, etc...).  When my dad built this house in 1984, he had a 15' x 15' shop built into the back of the attached garage.  This is now my shop space.  It was insulated, but not heated.  I hung a thermostat controlled electric heater from the ceiling to make it more bearable to work out there in winter.  It also keeps anything from freezing.

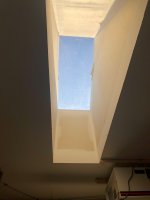
It has a concrete floor that is one step higher than the garage floor and french doors that open to the garage.  The crown jewel of the shop is that it has a skylight (the only one in the house).  My father always wanted natural light in the shop.
[attachimg=1]

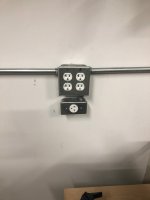
When we moved in the entire shop was on one 15amp circuit.  The panel for the house is on the opposite end of the house and it is located in a finished bedroom.  Since there was no good way to run power from the panel to the shop, about a year and a half ago I hired an electrician to run cable outside and around the house into the shop for a 60amp distribution panel in the shop.  This gave me the flexibility to do what ever I wanted/needed for power.  I chose to run conduit on the outside of the drywall to make changes easier.  I ran duplex 20 amp outlets every six feet.  I had the right outlet pair on one 20amp breaker and the left pair on a separate 20amp breaker.  A few weeks ago I added three 20amp 220v outlets in the middle of each of three walls.
[attachimg=2]

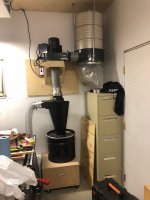
The first project was to upgrade my dust collection.  At our previous house I used a Rockler Dust Right wall hanging dust collector.  It worked OK for my table saw and router table, but I was do for something bigger.  I decided to buy the 2HP Harbor Freight dust collector and do the popular Oneida Super Dust Deputy/Wynn Environmental Filter modification.  To save space, I decided to hang the filter from the ceiling and the dust collector motor from the wall.
[attachimg=3]

The performance of the dust collector has impressed me for what it is.  My original intention was to run ductwork to all of the necessary tools, but I am still moving a flex hose from tool to tool as needed.  It works for me and isn't overly complicated.  I did run a PVC run from the collector to the opposite corner of the same wall and have my Rockler expandable hose attached from there.  I use the original version of the Rockler Dust right quick connect dust ports so changing is simple.
 

Attachments

  • IMG_2619.jpg
    IMG_2619.jpg
    1.2 MB · Views: 3,339
  • IMG_5640.jpg
    IMG_5640.jpg
    1.2 MB · Views: 3,267
  • IMG_2546.jpg
    IMG_2546.jpg
    1.6 MB · Views: 3,651
I have tried replying to this post several times and for whatever reason, I cannot do it.  If multiple posts pop up, I apoligize.
 
My first project in the new shop was to build a cabinet for my MFT table.  I wanted the working surface to be the same height as my table saw and my Sjoberg's bench so that any one of them could be support for the other two.  I wanted to maximize the systainer storage under the MFT and let that dictate the size of the cabinet.  This is what I came up with.View attachment 1
 

Attachments

  • IMG_2684.jpg
    IMG_2684.jpg
    2.1 MB · Views: 1,320
There are two bays for systainer storage on the long side (both 444mm wide) and also two bays on the short side (444mm).  This created a cabinet larger than the MFT table.View attachment 1
 

Attachments

  • IMG_2683.jpg
    IMG_2683.jpg
    1.9 MB · Views: 728
Both my computer and Tapatalk are locking up when I try to post images.  I will attempt to continue this thread at a later time

Sent from my iPhone using Tapatalk
 
Great idea on running the extra 220/240 volt outlets. The dual 120 services are already within arms reach so it’s easy to add the 220/240 circuit. [smile]

I’ve run dual 120 services in the basement and have marked them by using black and white receptacles. They’re instantly recognizable from across the room.
 
Cheese said:
I’ve run dual 120 services in the basement and have marked them by using black and white receptacles. They’re instantly recognizable from across the room.

I wasn't that creative.  I just marked the plates with a sharpie.  All of the left pairs of outlets are on breaker 1 and the right pair are on breaker 3.  For the 220, I actually pulled new wire and have them on a seperate 20 amp 230v circuit.  I did this for the bandsaw that I picked up about a week ago.  I wasn't sure exactly where I wanted to put it and I didn't want to run electrical more than once.  It was my first experience with the Wago push in connectors that you and several others have commented about on here in the past.  They were so much easier to work with than traditional wire nuts.
 
888aeb87435dcce25a437bd16b65c163.jpg


The added depth of the cabinet provides an added benefit besides the increased under table storage.  It allows clearance for both the protractor head arm and the rail.  Normally this cabinet is against the wall and the added setback allows the rail to be pivoted up with enough clearance for the clamps I have hanging on the wall above it.

Sent from my iPhone using Tapatalk
 
ee225f925240c2cf7b942b8c611d4401.jpg


The MFT is positioned on the cabinet by the four small cleats pictured here.  They are located so that the left short side and the front long side of the MFT is flush with the cabinet to facilitate vertical clamping from the MFT’s rails.  The MFT is a tight friction fit over the clamps allowing it to be lifted off and the legs reinstalled to retain its portability if needed.

Sent from my iPhone using Tapatalk
 
No.  The exposed block that you see is the top course of the foundation.  The shop space shares two walls with the living space.  I opened up this wall as there is a bathroom on the house side.  I’m going to put a sink in the shop, just trying to decide what form (laundry tub, 2 basin kitchen, etc...).
c08a85d312c25669dfc86de2573ac593.jpg


Sent from my iPhone using Tapatalk
 
Years ago I picked up a Sjoberg’s bench from Rockler on clearance ($200 if I recall).  It is approximately 20” x 60” (500mm x 1550).  Originally it had a shelf support to somewhat solidify the legs.  It was a decent bench, but it was too light and flimsy for much.  Soon after I assembled it I decided to build a cabinet for underneath to add rigidity and heft.  I designed a cabinet, ordered the slides, and nothing.  Fast forward 5 years to a couple of weeks ago and I decided to finally get it done.  A lot of my tools are still packed from when we moved and I finally need to start getting organized.  The legs of the bench had a series of vertical holes already in place (I assume for their cabinet to mount to).  I simply made a case that fit within those dimensions.
bc1a428cd06e5ea95a34c1472ecb1a7e.jpg

Then batches out some drawers.
220a064ca07de44c6140af0f37db4119.jpg

The VacSys was awesome for this.  Normally in the past for shop stuff I made the drawer face part of the box.  This time around I decided to do false fronts.
d5385f5f91ce77268e69e6bb99e39b7b.jpg

I remember years ago watching Norm Abram build a shop cabinet and he cut all of the drawer fronts out of a single sheet to have grain continuity.  I know it’s been done by a million people, but he was the first I saw do it, so that’s who I’m giving credit to.
a028f129cb564545726bb97ef643bb88.jpg


Sent from my iPhone using Tapatalk
 
Very nice work. Looks like you took your time and thought things out and they are fitting nicely together
 
Thank you.  I have been pretty happy with everything.  My biggest problem is that since my shop time is limited I tend to try to rush things.  It tends to create problems at times.  I need to learn to slow down a bit.  Being organized should help.

Sent from my iPhone using Tapatalk
 
In the center of the shop is my table saw/outfeed bench.  The saw began life as a SawStop PCS1.75 which has been converted to a PCS3.0.  At our old house I had more space and my previous Powermatic had a 52” fence so when I replaced it I got the 52” fence on the SawStop.  My shop space is 15’ wall to wall and I have the saw positioned that there is a little over 9’ on the outfeed side of the blade.  To rip 8’ or longer stock, I need to open the doors, that open into the garage, that are directly behind the infeed side.
73fb4ec7c636839dbb6ec0d574decb3c.jpg
37e8144fd2c1c5f890d288622bf24521.jpg


Sent from my iPhone using Tapatalk
 
Before I started building the outfeed bench, I decided that a stand alone router table took up too much space.  I went with the SawStop cast iron table and mounted it to the left wing of the saw.  I used an Incra Mast-R-Lift, the SawStop dust box, and a Jessem PowRTek remote controlled router.
a25ee3363d46da4899656224e136a10e.jpg

This combination put the overall length of the saw at about 101”.  Then I could start figuring out my outfeed solution.

Sent from my iPhone using Tapatalk
 
My out feed bench is about 30.5” by 100”.  When I was designing it, I wanted to maximize Systainer storage along with other storage.  I started by using the 444mm bays that I had used on my MFT cart (that width works with the drawers I came up with).  The three bays closest to the wall are all a little over 600mm deep and I used 600mm slides for the drawers. 
a4dcf4ac1ef5c93c18b44d48e2518a36.jpg

This allows 2 Systainers per drawer.
2fa5954f47bf8473599ccbf16a9e2497.jpg

The bottom drawer closest to the wall was to house my 2 VacSys modules, but since I have not put the VacSys SE 1 in its Systainer since I have gotten it, I chose to keep the pump in that drawer as well
d696e904a4bd761adc48245e3c7addf4.jpg


Sent from my iPhone using Tapatalk
 
The closer double wide bay uses drawers that are about 500mm deep with 500mm slides.  They had to be shallower due to the way the dust collection comes off of the back of the table saw.  I did a layout grouping Systainers that should be grouped together (Carvex and acc., sanders together, Domino 500 and tenon Systainer, etc...).  I then went back and fit some general drawers into the remaining spaces.
af835c53a1eb507d01f2b32dadf0f0ad.jpg
2db73c4e05b5d0fbd747aa2bc42cd089.jpg


Sent from my iPhone using Tapatalk
 
On the end next to the router table, I made a bay 444mm wide with the intent it keep my router accessories.  I made two Systainer drawers and two regular drawers.  I am going to remove the Systainers and replace this side with all regular drawers.  I have too many bits and the two drawers I have are not enough.
8721e6f62e1c6e8ee43113e9760ae198.jpg

Since the PowRTek LED is always on when it is plugged in, I added a power strip to the end of the bench which gave me a switched outlet.  Below that is the dust collection ports for the table saw (bottom) and router table (top).  The edge of the bench also gave me a place to mount the PowRTek controls.
243e58838d413d0592995f7b31508be3.jpg

The dust ports were made by using Rockler’s 4” through wall dust collection accessory.  I was able to buy a few of the parts piecemeal and out this together.  It works great for my needs.

Sent from my iPhone using Tapatalk
 
The top of the outfeed is a sheet of MDF that I cut down and is setting in a rabbet of sorts from the outer frame of hard maple.  I inset Misumi Engineering t-track into the maple on the horizontal and the vertical sides.  The top is supported in 6 places with cross pieces and there is a shelf above the drawers (below the top) for some storage and to facilitate clamping through the system holes.  The holes were created by using the Parf Guide and are in the top for the length of the cast iron on the saw.  The far left of the bench does not have any holes.  I then coated the MDF with Howard’s Feed N Wax.

Sent from my iPhone using Tapatalk
 
Back
Top