My take on the
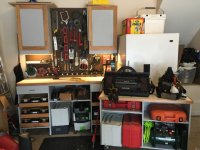
System workbench and cabinets. Since I am not planning to use this for woodworking I eliminate
torshion box top and the rails and peg mounts. I also made the cabinets wider to fit Stanley Fat Max sort boxes.
The rolling cabinet on the right is the low cabinet with wheels added. No doors because of the limidted clearance when the cars are in the garage.
Overall I was quite pleased with the results as this was the first time that I have made cabinets. It was a very satistied feeling when I slid the drawer bottom into place and the drawer box popped into square. I started with the low cabinet, which is a little out of square, then the workbench, which is not as bad but still not square and finished with the wall cabinet doors which came together quickly and square.
Major tools that I used:
1. Festool track saw with the 4 ft and 10 ft rail.
2. Bosch compound miter saw
3. Festool and Porter Cable routers
4. Porter Cable palm sander
5. Multi-Function slab on Stanley Fat Max sawhorses adjusted for a tall guy.
6. Parf and Quazz dogs
7. Kreg cup hinge, 32mm and pocket screw jigs
8. Woodpecker Square
9. Hitachi 18ga nailer
10. Rolair compressor.
After fighting to get that first cabinet close to square, I regrouped and made the following improvements to the processes.
1. Bought a Woodpecker and a Starrett square to replace the framing square I had been using
2. Used the squares to verify layout, jig setup and assembully.
3. Used a story pole for layout.
4. Used jigs and clamps as much as possible.
5. Do all of the cuts in batches. Do all of my rips, then do all of my crosscuts.
6. Took more breaks and cut my daily hours on the project. A tired woodworker is a inaccurate woodworker.
Thanks to everyone here and on YouTube for sharing their knowledge. Especially Tim at benchworks.be for a great set of plans.