Need to cut a clean 1 3/4" hole thru laminate and plywood...

Joined
Jun 23, 2024
Messages
88
I need to cut two holes thru my new laminated covered plywood bench top.  One of them is 1 3/4" and the other is 1".  What be the best, i.e. cleanest, way to do this?  Would forstner bits be the way to go?  I'm not sure I can source the 1 3/4" locally and I'd really like to finish this project this weekend.  I'm thinking hole saws would not give a very clean cut, but I can get those locally.  Maybe hole saws and then clean them up with a 1/8" round over bit in the MFK 700?
 
Use a hole saw to make a template, use a smaller hole saw to cut the initial opening, then use a router with guide bushing or ball bearing bit to finish the cut.

 
I have gotten very good results with hole saws. I think the pilot drill is quite helpful in this. Forstner bit that size is a horror unless you use a drill press, or maybe if you make a wooden guide bushing that exactly fits the forstner.
I have a Surform rotary rasp that has been useful in enlarging holes made with hole saw.
 
smorgasbord said:
Use a hole saw to make a template, use a smaller hole saw to cut the initial opening, then use a router with guide bushing or ball bearing bit to finish the cut.

I would go for the template method as well. I would probably use the Shaper Origin to make it, but that's not the point.

A 1 3/4" Forstner bit is much more of a drill press item, not exactly laminate-friendly either. I have a carbide-tipped one for drilling lock holes, in cabinet doors, but it's more of a spur-type bit and only 3/4" diameter. That is also something I used to do quite frequently.
For a single hole, especially on a large item (that won't fit on a drill press) a template/router makes the most sense.
 
Okay, so use the hole saw to cut the correct size hole in a scrap of plywood to make the template.  Clamp or secure the template to the workbench top and then use the router to cut the actual hole. 

Since I don't have a plunge router, should I use normal drill bits in my drill to get a hole large enough for the router bit to fit in and then go to town with the router?  Or use this as an excuse to buy a 1010 or 1400?  lol
 
Use a hole saw in the finished size.

Drill through until the pilot drill just pokes through the far end.

Then turn the stock over and drill from the other side using the pilot drill to assure alignment. 

Avoid human error by using a drill press.

I’ve done this many times using thin veneer plywood which will naturally splinter as you drill through. 

If you have scrap, test and practice first. 

The key is keeping the hole saw level.  You don’t want to enlarge the pilot hole.  It needs to be the same size as the pilot drill or you will get some misalignment.  That will only happen if the drill does not go through the stock straight. 

Or…

Drill the pilot hole first using a same size drill bit as on the hole saw.  Then drill about 1/4 of the way through from one side and finish drilling from the far side. 

If this is for a door, the door hardware will have a bezel to cover the hole’s edges. 
 
sawdust-samurai said:
Since I don't have a plunge router, should I use normal drill bits in my drill to get a hole large enough for the router bit to fit in and then go to town with the router?  Or use this as an excuse to buy a 1010 or 1400?  lol

As I said, use a smaller size hole saw to cut an initial hole. Then a non-plunge router with a bearing guided bit against a clamped-on template for the finishing pass. If you're cutting a 1.75" hole, then drill with about 1.5" hole saw, for instance. You don't want to be removing lots of material with a flush trim bit if you can avoid it.
 
Blue tape over the area, metal hole saw with finer teeth rather than wood hole saw with bigger teeth.
What we would use all the time drilling out grommet openings on office laminate tops. Be gentle, not too much speed or force until you get through the laminate top side.
Once the pilot hole comes out the bottom, drill out most of the wood from the bottom side. Don't poke up thru the laminate.
The router bit sounds great but way too cumbersome for me.
 
I normally just drill a pilot hole through the top and a piece of scrap MDF to line them up, then clamp the MDF to the top and use a hole saw to cut through both, gives a very nice clean edge.
 
A good hole saw and arbor are all you need. If you’re concerned about exit tear out clamp a sacrificial board to the bottom or core thru 7/8 of the thickness from the top then finish from the bottom, the pilot bit will mark where you need to drill from the bottom.

Tom
 
One more vote for a hole saw, blue painters tape, start from the top surface and gently break through the laminate surface, then finish the job from the bottom.

Actually, I drill the 1/4" diameter pilot hole from the top using a Big Gator drill template. This ensures that the hole will be 90º to the surface and reduces the potential for hole saw chipping.

I'll also drop the pilot drill in the hole saw as low as it will go to give additional guidance.

[attachimg=1]
 

Attachments

  • 4513.JPG
    4513.JPG
    349.5 KB · Views: 316
Thanks for all the great advice guys.  These holes were to pass come wiring harnesses through a table top and I decided to break the harnesses down some so that I would not need such big holes.  In the end I used a 5/8" spade bit to drill a pilot hole in the table top and a 1 1/4" hole saw to make a template.  I then used the MFK with a flush trim bit followed by a 1/8" round over bit.  This yielded a nice clean hole with an eased inside edge that easy on the wiring.
 
Cheese said:
One more vote for a hole saw, blue painters tape, start from the top surface and gently break through the laminate surface, then finish the job from the bottom.

Actually, I drill the 1/4" diameter pilot hole from the top using a Big Gator drill template. This ensures that the hole will be 90º to the surface and reduces the potential for hole saw chipping.

I've never seen that drill template, it is pretty cool!
 
Oops!  I see I was a day late.

They say, “A picture is worth a thousand words.”  This post would have been a lot longer without the images.  [eek]

Last night I took an old holesaw that I’ve used many times to cut cable access to a work top.  The hardware is 2” nominal and I think this saw is 2-1/8”. 

cablemanagementholder.jpg


You will probably find more uses for this size than 1-3/4”.

It is no longer sharp enough to use effectively on plywood, though it is OK for MDF and particle board.

You can introduce operator error by rocking the saw from side to side while drilling.  That will result in an enlarged pilot hole which will make registration on the second side iffy.

There are two ways to avoid this:  Either drill the pilot hole in advance using a guide as shown in the post above, or as I did, drill in a drill press.  For a table top, you will probably have to use the pilot hole method, per Cheese’s post.

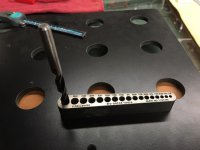
The photo labeled #1, was my first cut.  I drilled until the pilot drill was exposed.

The photo labeled #2, was my second cut from the opposite side.

The hockey puck was the piece I pulled from the hole saw.  Note the parting line.

The dull blade cut so slowly that it generated enough heat to melt the glue in the plywood.  It really was not suitable for plywood and a new blade would make a cleaner cut.

If you go with one of the cable pass through devices, this all becomes moot as they include a grommet to hide the cut edges.

bU8XCQ9.jpeg


G1vOVY3.jpeg


The “hockey puck” waste shows the parting line roughly in the middle.  The hole will also have some of the same.

l17V1Nt.jpeg


Additional notes:

The Gator drill guide is the Steinway of the drill guides.  If you are going to use it often (especially if you don’t have a drill press), then it is probably the way to go.

Milescraft  and Kreg make much less expensive versions using an injection molded base with steel drill bushings.  I have the Milescraft version and it is entirely competent.

As a side note:  It is impossible to get a suitable interior bore finish for these devices. Zinc plating will not “reach” inside a bore.  Nickel plating will, but nickel is so soft that it will abrade off the first time you use it.

There are two approaches to deal with this issue.  The first is to wrap it with an oily rag when you are done with it—but that can be messy.

The second is to use a vapor emitting, rust preventive paper, poly bag or poly tubing.  U-Line and Amazon carry versions of this.

The simplest way is to lay a sheet of this paper in your Systainer.  You can attach it to the walls, bottom or top. 

The sheets emit a (perfectly safe) vapor that combines with the oxygen in the box; the deficit of free oxygen molecules means that oxygen is not available to oxidize (rust) the tools. 

But note that these sheets only work if the container is typically in the closed condition, and eventually the paper has to be replaced after most of the vapor has been released.  The vapor is heavier than air, so it will last a long time in a container that is accessed from the top.

When I was still working, we used these vapor emitting sheets regularly.  They resemble heavy brown kraft paper.  They were perfectly capable of solving our rust problem when we shipped unfinished steel goods to the metal finisher.  We ordered directly from the manufacturer, but minimums apply there.  I think Uline or Amazon would be a better source for this stuff if you don’t use large quantities.

Here are some of the vapor emitting products:https://www.uline.com/Grp_89/VCI-Pr...5xNmB27Q-TOGgNiAy3fq2VUOs1KpkXqIaAqbREALw_wcB

Here is my search for cable pass through hardware.  Most are made from resin. The correct hole size will be specified on the packaging.
https://www.google.com/search?q=cable+pass+through+desk+plate&client=firefox-b-1-m&sca_esv=fbc34415c57d9a54&sxsrf=ADLYWIJMYsqApmgiv-b89zLJHy__3punBA%3A1728303265871&ei=odADZ5ffNL-X5OMP4pTyoA8&ved=0ahUKEwjXs-exn_yIAxW_C3kGHWKKHPQQ4dUDCA8&oq=cable+pass+through+desk+plate&gs_lp=Egxnd3Mtd2l6LXNlcnAiHWNhYmxlIHBhc3MgdGhyb3VnaCBkZXNrIHBsYXRlMggQIRigARjDBDIIECEYoAEYwwRIuOUBULQxWKqxAXADeAGQAQGYAZ4LoAHiNKoBDzAuNS4xLjIuMC4yLjAuM7gBDMgBAPgBAZgCDKACvR_CAgoQABiwAxjWBBhHwgINEAAYgAQYsAMYQxiKBcICBxAjGLACGCfCAgcQABiABBgNwgIGEAAYBxgewgIIEAAYBxgIGB7CAggQABgFGAcYHsICChAAGAcYCBgeGA_CAggQABgHGB4YD8ICCxAAGIAEGJECGIoFwgIIEAAYBRgNGB7CAgoQABgFGA0YHhgPwgIIEAAYCBgNGB7CAgsQABiABBiGAxiKBcICChAhGKABGMMEGAqYAwCIBgGQBgqSBw0zLjMuMy4xLjYtMS4xoAfQYQ&sclient=gws-wiz-serp
 
sawdust-samurai said:
I've never seen that drill template, it is pretty cool!

Cool yes...small & convenient yes...handy as hell...hell yes.  [big grin]

I carry it along with the installers kit for all install projects. You don't always need it but the small form factor is a winner. The hardened alloy they cast it from has a certain amount of natural lubricity inside the pilot bore holes and also deters corrosion. They offer versions for metric & imperial drill use along with a version for centering cutting taps. It is the next best thing to a mobile drill press.
 
Packard said:
Oops!  I see I was a day late.

They say, “A picture is worth a thousand words.”  This post would have been a lot longer without the images.  [eek]

Last night I took an old holesaw that I’ve used many times to cut cable access to a work top.  The hardware is 2” nominal and I think this saw is 2-1/8”. 

You will probably find more uses for this size than 1-3/4”.

I frequently use those 2" cable grommets.  When they are a little bit loose in the pre-drilled hole, I take one wrap (or maybe two) with electrical tape around the grommet and slide it into the hole with light, gentle force.  The grommet stays in place much better and doesn't pop out when a customer pulls cables through it. 
 
Packard said:
If you go with one of the cable pass through devices, this all becomes moot as they include a grommet to hide the cut edges.

bU8XCQ9.jpeg

G1vOVY3.jpeg

l17V1Nt.jpeg


Additional notes:

The Gator drill guide is the Steinway of the drill guides.  If you are going to use it often (especially if you don’t have a drill press), then it is probably the way to go.

Milescraft  and Kreg make much less expensive versions using an injection molded base with steel drill bushings.  I have the Milescraft version and it is en
Cheese said:
Thanks for the additional info Packard.  I've always disliked those passthrough covers.  To me they just look cheap.  That said, the one you posted a pic of does look better.

I don't think the ~$30 cost of the Gator guide is too bad, and I am coming to hate the plastic that Kreg uses in their products :(
 
If you modify the pass through search to read, “cable pass through, metallic finish”, you will end up with the classier versions.

There are resins available for injection molding that are “plate-able grade ABS”, which is just ABS plastic that will conduct electricity.  You can apply any metal plating you want on these parts.  They are widely used in the automotive industry.  It is likely that these metallic parts are plastic with an electroplated finish.
https://www.google.com/search?q=cable+pass+through+desk+plate+metallic+finish&client=firefox-b-1-m&sca_esv=fbc34415c57d9a54&sxsrf=ADLYWIId_6NxQUiIDHx2Lge1JlJnNCzUbQ%3A1728418545642&ei=8ZIFZ8_fJoesiLMPjtra-QE&ved=0ahUKEwiPnL7rzP-IAxUHFmIAHQ6tNh8Q4dUDCA8&uact=5&oq=cable+pass+through+desk+plate+metallic+finish&gs_lp=Egxnd3Mtd2l6LXNlcnAiLWNhYmxlIHBhc3MgdGhyb3VnaCBkZXNrIHBsYXRlIG1ldGFsbGljIGZpbmlzaDIIEAAYgAQYogQyCBAAGIAEGKIEMggQABiABBiiBDIIEAAYgAQYogQyCBAAGIAEGKIESJhsUOcmWLVmcAd4AZABAJgBywKgAegLqgEHNC4xLjMuMbgBA8gBAPgBAZgCD6ACzQrCAgoQABiwAxjWBBhHwgIHECMYsAIYJ8ICChAhGKABGMMEGArCAgUQIRirApgDAIgGAZAGCJIHBjEwLjIuM6AHiyw&sclient=gws-wiz-serp

I took a close look at my Milescraft version this morning.  The body is molded plastic with two anti-slip silicone inserts.  It is shaped to ride on a pipe like a cowboy on a horse.

The metal part does have me confused.  It is clearly a casting—probably stainless steel. 

But it looks like there is a spring steel insert for a wear surface.  But I am not able to tell.

It does have notches so that you can align the centerline on both axis when drilling.  Handy.

It was about $10.00 when I bought it.  It appears to be about $12.00 now. 

Milescraft stuff looks and feels cheap, but always works well and is always a good value.  I’ve bought several small items from them and they have always been satisfactory.

But note, none will feel like a quality piece like the Gator version does.  Though I think if you are cross drilling a round rod, the Milescraft piece will work better.

1335_S1.jpg


As a 40 year locksmith, another trick I use, actually two tricks.  I use the Gator drill guides with a 1/4” plastic drill as it will give a clean through hole. Once the hole drilled I put the guide drill for the holesaw in with the smooth rod to guide the hole.  Using the twist drill as the guide will often allow the holesaw to wobble.  I’ve often thought I should get straight drill rod for that purpose it still just reverse the guide drill.
 
Back
Top