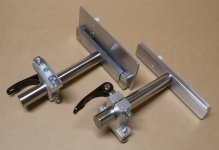
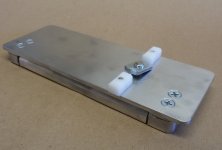
I built this guide rail support unit for my worktable over a year ago. It proved to be very sturdy, with zero play, and excellent repeatability when the guide rail is raised, lowered or reinstalled. This is my second prototype, hence RSU2. The set consists of two support blocks with cam clamps, two steel raiser rods, front horizontal support, and a rear hinge.
[attachimg=1]
1) This design addresses some known issues with stock supports by Festool. Namely, a) lack of repeatability and the need to re-square the setup often, b) excessive play where the guide rail engages frond support bracket. These issues caused many to use tall bench dogs for rail positioning instead, which has its drawbacks, especially when cutting narrow or small stock.
In my design the rail always registers perfectly due to tight fitting plastic (UHMW polyethylene) splines and precise fit of the raiser rods.
[attachimg=2]
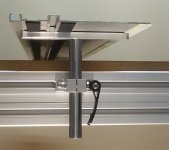
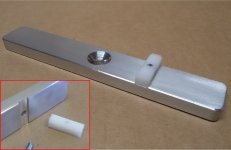
2) The raiser rods support blocks attach to the t-slot in your bench or cutting table. The spline ensures that the block is perfectly aligned and the rod is always perpendicular to the table surface. The slot milled in to the block is 8.6 mm wide. It matches Festool MFT3 t-slots. For use with 8020 type extrusions the spline has to be modified to fit 8.3 mm t-slot. The spline can also be removed completely to attach the block to any regular bench or flat surface. I intentionally made it this way (with removable spline) for easy modification.
[attachimg=3]
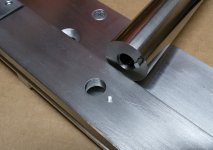
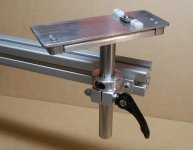
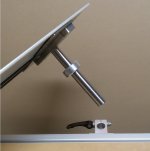
3) The rods lock securely by cam clamps in any position.
[attachimg=4]
[attachimg=5]
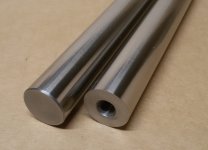
4) The rods are 416A stainless steel, 20.0 mm in diameter, drilled and tapped to M8 on one end. FYI: 416A SS is softer and less corrosion resistant than other SSs. It is also magnetic.
[attachimg=6]
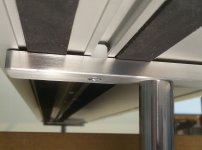
5) The support bar and hinge are made of 6061 aluminum. The hinge pivots on polished steel pins with nylon washers. Just like in all other components plastic splines that engage the guide rail are placed in slots and screwed to eliminate any lateral movement during use or reinstallation (original Festool hinge fastener allows some lateral play there).
[attachimg=7]
[attachimg=8]
6) When the raiser rod is locked and the rail is lifted or lowered the hinge/rod assembly may inadvertently experience torque. To prevent the central screw from loosening I installed an anti-rotation pin next to the screw. This is just a precaution. I used the setup without the pin for over a year and the screw never got undone.
[attachimg=9]
7) Using round raisers has added benefits. With the optional shaft collar the support block does not have to be clamped. If you lower the cam lever slightly to make the rod just snug the rail can simply swing out of the way left or right after the cut.
[attachimg=10]
[attachimg=11]
In addition, the guide rail can be positioned at any angle to the table. It is useful for miter cuts on long stock. Simply loosen the bolts and slide support block(s) in either direction.
[attachimg=12]
8 ) Removing the rail is easy. Release the cam clamp and pull out the rail with the hinge still attached to it. When you reinstall, it will be at the exact same position. No need to re-square.
[attachimg=13]
I have some improvements in mind, so perhaps I’ll come up with RSU3 in the future.
[attachimg=1]
1) This design addresses some known issues with stock supports by Festool. Namely, a) lack of repeatability and the need to re-square the setup often, b) excessive play where the guide rail engages frond support bracket. These issues caused many to use tall bench dogs for rail positioning instead, which has its drawbacks, especially when cutting narrow or small stock.
In my design the rail always registers perfectly due to tight fitting plastic (UHMW polyethylene) splines and precise fit of the raiser rods.
[attachimg=2]
2) The raiser rods support blocks attach to the t-slot in your bench or cutting table. The spline ensures that the block is perfectly aligned and the rod is always perpendicular to the table surface. The slot milled in to the block is 8.6 mm wide. It matches Festool MFT3 t-slots. For use with 8020 type extrusions the spline has to be modified to fit 8.3 mm t-slot. The spline can also be removed completely to attach the block to any regular bench or flat surface. I intentionally made it this way (with removable spline) for easy modification.
[attachimg=3]
3) The rods lock securely by cam clamps in any position.
[attachimg=4]
[attachimg=5]
4) The rods are 416A stainless steel, 20.0 mm in diameter, drilled and tapped to M8 on one end. FYI: 416A SS is softer and less corrosion resistant than other SSs. It is also magnetic.
[attachimg=6]
5) The support bar and hinge are made of 6061 aluminum. The hinge pivots on polished steel pins with nylon washers. Just like in all other components plastic splines that engage the guide rail are placed in slots and screwed to eliminate any lateral movement during use or reinstallation (original Festool hinge fastener allows some lateral play there).
[attachimg=7]
[attachimg=8]
6) When the raiser rod is locked and the rail is lifted or lowered the hinge/rod assembly may inadvertently experience torque. To prevent the central screw from loosening I installed an anti-rotation pin next to the screw. This is just a precaution. I used the setup without the pin for over a year and the screw never got undone.
[attachimg=9]
7) Using round raisers has added benefits. With the optional shaft collar the support block does not have to be clamped. If you lower the cam lever slightly to make the rod just snug the rail can simply swing out of the way left or right after the cut.
[attachimg=10]
[attachimg=11]
In addition, the guide rail can be positioned at any angle to the table. It is useful for miter cuts on long stock. Simply loosen the bolts and slide support block(s) in either direction.
[attachimg=12]
8 ) Removing the rail is easy. Release the cam clamp and pull out the rail with the hinge still attached to it. When you reinstall, it will be at the exact same position. No need to re-square.
[attachimg=13]
I have some improvements in mind, so perhaps I’ll come up with RSU3 in the future.
Attachments
-
 226.jpg346.5 KB · Views: 43,776
 -
 435.jpg361.7 KB · Views: 33,439
 -
 933.jpg386.1 KB · Views: 33,300
 -
 413.jpg165.8 KB · Views: 36,842
 -
 631.jpg372.3 KB · Views: 36,152
 -
 700.jpg324 KB · Views: 33,092
 -
 204.jpg318.3 KB · Views: 32,981
 -
 814b.jpg331.2 KB · Views: 33,269
 -
 929.jpg447.7 KB · Views: 32,864
 -
 233.jpg366.2 KB · Views: 34,727
 -
 025.jpg334.9 KB · Views: 32,694
 -
 451_120.jpg828.8 KB · Views: 33,547
 -
 907.jpg462 KB · Views: 33,083


