- Joined
- Nov 18, 2010
- Messages
- 1,023
Taunton Press has a new book out March 15, 2011 by Scott Gibson and Peter Turner called Blanket Chests. One of my pieces is features in the book on pages 142-145. The book features 30 chests by "30 of the world's finest furniture makers". Pretty cool! 8)
http://www.tauntonstore.com/blanket-chests-peter-turner-071312.html
Here's the back story, from my blog:
http://flairwoodworks.wordpress.com/2009/08/16/treasured-chest/
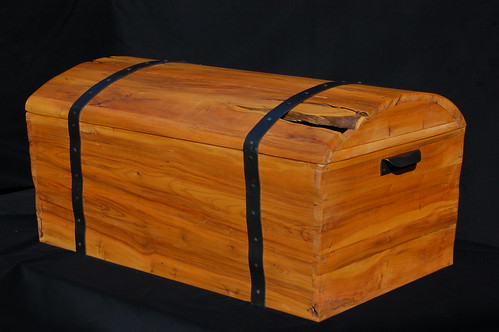
A few years ago, I built a small treasure chest out of oak and forged the strap hardware for it as well as the handles. It is still one of my favourite projects and I have longed to make another, of larger scale. Two weeks ago, I got word that Peter Turner was working on a book on blanket chests and that was all that it took to get me to started.
I had two weeks to build the chest, so I couldn’t afford to waste any time. With my original chest as a rough target of what I wanted to build, I omitted drawings and just built as I saw fit.
I searched through my wood piles for any suitable wood that was dry enough. My best bet, I concluded was a selection of 8/4 Pacific yew that was unusually dark and appeared to be slightly spalted. I crunched numbers to see if I would have enough wood to make the chest if I made the parts finished 3/4″ thick. What did I conclude? It would be close. Darn close. With nothing to lose, I went for it. I resawed and surfaced all the yew I had laid out the boards on my bench to match grain and colour.

I glued up the sides, front and back, and turned my focus to the coopered top. I started by determining the span of the lid – 21″. From there, I drew a pleasing curve on a scrap of wood with points 21″ apart. I cut bevels on the edges of the top staves on the jointer, test-fitting each part against its mate and comparing the resultant angle to the curve I’d drawn. When I was happy with the angles, I began gluing up. Normally, I’d use pinch dogs (incredibly useful, but unfortunately not well known any more), but because I had so little stock they were not an option as they leave holes in the end grain (which would normally be cut off). So instead, I resorted to packing tape and clamps. I really wish I’d been able to use pinch dogs – they would made my life so much easier. I glued up the staves in three stages, then glued the three assemblies together.
After the glue had cured, I surfaced the insides of the sides, front, back, and lid. I used a curved-soled plane to work the underside of the lid. At this stage, I did the majority of the contouring on the sides, front and back. I used my #9, #7, #5, and #3 gouges for most of the work, then refined the surface with a curved scraper. It is much easier to carve now than when the box is assembled. Next, I drew an angle on the front that represented the angle at which the sides, front and back would cant outwards. To draw the angle, I simply took a straight scrap of wood and placed it across the board at an angle and adjusted it until I was happy with it. The angle I settled with was about 2.5 degrees. I went to the table saw, set my miter gauge to that angle, and cut the sides, front and back to that angle, cutting them to length at the same time. While at the table saw, I also cut a 3/8″ groove at the bottom to accept the bottom. I stopped the groove short of the ends on sides so that it would not be visible on the assembled chest.

The next step was to cut the dovetails at the corners. I had never attempted to cut dovetails by hand on such wide boards. With wider boards, it is tougher as there are more pins and tails to make match! The carved sides were an added challenge for me. I started my usual way, cutting the pins, then transferring their locations to the tail boards, wasting away between the tails, and paring with a chisel until they fit. I found this incredibly tedious and not all that accurate. Then I tried cutting to the line when cutting the tails, eliminating all the test fitting. Now, with my first test fit, I find the problematic areas and correct them. On the second test fit, I can close the joint. I dry fit the chest. This was my first chance to see how big this chest would really be. Onto the lid.
The coopered lid, by nature, leaves a large arced hole below. I cut a curved piece of wood from the top of the sides so that the grain would match and glued it in place. I then smoothed the outside curve with planes and scrapers. Then I placed the lid on top of the dry-fit box and trimmed the lid down to size. I had deliberately built it oversized. It is easier to trim the lid smaller than to trim the box smaller.
The last component of the box was the bottom. In case anyone had any doubts of how close I would be in materials, I had to make the bottom from 24 pieces of wood, glued up in a brick-laid fashion. When the glue had dried, I cut a rabbet around the bottom to raise the panel, then did a final dry-fit followed by the final glue-up. The glue-up didn’t go as smoothly as the dry run, but it went together. I finished carving the chest, blending the curves around the joints.
I bought some 1-1/2″ wide, 1/8″ steel strapping for the strap hardware and started by forming the knuckles for the hinges. I bent the straps to match the carved contours of the chest and the coopered top by hand, using a pair of dogs in my vise as fulcrums. It wasn’t difficult at all, but required a lot of testing. The handles were formed from 1-1/2″ angle iron. I bored holes to accept cut nails and spray painted them with four coats of black “hammered” paint.

Meanwhile, I finished the chest with five coats of orange shellac, a 1lb cut. When everything had dried, I fastened the hardware to the chest. I used cut nails (vastly different and superior in holding strength than common wire nails) and went with 1-1/2″ nails for the critical points and clinched (bent over) them on the inside.
The void at the front right serves as a handle to lift the lid with.
http://www.tauntonstore.com/blanket-chests-peter-turner-071312.html
Here's the back story, from my blog:
http://flairwoodworks.wordpress.com/2009/08/16/treasured-chest/
A few years ago, I built a small treasure chest out of oak and forged the strap hardware for it as well as the handles. It is still one of my favourite projects and I have longed to make another, of larger scale. Two weeks ago, I got word that Peter Turner was working on a book on blanket chests and that was all that it took to get me to started.
I had two weeks to build the chest, so I couldn’t afford to waste any time. With my original chest as a rough target of what I wanted to build, I omitted drawings and just built as I saw fit.
I searched through my wood piles for any suitable wood that was dry enough. My best bet, I concluded was a selection of 8/4 Pacific yew that was unusually dark and appeared to be slightly spalted. I crunched numbers to see if I would have enough wood to make the chest if I made the parts finished 3/4″ thick. What did I conclude? It would be close. Darn close. With nothing to lose, I went for it. I resawed and surfaced all the yew I had laid out the boards on my bench to match grain and colour.
I glued up the sides, front and back, and turned my focus to the coopered top. I started by determining the span of the lid – 21″. From there, I drew a pleasing curve on a scrap of wood with points 21″ apart. I cut bevels on the edges of the top staves on the jointer, test-fitting each part against its mate and comparing the resultant angle to the curve I’d drawn. When I was happy with the angles, I began gluing up. Normally, I’d use pinch dogs (incredibly useful, but unfortunately not well known any more), but because I had so little stock they were not an option as they leave holes in the end grain (which would normally be cut off). So instead, I resorted to packing tape and clamps. I really wish I’d been able to use pinch dogs – they would made my life so much easier. I glued up the staves in three stages, then glued the three assemblies together.
After the glue had cured, I surfaced the insides of the sides, front, back, and lid. I used a curved-soled plane to work the underside of the lid. At this stage, I did the majority of the contouring on the sides, front and back. I used my #9, #7, #5, and #3 gouges for most of the work, then refined the surface with a curved scraper. It is much easier to carve now than when the box is assembled. Next, I drew an angle on the front that represented the angle at which the sides, front and back would cant outwards. To draw the angle, I simply took a straight scrap of wood and placed it across the board at an angle and adjusted it until I was happy with it. The angle I settled with was about 2.5 degrees. I went to the table saw, set my miter gauge to that angle, and cut the sides, front and back to that angle, cutting them to length at the same time. While at the table saw, I also cut a 3/8″ groove at the bottom to accept the bottom. I stopped the groove short of the ends on sides so that it would not be visible on the assembled chest.
The next step was to cut the dovetails at the corners. I had never attempted to cut dovetails by hand on such wide boards. With wider boards, it is tougher as there are more pins and tails to make match! The carved sides were an added challenge for me. I started my usual way, cutting the pins, then transferring their locations to the tail boards, wasting away between the tails, and paring with a chisel until they fit. I found this incredibly tedious and not all that accurate. Then I tried cutting to the line when cutting the tails, eliminating all the test fitting. Now, with my first test fit, I find the problematic areas and correct them. On the second test fit, I can close the joint. I dry fit the chest. This was my first chance to see how big this chest would really be. Onto the lid.
The coopered lid, by nature, leaves a large arced hole below. I cut a curved piece of wood from the top of the sides so that the grain would match and glued it in place. I then smoothed the outside curve with planes and scrapers. Then I placed the lid on top of the dry-fit box and trimmed the lid down to size. I had deliberately built it oversized. It is easier to trim the lid smaller than to trim the box smaller.
The last component of the box was the bottom. In case anyone had any doubts of how close I would be in materials, I had to make the bottom from 24 pieces of wood, glued up in a brick-laid fashion. When the glue had dried, I cut a rabbet around the bottom to raise the panel, then did a final dry-fit followed by the final glue-up. The glue-up didn’t go as smoothly as the dry run, but it went together. I finished carving the chest, blending the curves around the joints.
I bought some 1-1/2″ wide, 1/8″ steel strapping for the strap hardware and started by forming the knuckles for the hinges. I bent the straps to match the carved contours of the chest and the coopered top by hand, using a pair of dogs in my vise as fulcrums. It wasn’t difficult at all, but required a lot of testing. The handles were formed from 1-1/2″ angle iron. I bored holes to accept cut nails and spray painted them with four coats of black “hammered” paint.
Meanwhile, I finished the chest with five coats of orange shellac, a 1lb cut. When everything had dried, I fastened the hardware to the chest. I used cut nails (vastly different and superior in holding strength than common wire nails) and went with 1-1/2″ nails for the critical points and clinched (bent over) them on the inside.
The void at the front right serves as a handle to lift the lid with.