New cabinet doors

Joined
Oct 17, 2010
Messages
722
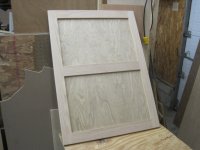
So the boss (wife) wants a new cabinet door look.
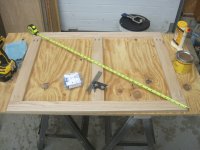
I have a early 80’s style door , where they put a raised panel over a thin plywood center. What they did is cut a shallow cut in the panel to create a “bead board “ look.
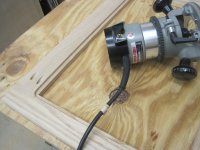
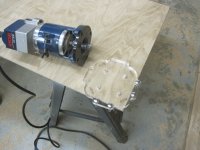
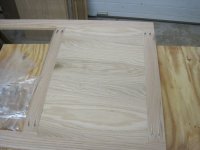
What my question is , how do I retain the outer frame while changing the inside ?
Is there a router bit that can cut a slot and replace the panel?
Oh, the original panel was just nailed or glued to the inside of the door frame btw. Not “floating”.

Thanks in advance ,
Charlie

Sent from my iPad using Tapatalk Pro
 
Can't help but is that a recurve bow? I've done elk in New Mexico with my father with a compound. I own a recurve but not confident enough to hunt with it. Sorry for going off topic.
 
Need pictures, both close up and full view. Pictures of the top and bottom rail outer edges also so I can see the cope and stick construction.

Dynaglide---I'm no help on the bow....

Tom

 
I’ll get some pics
Yes on the recurve bow.
Been hunting with them since about 1078-79
Was a big game guide in NM in the late 80’s early 90’s
Charlie

Sent from my iPhone using Tapatalk Pro
 
396cde08004d2d84d4aa7763bd5e059b.jpg
fb72cf8261659907b06c650e490376ff.jpg
39feb72256f6ef5c9aad0cf5cd3621e6.jpg


Sent from my iPad using Tapatalk Pro
 
Here is some pics ,Tom.
The thin panel is just glued to the back as in one of the pics.
Thanks for the help,
Charlie

Sent from my iPad using Tapatalk Pro
 
First cut the plywood panel out with a jigsaw close to the frame say maybe a quarter of an inch. Then use a flush cut router bit from the back and rout the panel using your frame as your guide. Now use a rabbeting bit of at lest 3/8'' depth of cut and rout around the back side of the door frame. Then make your desired panel to lay in your new rabbit, finish out the back side with a small piece of trim around the back side of your new panel to cover the seam. Hope this helps.
 
I've been making the doors for my shop cabinets like that for a few years. the only difference is that I use pocket holes for the corners - it is a shop cabinet. Here are some photos.

The completed frame, ready to be rabbetted.

View attachment 1

One of the corners after rabbeting - particularly with oak, I found that you get way less splintering if you take light cuts and feed counter-clockwise.

View attachment 2

All rabbeting for the plywood panels completed.

View attachment 3

Cutting a radius on the corners of the plywood panel to match the recess. The Rockwell corner jig gives a perfect match for the radius of the rabbeting cutter.

View attachment 4

First panel fitted in the door. I use Tightbond and enough brad nails to hold the panel in place until the glue dries.

View attachment 5

Completed door, ready for finish. This method gives a nice sturdy door, never had any problems with one warping either. I made a storage cabinet for my wife for the laundry room, used this same method except with left over pre-finished bead board paneling from the walls for the door panels.

View attachment 6

Adding some thin decorative molding to cover the seam in the back would be easy enough, and certainly dress up the door.
 

Attachments

  • IMG_3757.JPG
    IMG_3757.JPG
    509.5 KB · Views: 183
  • IMG_3758.JPG
    IMG_3758.JPG
    529.1 KB · Views: 189
  • IMG_3759.JPG
    IMG_3759.JPG
    533.6 KB · Views: 164
  • IMG_3760.JPG
    IMG_3760.JPG
    464.2 KB · Views: 178
  • IMG_3762.JPG
    IMG_3762.JPG
    421.8 KB · Views: 187
  • IMG_3763.JPG
    IMG_3763.JPG
    424.4 KB · Views: 173
Rollin22Petes said:
First cut the plywood panel out with a jigsaw close to the frame say maybe a quarter of an inch. Then use a flush cut router bit from the back and rout the panel using your frame as your guide. Now use a rabbeting bit of at lest 3/8'' depth of cut and rout around the back side of the door frame. Then make your desired panel to lay in your new rabbit, finish out the back side with a small piece of trim around the back side of your new panel to cover the seam. Hope this helps.
Thanks,it does help, I had thought of something similar,but didn’t know what to do with the exposed line between the new and old.
Cheers ,Charlie

Sent from my iPad using Tapatalk Pro
 
Back
Top