Bugsysiegals
Member
- Joined
- Mar 19, 2016
- Messages
- 908
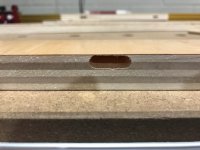
I bought my Domino XL back in 2016 along with many other Festool tools and have only recently had the need to use it. As it turns out, I'm unable to use the tool when I finally need it because of misalignment. I sent the tool back to Festool with a note describing the issue and received it back with a note saying it was fine. I retested the machine, have the same issue, and personally don't consider this the quality one should expect from a $1,400 machine. I don't like the idea of having to contort the wood to fit together whenever using the tool which then requires the amount of sanding which could damage thin plywood veneer. Am I being to much of a perfectionist? Would you consider the amount of skew below acceptable or "in spec"?
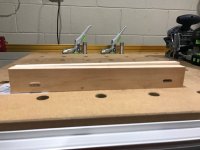
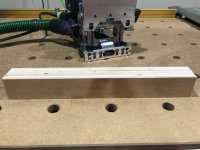
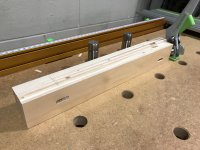
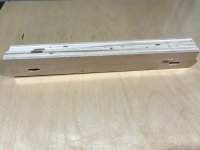
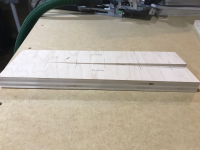
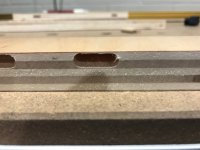
Below is an image of a single tenon joining two pieces of 10-12" plywood.
View attachment 1
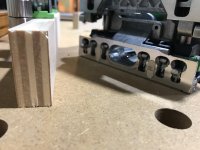
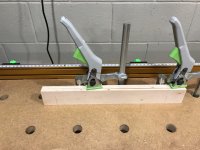
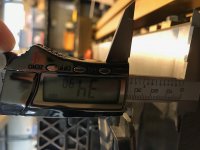
FWIW - I've completely square plywood and a completely flat MFT/3 table for reference. I've used spacers and clamps to ensure the wood is hanging off the edge of the table so as not to interfere with the Domino while keep everything flat. I've held the front down firmly, plunged fast/slow, using different sized bits, and even tried using my back hand to twist to the left while plunging to avoid the higher Left skew all with the same result. Additionally, I've placed the Domino flat on the table, to test whether the bit is aligned with the base plate, and plunged into the wood with the same result seen below. While it doesn't seem like much, the doubled error, results in the fit seen above.
View attachment 3
View attachment 4
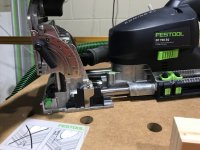
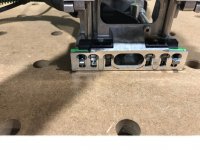
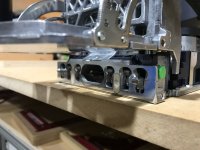
As another test, I've held the Domino upside down, placed a 4' woodpeckers rule centered on the bottom of the Domino base plate going side to side and another across the motor arm to get a better visual of how "aligned" the motor is with the base plate. By doing this, I can clearly see the rule on the motor slanting up to the Left in comparison to the base plate rule which is exactly how it's cutting. I haven't taken any measurements but could to find the exact angle it's off if it's of any value.
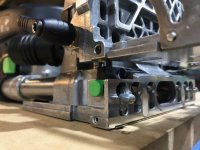
All that said, I'm ready to remove the two outer screws, motor, check if there's a bur/shaving, or anything I can do to get the motor to sit better in the housing so it's closer to parallel with the base plate but am hesitant since I'm not sure whether motor brushes/armatures etc. will come flying out. Has anybody any experience removing this motor and can it be done without destroying the tool? Or do I just live with the skew and get over it?
View attachment 2
Below is an image of a single tenon joining two pieces of 10-12" plywood.
View attachment 1
FWIW - I've completely square plywood and a completely flat MFT/3 table for reference. I've used spacers and clamps to ensure the wood is hanging off the edge of the table so as not to interfere with the Domino while keep everything flat. I've held the front down firmly, plunged fast/slow, using different sized bits, and even tried using my back hand to twist to the left while plunging to avoid the higher Left skew all with the same result. Additionally, I've placed the Domino flat on the table, to test whether the bit is aligned with the base plate, and plunged into the wood with the same result seen below. While it doesn't seem like much, the doubled error, results in the fit seen above.
View attachment 3
View attachment 4
As another test, I've held the Domino upside down, placed a 4' woodpeckers rule centered on the bottom of the Domino base plate going side to side and another across the motor arm to get a better visual of how "aligned" the motor is with the base plate. By doing this, I can clearly see the rule on the motor slanting up to the Left in comparison to the base plate rule which is exactly how it's cutting. I haven't taken any measurements but could to find the exact angle it's off if it's of any value.
All that said, I'm ready to remove the two outer screws, motor, check if there's a bur/shaving, or anything I can do to get the motor to sit better in the housing so it's closer to parallel with the base plate but am hesitant since I'm not sure whether motor brushes/armatures etc. will come flying out. Has anybody any experience removing this motor and can it be done without destroying the tool? Or do I just live with the skew and get over it?
View attachment 2

")