ear3
Member
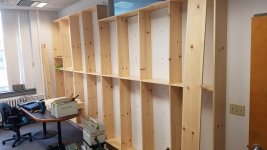
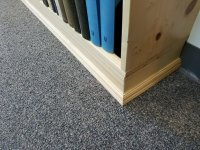
Finished up last week the shelving for my new office, which was the first time I have used the DF500 connectors on a project. I did most of it with the LR32 connectors, which made the positioning of the holes for the verticals on the top and bottom boards (and obviously, also the positioning of the individual shelves) super simple. Limited process pics, simply because it was a pretty vanilla build, and you can get the idea from the finished photos appended to this post. The most challenging part was actually the 2x4 base to level the unit relative to the floor, which had about a 3/4" concavity in the middle along that long wall.
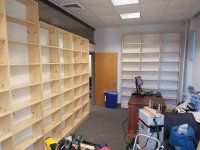
I would have liked to have used a better wood than common pine, but since I needed close to 400 lf of 1x10, which was procured for $1 per lf, doing it in anything else would have been too expensive given that I'm footing the bill. I did all of the work way under the radar so that the Facilities folks didn't see what I was doing before I finished. I moved all the tools and wood in and out after hours, though because it's in a separate office suite, I was able to work during the day. Now that it's done they're fine with it, if a little bit grumbly about following proper administrative procedures. But as I told them 6 years ago after I did the shelving in my first, smaller office, and faced some backlash for having gone ahead without prior notification: "you guys are welcome to de-install everything if you want." All those holes that you see in the wall during the installation phase are from the wall mounted standards that were there previously. I considered filling all the holes, but then realized I might be giving myself away when I started opening windows and doors to air out the smell from the new coat of paint I would have to put on after spackling everything. But with the books now on the shelves, those holes are all but invisible.
Two things I regret now.
First, I investigated doing a stain with Osmo color oil and the Polyx topcoat, but it would have easily been another $300 to $400 in costs for that much square footage, so I opted for a clearcoat of cheap poly. I wish now that I had at least used a cheap minwax stain to color the wood closer to the desk.
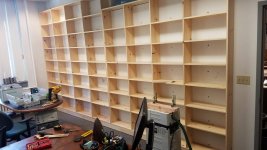
Second: because the verticals are so tall (9 ft. and 8ft), I felt that I needed to fix one of the shelves in each column with connectors to prevent any bowing. But doing that negates much of the advantage of using the LR32 shelf pin holes, since that fixed middle shelf limits the range of adjustability of the others. I realize now that it would have been fine just to do two fixed shelves at either end of each unit, and keep all the shelves of the middle columns fully floating on pins. Oh well, live and learn.
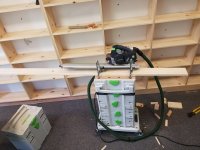
Overall, though, the connectors made the assembly incredibly simple, and allowed me to prebuild everything at my shop, with no additional fitting required other than what was done on the leveling base and doing a cutout on one column of shelves to accommodate the native wiring. My only criticisms of the connector system are:
1) the included hex driver (which is the same one coupled with the MFS set), is really flimsy. I snapped off the tip in one of the connectors early on. I'm sure I was overtightening a bit, but the driver should be built to handle that.
2) I think this problem may have been exacerbated by the fact that I was using softwood, but I did have some issues with the LR32 corner connectors. The problem resulted from the fact that I did an initial dry run installation of the connectors on the bottom boards for each unit so I could determine the exact width of each shelf column and cut the shelves accordingly. I then unscrewed the connectors when transporting the wood to the office. What I found, however, was that when I reinstalled the LR32 connectors in the same holes, I had to sink them deeper than before, otherwise they were too wobbly in the holes. But sinking them deeper meant that when it came time to connect the boards, I had to tighten the connectors on the verticals even more to pull the boards together, and in some cases felt like the connection was less than optimal. That's why I also decided to add an additional layer of security with the pocket screws at the bottom of all the verticals -- which was fine, since those have since been covered up with books.
But with all this in mind, I would definitely still use the connectors on another, similar project.
The units are anchored into the drywall and are solid, but if ever my institution finally pulls the trigger on the long-promised renovations they have in store for the building in which my office is lodged, I can easily deinstall everything while work is in progress.
I would have liked to have used a better wood than common pine, but since I needed close to 400 lf of 1x10, which was procured for $1 per lf, doing it in anything else would have been too expensive given that I'm footing the bill. I did all of the work way under the radar so that the Facilities folks didn't see what I was doing before I finished. I moved all the tools and wood in and out after hours, though because it's in a separate office suite, I was able to work during the day. Now that it's done they're fine with it, if a little bit grumbly about following proper administrative procedures. But as I told them 6 years ago after I did the shelving in my first, smaller office, and faced some backlash for having gone ahead without prior notification: "you guys are welcome to de-install everything if you want." All those holes that you see in the wall during the installation phase are from the wall mounted standards that were there previously. I considered filling all the holes, but then realized I might be giving myself away when I started opening windows and doors to air out the smell from the new coat of paint I would have to put on after spackling everything. But with the books now on the shelves, those holes are all but invisible.
Two things I regret now.
First, I investigated doing a stain with Osmo color oil and the Polyx topcoat, but it would have easily been another $300 to $400 in costs for that much square footage, so I opted for a clearcoat of cheap poly. I wish now that I had at least used a cheap minwax stain to color the wood closer to the desk.
Second: because the verticals are so tall (9 ft. and 8ft), I felt that I needed to fix one of the shelves in each column with connectors to prevent any bowing. But doing that negates much of the advantage of using the LR32 shelf pin holes, since that fixed middle shelf limits the range of adjustability of the others. I realize now that it would have been fine just to do two fixed shelves at either end of each unit, and keep all the shelves of the middle columns fully floating on pins. Oh well, live and learn.
Overall, though, the connectors made the assembly incredibly simple, and allowed me to prebuild everything at my shop, with no additional fitting required other than what was done on the leveling base and doing a cutout on one column of shelves to accommodate the native wiring. My only criticisms of the connector system are:
1) the included hex driver (which is the same one coupled with the MFS set), is really flimsy. I snapped off the tip in one of the connectors early on. I'm sure I was overtightening a bit, but the driver should be built to handle that.
2) I think this problem may have been exacerbated by the fact that I was using softwood, but I did have some issues with the LR32 corner connectors. The problem resulted from the fact that I did an initial dry run installation of the connectors on the bottom boards for each unit so I could determine the exact width of each shelf column and cut the shelves accordingly. I then unscrewed the connectors when transporting the wood to the office. What I found, however, was that when I reinstalled the LR32 connectors in the same holes, I had to sink them deeper than before, otherwise they were too wobbly in the holes. But sinking them deeper meant that when it came time to connect the boards, I had to tighten the connectors on the verticals even more to pull the boards together, and in some cases felt like the connection was less than optimal. That's why I also decided to add an additional layer of security with the pocket screws at the bottom of all the verticals -- which was fine, since those have since been covered up with books.
But with all this in mind, I would definitely still use the connectors on another, similar project.
The units are anchored into the drywall and are solid, but if ever my institution finally pulls the trigger on the long-promised renovations they have in store for the building in which my office is lodged, I can easily deinstall everything while work is in progress.
Attachments
-
 20180724_150129.jpg448.1 KB · Views: 370
 -
 20180724_150137.jpg480.4 KB · Views: 340
 -
 20180724_171242.jpg191.1 KB · Views: 345
 -
 20180724_173957(0).jpg219 KB · Views: 340
 -
 20180725_155234.jpg374.9 KB · Views: 317
 -
 20180726_155058.jpg566.6 KB · Views: 348
 -
 20180726_165445.jpg405.7 KB · Views: 389
 -
 20180726_173227.jpg522.6 KB · Views: 373
 -
 20180728_161551.jpg511.8 KB · Views: 386
 -
 20180802_162829.jpg267.6 KB · Views: 297
 -
 20180802_162855.jpg719.7 KB · Views: 328
 -
 20180802_162928.jpg312.8 KB · Views: 277
 -
 20180802_162936.jpg708.3 KB · Views: 305
 -
 20180802_162944.jpg657 KB · Views: 287
 -
 20180802_163024.jpg652 KB · Views: 277
 -
 20180802_163107.jpg714 KB · Views: 299
 -
 20180802_165112.jpg802.1 KB · Views: 340
 -
 20180807_155740.jpg222.7 KB · Views: 346
")