New Sweepstakes! Win an HK 55 or HKC 55 (North America only)

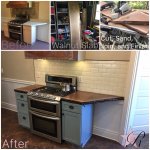
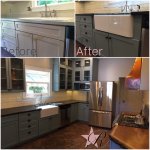
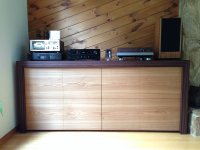
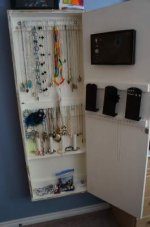
There are some awesome projects in this thread.  I really like the MDF panels and the walnut mirror.

I took on a job to reconfigure a local shop and set up a new production system for building custom carriage house-styled garage doors.  The labor market here is pretty tight, so for the last six weeks I've made little progress on making changes, and spent a lot of time keeping the current projects on track by doing it myself, a real "head cook and bottle washer" situation. My first non-temp hire starts tomorrow.

The two reasons I took on the job were the owner's willingness to let me make any changes I saw fit, and the investment in a TS 75 and a lot of rails that he had already made.  I gave him the part numbers for a CT 36 and an ETS EC 125 to get started, but that's really the tip of the iceberg for this shop.

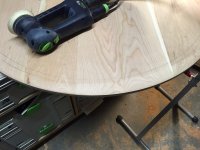
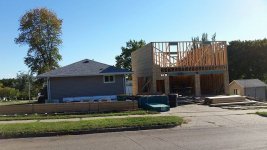
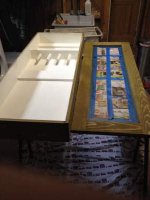
I can't say that this job is really my favorite of the summer. That honor would go to a gnarly murphy bed I designed made from wire-brushed alder and speed-rusted metal panels, but I didn't build or install it, nor do I have photos (the builder has an enviably solid Festool stash, and the installer definitely used a Kapex on the job).  But this garage door is one I built from reclaimed wood, and it's pretty well documented.  I used the TS 75 to straight-line the LVL's used for framing material, and to square up the finished door, and to cut apart the sections.  I also used the TS with the 1080 rail to crosscut the lauan door skins that went on the back of the sections.

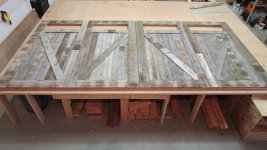
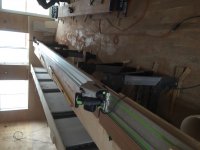
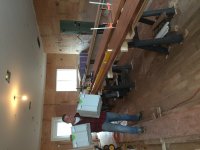
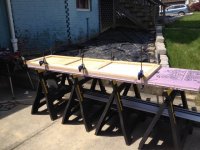
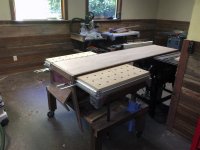
Here's the entire 8x16 door:
View attachment 1

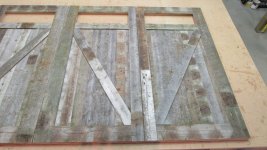
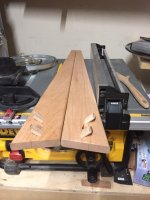
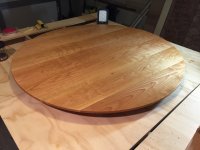
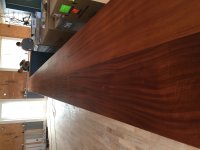
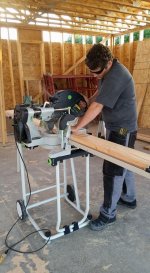
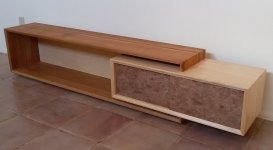
This is a closer view to show the wood.  The material looks janky, but I was impressed by how sound the wood was.  Many of the checks that look extra rustic are very shallow.  I had 5/8" thick tongue and groove milled out of it and every single piece was usable.
View attachment 2

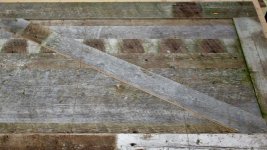
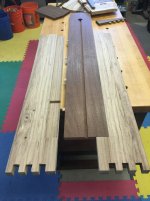
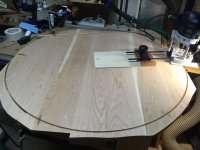
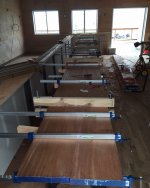
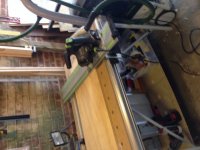
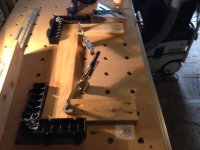
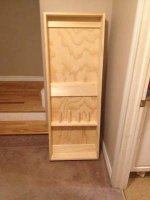
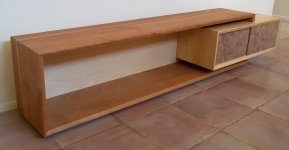
Here's a closer view of the section cuts after the door was put back together for a test fitting.
View attachment 3


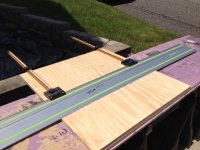
A sixteen-foot cut in a finished product is intimidating.  Even the smallest door has to have it done twice.  I have to put a lot of trust in the Festool TS system.  It has yet to let me down.
 

Attachments

  • IMG_0629.jpg
    IMG_0629.jpg
    101.9 KB · Views: 291
  • IMG_0630.jpg
    IMG_0630.jpg
    111.6 KB · Views: 228
  • IMG_0634.jpg
    IMG_0634.jpg
    139.2 KB · Views: 265
My favorite project this summer: Full Kitchen Remodel

Using Festool friends (don't call them tools):
New live edge walnut countertop
Custom cabinets to match existing
Completely modify built in bookcase in pantry

Other tasks:
Tile floor and backsplash
New recessed and undercab lighting
Paint
Lots of love

Thanks for looking!
 

Attachments

  • IMG_0134.JPG
    IMG_0134.JPG
    707.1 KB · Views: 472
  • IMG_0568.JPG
    IMG_0568.JPG
    860.5 KB · Views: 488
  • IMG_0569.JPG
    IMG_0569.JPG
    788.8 KB · Views: 528
I posted this a few weeks ago in the Member Projects section, reposting a few pics here. Favorite Summer project that actually got a lot of outdoor use by the pool - these Adirondack chairs and side table.

The TS55 was used on the chairs, mainly on the angled cuts on the armrests, much easier than cutting on the table saw. I made extensive use of the RO90, using both the hard disk and the delta sander. The DF500 was used on the side table. All were hooked up to my CT26.

Sanding chair parts with the RO90 -


Mortises cut on the table parts with the DF500 -


Finished chairs and table -


-Dom
 
I have been building  this workshop  nights and weekends since April and it's almost ready to move in!  Including foam board, soffits, exterior wall and roof sheathing, and 7/16 OSB on the inside, there are more than 200 sheets of 4x8 material in the building.  The TS 55 was an essential tool for getting good cuts in those sheet goods.  The only trim thus far is around the attic hatch, joined with my Domino 500. 
 

Attachments

  • 20160920_183807.jpg
    20160920_183807.jpg
    872.8 KB · Views: 423
Several small projects...

Tool well for my bench.  Domino and DTS

Bedside tables for my son.  Domino and 150/3 ETS EQ

Wall hanging for the fireplace.  Domino and 150/3 ETS EQ


Attachments

  • ToolWellAssembled-1.jpg
    ToolWellAssembled-1.jpg
    1.6 MB · Views: 526
  • Back Tenons.jpg
    Back Tenons.jpg
    1.7 MB · Views: 450
  • FireplaceCenterpiece-1.jpg
    FireplaceCenterpiece-1.jpg
    1.2 MB · Views: 520
A new dinning table made out of cherry.

Used virtually all Festool I own from TS55, Three sanders, domino, and MFT.


Attachments

  • IMG_5034.jpg
    IMG_5034.jpg
    227.8 KB · Views: 494
  • IMG_5025.jpg
    IMG_5025.jpg
    223.3 KB · Views: 557
  • IMG_4978.jpg
    IMG_4978.jpg
    218.3 KB · Views: 418
  • IMG_4940.jpg
    IMG_4940.jpg
    243.1 KB · Views: 499
  • IMG_4937.jpg
    IMG_4937.jpg
    239.5 KB · Views: 540
  • IMG_4930.jpg
    IMG_4930.jpg
    238.3 KB · Views: 502
Bar build using ts55,domino,Ets ec ,of 1400
 

Attachments

  • image.jpeg
    image.jpeg
    1.4 MB · Views: 500
  • image.jpeg
    image.jpeg
    1.5 MB · Views: 512
  • image.jpeg
    image.jpeg
    673.1 KB · Views: 422
  • image.jpeg
    image.jpeg
    618.2 KB · Views: 412
  • image.jpeg
    image.jpeg
    1.4 MB · Views: 483
This summer I am tackling a very large project. I am adding a 900 sqft shop, and 1100 sqft of livable space to my house. I have another thread on it but just haven't had time to update it.

So far for all the rough framing I've used a ton of my festoon including, RO 150 for fixing a truss end the factory had unsquare, my TS 55 for cutting sheeting down, my HK 55 and FSK guide rail for cutting lumber as well as my kapex and UG cart. When finishing work starts I'll endorse the entire festool line up guaranteed.
 

Attachments

  • IMG_0012.JPG
    IMG_0012.JPG
    205.4 KB · Views: 541
  • IMG_0011.JPG
    IMG_0011.JPG
    155.7 KB · Views: 469
  • IMG_0010.JPG
    IMG_0010.JPG
    151.3 KB · Views: 465
I have been trying to organize the shop a bit and create more storage, so the first part of my plan is to build a table saw workstation. I used my ts55, ct26, mft and my fleet of sanders.  I still have some work to do.
 

Attachments

  • image.jpg
    image.jpg
    91 KB · Views: 465
  • image.jpg
    image.jpg
    106.6 KB · Views: 496
  • image.jpg
    image.jpg
    76 KB · Views: 451
  • image.jpg
    image.jpg
    112.5 KB · Views: 573
2016 turned out to be the year I redecorated our great room by building two matching credenzas and two matching "Z" plant stands. 

The credenzas were made by creating torsion box assemblies for the tops and legs, which were then covered with rosewood veneer and joined together with my DF 500 Domino.  The doors are made from one large section of 3/4" ply and covered with ash veneer. My TS 55 REQ was then used to cut the four door panels from the one large 6' 6" door panel.  The Festool track saw is the only tool I know that can make a perfect cut in fragile veneer without any tear out, allowing me to create the continuous grain pattern across all four doors.

The "Z" plant stands were made by gluing two sections of 12" wide by 8' long 3/4" ply together to create 1 1/2" boards, which were then covered with ash veneer. The DF 500 Domino was used to join the three sections of each "Z" together.  Since I was concerned about the strength of the joints, I used 6: 10mm x 50mm dominoes in each joint, resulting in  a surprisingly strong structure.
 

Attachments

  • Z Plant Stands.JPG
    Z Plant Stands.JPG
    939.1 KB · Views: 439
  • Matching Credenzas  2.JPG
    Matching Credenzas 2.JPG
    1.9 MB · Views: 432
  • Matching Credenzas 1.JPG
    Matching Credenzas 1.JPG
    2 MB · Views: 1,558
new-sweepstakes!-win-an-hk-55-or-hkc-55-(north-america-only)


These credenzas are superb Steve!
 
Here's a kitchen island we designed with a countertop made from reclaimed threshing floor material (White Oak) from an old timber frame barn in Amish country.

We used a TS 75, Domino XL, ETS 150/5, RO 90, OF 1400, OF 1010, HL 850 (with undulating head), Kapex, and CT36 during construction.

Fun project.

Joe

[attachimg=1]


Attachments

  • Kitchen Island with Reclaimed Top.jpg
    Kitchen Island with Reclaimed Top.jpg
    524.2 KB · Views: 1,067
I have spent time this summer working on my Maloof inspired dining chair. This is the first of several I will be making at it has taken longer than I had initially thought, but the first one was working out all the nuances and challenges with a project of this scope and I think the rest will go better.

Used several Festool tools in the project including my TS75, CT22 and CT26, MFT/3 tables, Kapex, C12 and T15 drills, my most used tools include the RAS 115 and the RO90 and I have also used the ETS EC125 and RO150.

First pic is after rough grinding and the second pic is after assembly and sanding through 100 grit, all shaping done and now just working through the grits through 1,000.


Attachments

  • Chair Front after Grinding.JPG
    Chair Front after Grinding.JPG
    47.5 KB · Views: 354
  • Chair 100 Grit.JPG
    Chair 100 Grit.JPG
    65.4 KB · Views: 368
This summer I built my wife a LARGE jewelry cabinet for our bedroom.  I was getting tired of necklaces EVERYWHERE and untangling them for her. There is a mirror on the door, almost 100 hooks, ring and earring holders, and places for bracelets. Since finishing this I have invested in a CT26 and ETS EC 125 so I may end up refinishing it in the future haha.
 

Attachments

  • cabinet3.jpg
    cabinet3.jpg
    16.1 KB · Views: 366
  • cabinet2.jpg
    cabinet2.jpg
    18.4 KB · Views: 367
  • cabinet1.jpg
    cabinet1.jpg
    15.2 KB · Views: 365
DW has long complained that there's not enough seating in our living room, especially since my favorite reading spot is lying down on the couch. The Summer project was building a sofa/bench which provided more bookshelf area, gives additional seating area in one configuration and allows me to read comfortably in a supine position.  Domino 500 was used for all the joinery (can't imagine doing the angled stuff w/o it). The TS 55 made the beveled inset for the backrest simple and safe to do along c making angled cuts for the back supports, etc. The MFT tables and clamps were also essential. My Kapex worked as it's supposed to- clean, accurate cuts with good dust collection. A RO150 was used for sanding for the whole project; but the project led to the subsequent purchase of a RO90 as that size would have made life simpler on this project.
 

Attachments

  • FestoolSaw1.jpg
    FestoolSaw1.jpg
    1 MB · Views: 388
  • FestoolSaw3.jpg
    FestoolSaw3.jpg
    1.6 MB · Views: 396
  • FestoolSaw4.jpg
    FestoolSaw4.jpg
    1.3 MB · Views: 404
I've been working on converting our old pool deck to a playhouse & swing set.  I started to tear it down, but thought there had to be some way to make use of it.  So, my daughter and I started working on drawing up a plan of action.  My TS 75 Track Saw & MFT/3 table made it so much easier.  No more dragging everything back to the garage to make a cut.  Popped the MFT up and the TS 75 cut like butter! 

We repurposed nearly all of the lumber from the deck, made use of some leaded glass that someone had given me for windows, and only spent $30 for the little side window.  We were having Pella windows installed on our home and they damaged our bedroom window and had to replace it.  They gave me the damaged one for the playhouse.  I used it as the front door on the playhouse.  This was my first experience framing/structural.  I usually build furniture & cabinets.  I'm pretty proud of it.  Still have work to do on the inside after the electric is run next month.
 

Attachments

  • IMG_1668.jpg
    IMG_1668.jpg
    91.5 KB · Views: 384
  • IMG_1420.jpg
    IMG_1420.jpg
    48.8 KB · Views: 366
  • Pool Deck Tear Down.jpg
    Pool Deck Tear Down.jpg
    50.7 KB · Views: 382
  • IMG_1655.jpg
    IMG_1655.jpg
    69.2 KB · Views: 388
Here's my entry. For the past few years I've done a donation build for an auction to benefit the Seattle Ronald McDonald House. For those that don't know, RonDon is a charity that provides housing for seriously and terminally ill children and their families while they are treated. Seattle Children's Hospital is a great facility, but is not convenient for someone in Montana or rural Oregon. Hence the need for free housing.

Anyhoo, I've made a few pallet maps of Washington state before but this year I wanted to do something different. So since Seattle is a city of neighborhoods (the locals, when giving directions, use neighborhoods instead of streets for the most part. "I live in Wedgwood, or Laurelhurst, etc."), I made a pallet wood map of Seattle's neighborhoods.

f4bc7c9c517752265010d6b77bf82470.jpg


I wanted something a bit better than just drawing in the borders, so I cut them out on my scroll saw and beveled the corners.

2e4dce2c87090e4968a82ba709102abb.jpg


This is where Festool comes in. I didn't dare bevel the edges with a router since they were fragile, so in came the RO90's delta head. It made quick work of individually shaping all the pieces.

ff947e32b99cac5724bb79749704ad58.jpg


The round head smoothed out the faces and then it was all reassembled and glued to some mahogany plywood as a backer. I'm not 100% done (tomorrow), but I will epoxy in some thick gauge copper wire to connect the four pieces and it should all hang from one hangy thing.

Winning an HKC55 would rule, but kids having cancer is the suckiest thing that ever happens so I hope it makes a ton of money at the auction.
 
Modern shelf. Maple, cherry, Carpathian elm burl, oil. Used TS75.
Still working on sliding doors and mounting hardware.
 

Attachments

  • shelf1.jpg
    shelf1.jpg
    164.7 KB · Views: 367
  • shelf2.jpg
    shelf2.jpg
    181.2 KB · Views: 337
Back
Top