New Sweepstakes! Win an HK 55 or HKC 55 (North America only)

Mort said:
I didn't dare bevel the edges with a router since they were fragile, so in came the RO90's delta head.

Are there abrasive bits with guide bearings? Intarsia makers must be dealing with this task all the time.
 
TylerC said:
To enter, tell us about your favorite project that you’ve worked on this year.
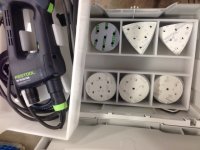
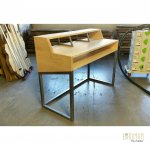
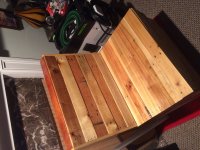
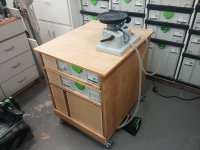
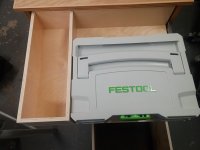
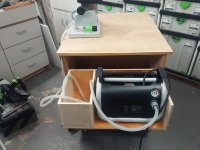
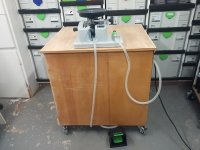
A simple project made me happy. Took my RO90 and figured out how to get the most commonly used sandpaper into the same Systainer (Sys-3) as the sandpaper Systainer (STF-RO 90 DX) wouldn't hold it all anyway. Since I had plenty of acrylic left over from a previous job, I cut it with my tracksaw, glued it up, and eased the edges with a router. This is the end result.

[attachimg=1]
 

Attachments

  • RO90.jpg
    RO90.jpg
    70.7 KB · Views: 2,865
Some very nice project entries here, many of which would be great to see under the Member Projects area. Please consider posting more details in that area. I'm sure I'm not the only one who would like to see additional build photos, techniques, etc. While finished project photos are great, how you got there is invaluable.
 
Svar said:
Mort said:
I didn't dare bevel the edges with a router since they were fragile, so in came the RO90's delta head.

Are there abrasive bits with guide bearings? Intarsia makers must be dealing with this task all the time.

That's funny, I actually had that idea when I was going through about the 25th or 30th piece. If they do exist I sure don't have one, hence the RO90.
 
Mort said:
Svar said:
Mort said:
I didn't dare bevel the edges with a router since they were fragile, so in came the RO90's delta head.

Are there abrasive bits with guide bearings? Intarsia makers must be dealing with this task all the time.

That's funny, I actually had that idea when I was going through about the 25th or 30th piece. If they do exist I sure don't have one, hence the RO90.
Sorry for hijacking the thread, but perhaps a small grinding bit in a pin router setup will work.
 
Kitchen renovation...Replaced the dated golden oak cabinets and dark grouted ceramic tile with white painted soft maple and soapstone counter tops.  I did the entire kitchen, but this just shows the cook top area transformation.

I used many Festool tools including CT33, ETS 125, ETS 150, RO 90, RO125. TS55, Domino 500, CXS, Installers kit and others.
 

Attachments

  • k001.jpg
    k001.jpg
    70 KB · Views: 370
  • k030.jpg
    k030.jpg
    143.2 KB · Views: 368
  • k002.jpg
    k002.jpg
    102.8 KB · Views: 358
This desk I did out of maple, with a steel base.  [big grin]

Used the TS75 and Carvex 420 to cut it all up, Domino500 to put it together, Rotex125 to get it smooth,  all on my MFT/3, and cleaned up what little mess was on the floor with my Workshop Cleaning set and CT26! Dream team there!
 

Attachments

  • IMG_20160605_073309.jpg
    IMG_20160605_073309.jpg
    1.5 MB · Views: 367
  • IMG_20160525_175920.jpg
    IMG_20160525_175920.jpg
    1.3 MB · Views: 354
  • IMG_20160525_181814.jpg
    IMG_20160525_181814.jpg
    1.5 MB · Views: 374
Well I just got into woodworking this summer. Have a bunch of Festool tools but have only had time to build a couple small items so far. This winter I plan to build more and get much better at it.

The one project that I have completed is a wooden stool that I build based on a stool my mom bought for me as a small child. It is built out of a 2x10 construction lumber.
For the Stool I used my TS55 on my MFT3 set for the cuts. Used the 420 Jigsaw for the half circles by the legs. I used my RO 150 and RO 90 for all the sanding to make it smooth. I used the Domino 500 to connect it all together with some wood glue. Then I used my 1400 router to round over the top edge and the RO 90 to smooth the other sharp corners. I then used some poly to finish. Then the RO 90 to remove my horrible first finish attempt. Then did a much better job the second try. Have about 4 coats with sanding in between. This is all hooked to a CT 36.

[attachimg=1]

[attachimg=2]

[attachimg=3]

As you can see someone has claimed it and loves it.

Thanks
Daryl
 

Attachments

  • IMG_5946.jpg
    IMG_5946.jpg
    56.5 KB · Views: 619
  • IMG_5882.jpg
    IMG_5882.jpg
    57.3 KB · Views: 607
  • IMG_5881.jpg
    IMG_5881.jpg
    80.7 KB · Views: 635
Hi all. First post but long time reader.
The FOG's many contributors has inspired me to expand my skills....and spend a lot of money.
Anyway, to the last point.
I bought a Vac Sys set when they came out and I have been very happy with it.
I have used it on my MFT and other work tops but haven't been completely comfortable with it on those surfaces.
Also I also like to keep my setups as neat as possible when I start as they degrade pretty quickly after I start and I didn't like the hose tangle that the vacuum tubing created.
I had this old cabinet in my shop that was just holding "stuff" that I noticed one day and that's when the light bulb turned on.
Some quick measurements and sketches and then the TSC and Domino started buzzing.
After some adjustments and fittings I ended up at the mostly complete state below.
I still need to make drawer fronts, pulls and maybe a paint job.
Once I start really using it I also plan on adding tubing management holes where they are needed.

The pump is on a drawer slide with a storage box for smaller pieces and extra hose beside it.
View attachment 2

On the other side I added storage drawers.
The 2 top ones hold Sys 1's with small piece storage on the side.
View attachment 4

The Largest drawer holds both clamps.
The second large drawer holds odd shaped things like tubing or the foot pedal
View attachment 7
 

Attachments

  • 20160929_104114.jpg
    20160929_104114.jpg
    1,013.4 KB · Views: 347
  • 20160929_104041.jpg
    20160929_104041.jpg
    1.2 MB · Views: 213
  • 20160929_104019.jpg
    20160929_104019.jpg
    775.5 KB · Views: 361
  • 20160929_103956.jpg
    20160929_103956.jpg
    975.9 KB · Views: 341
  • 20160929_103942.jpg
    20160929_103942.jpg
    935.3 KB · Views: 198
  • 20160929_103914.jpg
    20160929_103914.jpg
    929.7 KB · Views: 351
  • 20160929_103900.jpg
    20160929_103900.jpg
    962.6 KB · Views: 231
  • 20160929_103804.jpg
    20160929_103804.jpg
    931.9 KB · Views: 338
Also wanted to add that it was a pleasure to meet TylerC and the other Festool staff at the roadshow at Atlas Machinery in Toronto on Tuesday.
 
I've recently been working on some projects for my upcoming wedding (at the request of my future wife) and have almost exclusively used my Festools to complete them. So far I've finished 2 out of 3 and I really need to get on the third one as I only have 3 and a half weeks until the big day!

This is a "Welcome" chalkboard sign with custom frame and Cherry stain. I used the TSC 55, RO 125, CT MIDI, CXS and did all the routing (3 different bits and 3 steps) with the OF 1010. The 1010 was the star on this build hands down. I purchased the dust hood attachment for this project and wish I had made the purchase a long time ago as the dust collection is awesome with it.
1ce56cddc59727bcbbd8482c993fc429.jpg

e5ca67a094ad34ee99bb42aeeebdbeef.jpg

c434a7160be49a50de20128acaa6dd0f.jpg

4b5a8034c35888136130a948c79cac8c.jpg

2b69faf967b4c846eacd3f920bd3bc38.jpg


This second project is actually going to be our "guest book" that people will be signing. We felt an actual book would just get put into a box and forgotten about so we decided to cut out our initials and a big "R" for Rodriguez (our last name) so we can hang them as art pieces and always be reminded of who shared in our wedding day celebrations. Tools used were TSC 55, RO 125, CXS and CT MIDI.
b0b5ae197fcfcb3c9dbde8b26ac75c3f.jpg

22ec451dbf2ae3bdb103e5bdf2da0b74.jpg

52a0ab88cc472784d0e4bc3266fa3ba2.jpg


The third project is a cutout that will say "Thank You" and we'll be holding each word in some of our wedding day picture. Tools to be used will be TSC 55, RO 125, CXS and CT MIDI.

By the way, my future wife said to me when I showed her the new HKC 55 "the only way you're allowed to have that is if you win it or someone gets it for you" so, here I am. She also loves the TSC 55 and said it would be cool to use the HKC so hook it up Festool!

Oh and I should probably mention the plantation shutters I finished this year for my step mom, too. I dug out some old plans my Dad had and a couple of panel frames he started 8 years ago and finished the project for him. Made 6 more complete shutter panels including the louvers, panel frame and overall shutter frames then installed them. Used the TSC 55, RO 125, OF 1010, CT MIDI, CXS and PDC.

8d9aa852f918ebd9e610457b6a9baaec.jpg

a4273130a58b349d986c6131de612447.jpg

be6e3987d15db3891fed75b413465387.jpg

148c2fb21255dfd75061cd78e8fe7fff.jpg

8cbf36f696a221d4342d76099b2355b1.jpg

 
I have been wood working for a little but rarely do I get to do something that is not trim carpentry, and grow boxes.  Eventually I would like to get into building more refined items but I do what I can with the little spare time I have.  I was asked to build a Chicken ark that was going to be used in a garden to maintain 3 to 4 chickens during the day and sometimes allowing them to roost overnight.  The Ark had to be secure as to not allow animals to get in etc.  The tools that I used in this project were the Trion Jigsaw, the RO 90, OF 1400, TS55, and the MFT.  The angles were odd so they were not able to be cut with the miter saw that is where the MFT and TS55 were a time saver.  The jigsaw was used to hand form the handles, and the of 1400 was used with a flush bit to make the doors sit flush with the wood.  The RO 90 was used to sand the wood for painting and any hole filing that was done.  I had to waterproof the raw wood and it was done with a clear Eco-friendly repellent which was necessary as this will be on top of one’s garden.  I have since built bigger structures and other garden features but sadly I don’t have pictures of those.  I know that with some of the larger structures using the HKC would be very beneficial in safety and quickness and could greatly use it.
 

Attachments

  • 6089663004995550976-account_id=1__1475177855_198.210.1.3.jpg
    6089663004995550976-account_id=1__1475177855_198.210.1.3.jpg
    98.6 KB · Views: 343
  • 2096113834017038048-account_id=1__1475177844_198.210.1.3.jpg
    2096113834017038048-account_id=1__1475177844_198.210.1.3.jpg
    69 KB · Views: 357
  • 375435890955216661-account_id=1__1475177814_198.210.1.3.jpg
    375435890955216661-account_id=1__1475177814_198.210.1.3.jpg
    64.9 KB · Views: 383
I just re-read the "rules" and it says 1-3 pictures. Will we be disqualified if we uploaded more than 3? Might be a silly question but also a potentially important one  [big grin]
 
Staniam said:
I just re-read the "rules" and it says 1-3 pictures. Will we be disqualified if we uploaded more than 3? Might be a silly question but also a potentially important one  [big grin]
Pictures need to be small too...
Going through this thread I simply reaffirm that most people don't read or follow rules  [poke].
P.S. Erica is an exception.
 
I finished building my pallet chair this summer using my TS75, MFT/3, Ro90, and CT48.
 

Attachments

  • IMG_7461.JPG
    IMG_7461.JPG
    1.3 MB · Views: 365
Built a Rietveld Garden Bench from redwood. Used the TS-55 to break down the planks. First go on a TSX with the right-hand chuck to  set the screws under the arm rest. I don't know how I would have done it without the chuck.

[attachimg=1]
 

Attachments

  • Bench #1.JPG
    Bench #1.JPG
    233.1 KB · Views: 454
With our house being over 60 years old there has been a lot of painting that's been done over the last several years we've lived here. Our bedroom was next up on the list.

The Festool power tools that have been used in every room thus far are the CT 26 dust extractor and the ETS 150/3 sander.  It allows me to remove or smooth out old paint runs and rough spots, remove loose paint, smooth out old brush stroke marks on baseboard, etc.  I also usually make use of the DTS400 for the trim and smaller detail surface areas, breaking out the Rotex RO 90 if I need to really get serious about removal of old finish.

My favorite tool is definitely the dust extractor, though.  Realizing I could work with tools and have cleaner area and less mess to clean up at the end was a revelation. 

I'd like to say I had a favorite project that used my TS 55 track saw too but my Uncle has borrowed it for so long while rehabbing a house I've nearly forgotten what it looks like!

-Rodger

[attachimg=2]
 

Attachments

  • room1.jpg
    room1.jpg
    72.9 KB · Views: 341
Back
Top