Nightstand for my son

Joelm

Member
Joined
Feb 25, 2019
Messages
218
My kid needed a nightstand so before we shut ourselves in I went to my local rockler and picked up some 1/2" Baltic birch plywood and some hairpin legs.

He chose the colors and did the painting himself (with a little help from mom and dad).

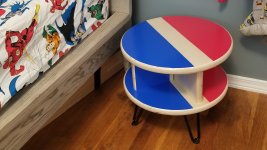
We attached the legs this morning and he's been busy seeing what he can fit in the shelves. View attachment 1
 

Attachments

  • 20200402_102358.jpg
    20200402_102358.jpg
    718 KB · Views: 290
Very nice! I'm sure he'll treasure it for years to come, especially because he helped!
 
What a great way to get the young ones involved and interested!  How did you cut the circles and what did you do to get the edge thickness? 

Thanks for sharing this with us.

Mike A.
 
I like the design. It is even better that he was involved in the process.
 
mike_aa said:
What a great way to get the young ones involved and interested!  How did you cut the circles and what did you do to get the edge thickness? 

Thanks for sharing this with us.

Mike A.

Thanks everyone. 

I first glued two 1/2" plywood  boards together to Getty a 1" thick surface.
For the circle,  I made a template with my carvex and the circle cutting attachment. I had a few areas the were not smooth  on my first cut and all of my subsequent tries were garbage. So I ordered the circle cutting attachment for my OF 1010 to make a clean circle.
Did some dominoing for assembly.
I masked off the areas my son could paint and once it was dry I ran the edges through my router table with a medium sized round over bit.
The only thing I wish I hadn't used was a gel edged painter's tape I pick up on sale at rockler. It let the paint bleed under the tape which meant a lot of sanding after removal to get nice clean lines.
 
Back
Top