Nightstands in oak and wenge

CirclDigital

Member
Joined
Jul 23, 2018
Messages
71
A few months ago I bought some pretty nice white oak and have been thinking about using it for a project.....

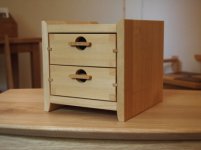
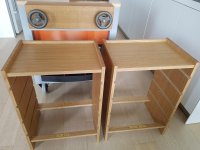
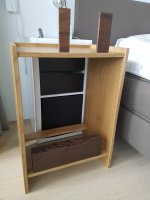
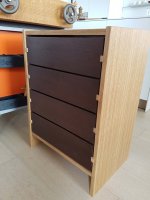
And after seeing this design I thought it, as a broad design idea, would also work for a set of nightstands that would replace the ones I currently use.
[attachimg=1]

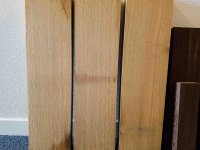
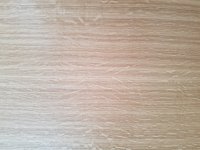
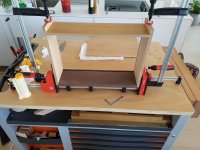
The oak that I had bought would suffice for the 4 sides and tops and was just wide enough that it could be resawn and bookmatched. After the getting everything roughly square and to size I could see a bit more of the wood and grain pattern that I was starting with.
 
[attachimg=2]

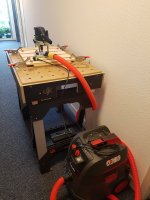
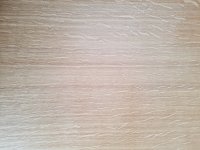
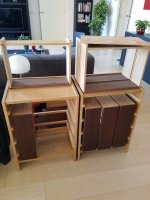
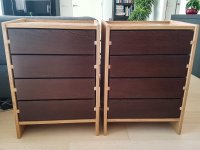
The resawing didn't quite work out as I had anticipated (or hoped). The bandsaw blade wandered a bit in most boards so I ended up with a somewhat thinner board than I had calculated. But a careful glue-up and some moderate planing gave me just enough thickness to continue. I should have known that starting with a rough board that is 55mm thick it would be nearly impossible to get a panel that is 24mm. In the end I had a flattened panel that is 21mm, not as good but still aesthetically pleasing in my design.

[attachimg=3]

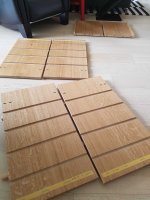
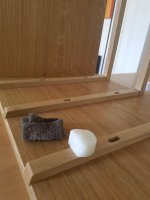
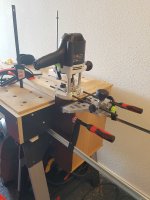
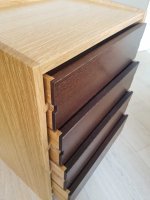
The construction was done with domino's since I didn't want to clutter the design with dovetails or through tenons.  And a router was to be used to cut the dado's for the drawer runners. Spacing those dado's was pretty critical in getting a good result since the only way to get an even spacing between the drawers was getting the placement of the dado's in the carcass and the groove in the drawers lined up correctly. So I build a jig, from plywood, that could be fitted to the panel where all the dado's could be routed by using the 30mm guide bushing. This worked great and I ended up with panels that were identical.

I do like working with the Domino XL and OF1400 for such tasks.

[attachimg=4]


Attachments

  • IMG_0583.JPG
    IMG_0583.JPG
    72.7 KB · Views: 1,253
  • 2018-04-23 19.53.59-1.JPG
    2018-04-23 19.53.59-1.JPG
    830.9 KB · Views: 1,323
  • 2018-05-25 13.13.12-5.JPG
    2018-05-25 13.13.12-5.JPG
    882.9 KB · Views: 1,172
  • 2018-06-13 08.31.53-7.JPG
    2018-06-13 08.31.53-7.JPG
    953 KB · Views: 1,185
This is what I ended up with as my first components after applying a first coat of Osmo hardwax oil.

And as you can see, no workshop for me yet. I live in an apartment so I have to make due with the space that's available. And that's the hallway leading from the elevator to my front door and the free space I have between my living room and kitchen.  It's a bit of a challenge but it's doable.

More to follow....


Attachments

  • 2018-06-13 13.57.47-8.JPG
    2018-06-13 13.57.47-8.JPG
    862.9 KB · Views: 276
  • 2018-06-14 12.46.10-10.JPG
    2018-06-14 12.46.10-10.JPG
    963.5 KB · Views: 291
That’s an unusual design - really nice! 🙂
That’s mad you ended up with 21mm from 54mm rough board - what did you use to smooth it?
I’m pretty new to good quality woodworking so keen to learn! 🙂 sorry if that’s a simple question!
That’s great you can built your own jig for a bespoke project! Would love to be able to do that one day! 🙂
And, lol that’s mad I was thinking that looks like carpet on the floor! In a narrow passage! Fair play!! Good job you’ve got a dust extractor! Definitely my next purchase! 🙂

Will be interested to see how it turns out! 😀
 
ilovesunshine said:
That’s mad you ended up with 21mm from 54mm rough board - what did you use to smooth it?

The challenge was to cut the 55mm thick boards in half to be able to use the inside grain pattern for a bookmarked glue-up. In the end after getting everything flat and square to end up with a panel that's 21mm is not too bad. I had hoped for a bit more though.

The rough work was done with machines, the final planning of the board by hand using a 5 1/2 and no 3 plane. And then some sanding up to 220.
 
Nice use of wood and space.  It's a continual challenge to resaw so that you lose the minimum amount of wood - for two reasons.  The first is losing the thickness, and the second is that the more wood you remove, the less perfect the bookmatch.  I've been continually tuning my resaw technique, and it's still not to where I would like.  At present I still have to count on losing between 1/4" and 3/16" to a resaw cut, which is better than I was getting 5 years ago, but I'd like to get it down to under 1/8" next, and eventually down to veneer slicing.  The end result is worth it, so keep working on the process.

It's a challenge to work in a dual-duty living space.  It also fosters creativity.  Keep up the good work.
 
It sure was a challenge..... and my main concern, as you mentioned, was losing the least material on the inside so the bookmark would still be good. There was quite the difference on both outsides, as you can see from the earlier pictures where the inside of the panel is shown. And I was using a bandsaw that wasn't that great, a bit of a loose blade and a small fence. But that's the problem with having to use gear that's not your own...

When I got through with that first board I was quite annoyed since I had a single board for both sides and the top for each of the nightstands. And I really wanted to build each out of one single board... it worked out in the end though.

This is what some of the panels, one side and the top, looked like in more detail. Far from perfect but it works for me (the photo is a bit brighter).


Attachments

  • 2018-08-13 14.21.00.jpg
    2018-08-13 14.21.00.jpg
    4.9 MB · Views: 217
  • 2018-08-13 14.21.45.jpg
    2018-08-13 14.21.45.jpg
    4.8 MB · Views: 204
Originally I had planned to build everything in oak but when the cabinet was taking shape I decided against that.

[attachimg=1]

After some discussion with my girlfriend I thought making the drawer front in wenge would be a nice touch. I liked that better than the walnut I also looked at....

So off to the lumber yard again to get some nice wenge and some oak veneered ply for the drawer bottoms. With the 8 drawers in total that I planned on building the volume of lumber really started to add up. And so did the work :-).

For the drawer slides and the stops there also was some more oak to be machined. Since I wanted an exact fit in the dado's I had routed in the panels having access to a good thicknesser was quite nice. Especially since the volume there also added up, in total in needed about 10m/35ft of length. And in reality quite a bit more since things were going so smoothly I stopped thinking and cut all drawer stops a bit short (If it needs to fit in the dado spanning the inside with it does come in handy if you include the depth of the dado on both sides in the size of the cut you need to make, duh). After making that mistake I cut another set a bit oversized and planed that down on my shooting board to get an exact fit.

Then is was back to the Domino again to make the holes for the screws to fix the drawer slides to the panels. A 5mm cut first and then an 8mm cut so that the screw holds the slide but the panel can still move somewhat. Could have also done it with a router but the domino was quite a bit faster.....

I forgot to document the process but this shows the end result when I fixed the drawer slides and waxed them...

[attachimg=2] 
 

Attachments

  • 2018-07-21 10.51.21-17.JPG
    2018-07-21 10.51.21-17.JPG
    796 KB · Views: 989
  • 2018-06-12 11.48.30-6.JPG
    2018-06-12 11.48.30-6.JPG
    986.9 KB · Views: 1,025
After quite a bit of sawing, planing and routing the drawers are taking shape.....
First a fitting session to make sure that I didn't make a mistake:

[attachimg=1]

Everything was as it should be so a lot of glue-ups to do.

[attachimg=2]

I decided against using dovetails since I didn't like the look for this design so it's a simple design.... but with 8 drawers to be completed that wasn't a bad thing :-).

[attachimg=3]
 

Attachments

  • 2018-06-27 11.40.30-11.JPG
    2018-06-27 11.40.30-11.JPG
    899.5 KB · Views: 901
  • 2018-07-02 13.56.42-12.JPG
    2018-07-02 13.56.42-12.JPG
    774.7 KB · Views: 928
  • 2018-07-02 13.56.54-13.JPG
    2018-07-02 13.56.54-13.JPG
    817.6 KB · Views: 901
I really like the idea of showing the drawer runners . adds to the design. Im gonna have to use that on some future project
 
HarveyWildes said:
Any Wenge splinters yet?

Plenty :-).

Most when handling the rough boards, and they are nasty. And the dust isn’t that great either. But the finished wood does look quite nice.

I was a afraid that I would get some tearout when routing since it can be a bit brittle. So I decided to make some sawcuts first. But so far so good.

jobsworth said:
I really like the idea of showing the drawer runners . adds to the design. Im gonna have to use that on some future project

As a design feature it turned out pretty good....and it’s simple. It’s just the accuracy that matters :-).
 
I agree, the inset runners showing in the face of the cabinet looks really nice.
Next time you could use a contrasting wood for the runners. :)

Wenge must be like Batu.  I was getting splinters from that even with thick gloves and they were nasty!
 
jarbroen said:
Next time you could use a contrasting wood for the runners. :)

I thought about that, but adding a 3rd wood species would be a bit too much in my opinion. My backup plan was making the runners from wenge or walnut and the fronts from oak. But I like this combination better.... there is a bit of contrast since the end-grain is facing forward for the runners, but not much.
 
Work continued with pinning the front of the drawers to the sides for some additional support. I used some conical wooden nails for that. They are store bought and come in beech.... they are discernible from the oak but they don't stand out.

[attachimg=1]

I used a simple oak veneered 4mm panel for the botoms that slides in and is fixed with one screw. Then the grooves for the runners in the drawers needed to be routed. My design called for a 7mm gap on all sides of the drawers and since there really is no room for adjusting the drawers the grooves needed to be accurately cut. Tilting the cabinets on the sides and using the drawer stops as a reference for each drawer worked out beautifully since everything did align perfectly.

[attachimg=2]

[attachimg=3]

[attachimg=4]

Just a minor amount of tear-out on one of the drawer fronts..... but fortunately nothing that cannot be repaired. A bit of waxing the grooves and after some minor corrections everything seems to slide effortlessly. And since the drawer stops at the back are perfectly aligned and the drawer components are dimensioned accordingly that means that the fronts align perfectly as well.

Now for the last part.... designing and fitting some drawer pulls. 
 

Attachments

  • 717527_02_A_WE_8_Japanische_Pr_zisions_Holzn_gel_WZ_jpg_c2_90x90.jpg
    717527_02_A_WE_8_Japanische_Pr_zisions_Holzn_gel_WZ_jpg_c2_90x90.jpg
    2.1 KB · Views: 725
  • 2018-07-21 16.17.09-23.JPG
    2018-07-21 16.17.09-23.JPG
    833 KB · Views: 716
  • 2018-07-18 16.13.22-16.JPG
    2018-07-18 16.13.22-16.JPG
    818.1 KB · Views: 757
  • 2018-07-21 11.39.08-19.JPG
    2018-07-21 11.39.08-19.JPG
    743.5 KB · Views: 802
That looks really cool!  Now I really want to attempt the wood slides.  That's the first time I've seen wood drawer slides that look really nice. 

How snug is the drawer to slide fit? 
 
I routed all grooves, both the cabinet and the drawers, with a 20mm bit. The drawer runners are 20mm as well and with the template I used and the 30mm copy ring that provided a snug fit but I didn’t have to force them into the groove of the cabinet.

When I routed one of the drawers I tested the fit.... and as expected a groove of 20mm was too tight. But with the micro adjust of the OF1400 it’s easy to make a second pass with a slightly different setting from the fence. I found an offset of 0,2mm worked pretty good (for the offset in depth as well).

With everything sanded and waxed the offsets ended up being 0,3mm and the drawers move with only the slightest of pressure and they don’t wobble [smile]. I’m even wondering if they aren’t too loose since humidity here is now at its peak. Time will tell, it’s the first time I have used this type of runners....

 
I build each cabinet from a single board so the sides and top should move somewhat at the same rate.

The runners would be an issue since the grain doesn't follow the sides they are mounted to, so I just used a drop of glue at the front and fixed them with screws at two more places but since they are fixed in elongated holes (used the Domino for that) there is room for wood movement there. The drawers shouldn't move that much, and mostly in height. The 7mm spacing there should be more than enough :-).

And yes, moxon vise with bench fitted to my tool trolley/worktop for that additional clamping or elevated worksurface.

And both will now need drawer pulls  [cool]

[attachimg=1]
 

Attachments

  • 2018-07-23 09.45.36-21.JPG
    2018-07-23 09.45.36-21.JPG
    890.2 KB · Views: 650
Back
Top