Rutabagared
Member
- Joined
- Jan 27, 2008
- Messages
- 296
I saw a post a while back inquiring about undermount drawer slides for shop cabinets, which reminded me of heavy duty drawers I made with wooden slides, NK drawers.
I recently made an Asian nightstand using this method because I prefer them but do not encounter many who use them. They are very easy to fit (you’re only planing or sanding a small edge to an already custom-fitted drawer bottom assembly), can handle a lot of weight, function very smoothly, and can use thinner stock for the drawer box. Some compromises are the assembly is a bit more involved (two glue-ups but very straight forward and easy), and aesthetics aren’t everyone’s cup of tea. I first used them about 15 years ago for my bedroom furniture and those drawers function as smoothly as when they were new. I now make almost all of my drawers this way.
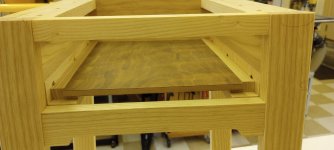
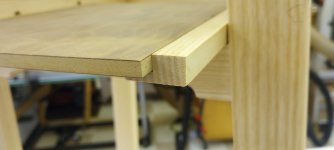
The drawer box is constructed much like a typical drawer box minus the bottom. The box is then glued to a bottom assembly that consists of L-shaped runners attached to a bottom panel. The box is then attached to this assembly. One of the advantages of this method is that the drawer side is located away from the side of the carcass or runner assembly. This is advantageous for drawers with wide sides, as I have several antique dressers with wide sides that tend to cup over time, leading to binding. Also, the bottom assembly can be custom fitted to its opening. This makes fitting drawers much easier, a few swipes with a plane/sanding block are all that’s required.
Bottom assembly ready for glue-up.
[attachimg=1][attachimg=2][attachimg=3]
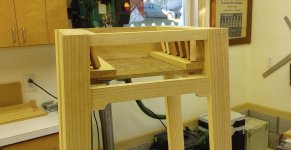
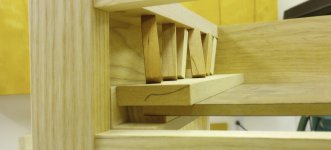
Glue-up in vivo. Simply wedged in with fitted cauls.. The cauls work well. Just cut them slightly longer than needed. The corners dig in, so they stay put and they apply a surprising amount of pressure. The mdf scrap protects the drawer bottom.
[attachimg=4][attachimg=5]
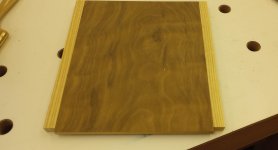
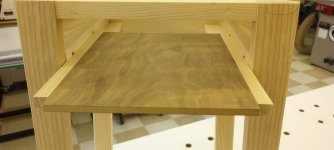
Bottom assembly complete. The bottom sits proud to fit into a groove in the back of the drawer face.
[attachimg=6][attachimg=7][attachimg=8]
I overbuilt the drawer box a bit. I wanted to maintain a minimum thickness of stock so I could use the minimum domino depth setting.
[attachimg=9]
I recently made an Asian nightstand using this method because I prefer them but do not encounter many who use them. They are very easy to fit (you’re only planing or sanding a small edge to an already custom-fitted drawer bottom assembly), can handle a lot of weight, function very smoothly, and can use thinner stock for the drawer box. Some compromises are the assembly is a bit more involved (two glue-ups but very straight forward and easy), and aesthetics aren’t everyone’s cup of tea. I first used them about 15 years ago for my bedroom furniture and those drawers function as smoothly as when they were new. I now make almost all of my drawers this way.
The drawer box is constructed much like a typical drawer box minus the bottom. The box is then glued to a bottom assembly that consists of L-shaped runners attached to a bottom panel. The box is then attached to this assembly. One of the advantages of this method is that the drawer side is located away from the side of the carcass or runner assembly. This is advantageous for drawers with wide sides, as I have several antique dressers with wide sides that tend to cup over time, leading to binding. Also, the bottom assembly can be custom fitted to its opening. This makes fitting drawers much easier, a few swipes with a plane/sanding block are all that’s required.
Bottom assembly ready for glue-up.
[attachimg=1][attachimg=2][attachimg=3]
Glue-up in vivo. Simply wedged in with fitted cauls.. The cauls work well. Just cut them slightly longer than needed. The corners dig in, so they stay put and they apply a surprising amount of pressure. The mdf scrap protects the drawer bottom.
[attachimg=4][attachimg=5]
Bottom assembly complete. The bottom sits proud to fit into a groove in the back of the drawer face.
[attachimg=6][attachimg=7][attachimg=8]
I overbuilt the drawer box a bit. I wanted to maintain a minimum thickness of stock so I could use the minimum domino depth setting.
[attachimg=9]
Attachments
-
 nk drw5r.jpg290.1 KB · Views: 341
 -
 nk drw3.jpg404.9 KB · Views: 347
 -
 nk drw6.jpg443.2 KB · Views: 355
 -
 nk drw8r.jpg496.6 KB · Views: 347
 -
 nk drw7r.jpg342.9 KB · Views: 343
 -
 nk drw4r.jpg334.8 KB · Views: 338
 -
 nk drw3.jpg404.9 KB · Views: 337
 -
 nk drw2.jpg218.7 KB · Views: 343
 -
 drawer corner.jpg258 KB · Views: 341