NOVA Voyager DP

Bob D.

Honorary Member
Member
Joined
Feb 22, 2016
Messages
3,014
I know I posted in another thread about the Voyager and I sorta took that thread off topic which I apologize for.

So I am starting this new thread about my NOVA Voyager which arrived on Wednesday and I got to put together yesterday.

Anyone has questions or wishes to add information about their Voyager feel free to do so. That keeps all the info in one place for others to find later on.
 
To start the shipper gave me a delivery window of basically all day, anywhere from 8am to 6pm.

OK, I know how it goes, I drove a truck and made deliveries in a 400 mile radius of
home many moons ago but it has not changed much. The sooner you can make that
first stop, the sooner you'll be back home.

Luckily I was awake early on Wednesday because at 0630 the driver is out front getting
ready to drop the thing off the lift gate at the end of my driveway. It was no signature
required and he was going to leave it in the driveway and go on his merry way. That
would have created more work for me to get it up on a dolly and into the shop 100 feet
away. Bottom of the box is flat (not on a pallet and no skids) so not easy to get something
under it.

But I happened to see him and went outside and we got it up to the garage where we
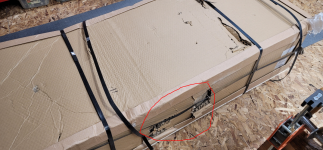
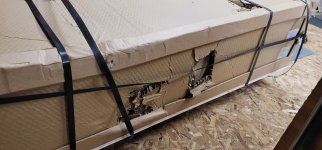
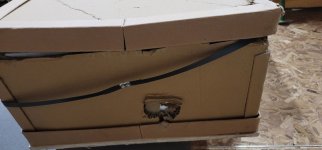
transferred it onto a dolly from his pallet jack. I'm looking at this thing as we move it
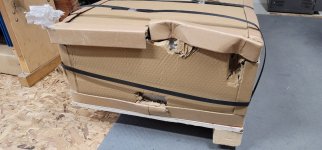
and the box is pretty beat up, lots of gashes and dents in the cardboard which is a 1"
thick honeycomb not your standard corrugated stuff. Bottom of the box is a piece of
plywood about 1/2".

Shipping weight was 310#, I'd guess 275 of that is the DP itself and the rest is the
packaging.

I was to find out very soon how close this machine came to disaster. When I opened the
box I saw that the display on the front of the head was facing out to the side and the box
had been crushed in that area to within 1/4" of the face of the display. But no damage that
I can see so for now OK. A few other parts jostled around and some cracked Styrofoam
indicating a few drops along the way but no damage to the drill press itself so I signed
for it and proceeded to unpack the beast.

Took about an hour to clean all the oil off the cast parts with some mineral spirits and then
wipe them down with a clean rag. Then I gave all the bare CI a first coat of wax while all
surfaces were accessible before assembly.

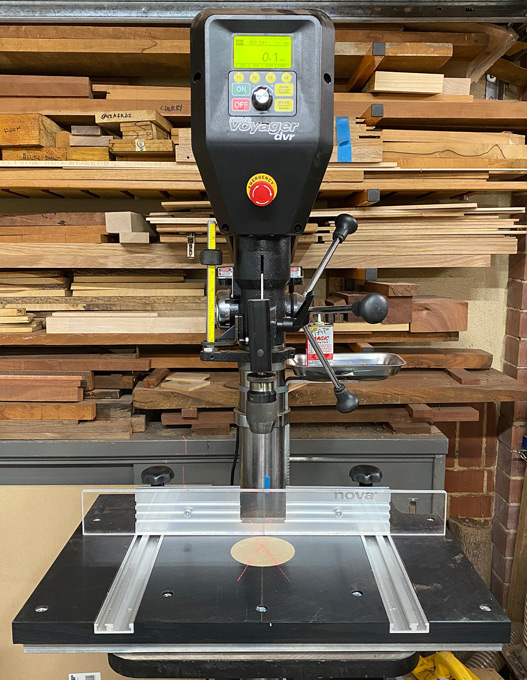
The base is much larger than my old Craftsman DP, twice as wide and about 6 inches
greater in depth. I figured where I wanted to place the DP and marked out the floor so I
could cut the Dricore with my tracksaw. It ended up in roughly the same spot my old DP
has occupied for the last 15 years. It's proven to be a good spot so I decided to keep it.

I didn't put any anchors in yet and level the base, that will probably happen this weekend.
Out of order I know but I didn't have my Hilti drill with me. So I proceeded to mount the
column on the base then installed the table support arm on the column and engaged the rack.

Then it was time to put the head on top the column. The head with all the electronics and the
motor I'd say is better than 100#. More than I want to lift over my head and slip onto the top
of the column which is about 5.5 feet high. That puts most of the weight over 6 feet above the
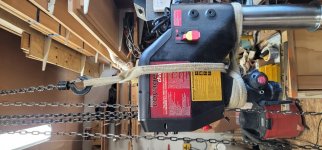
floor. Not a good plan for a one man operation so I setup my small chain hoist over head and
that made it easy. I lagged a 3 foot length of Unistrut into three joists and hung the chain hoist
from there. If I had an open ceiling I would have just laid a 4x4 across three joists and hung
the hoist from there but such is not the case for me. The ceiling is insulated and the space above
the DP location is at an outside wall so in the attic space very little room to maneuver for an old
fart like me.

Rigging I can do so that was the smart way to go for me. It also meant there was no time pressure
putting the thing together because I was not holding 100# over my head. I could take my time and
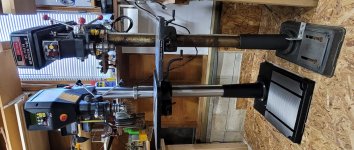
get the head aligned with the column and slide it down on there easy as pie. One of the pics below
shows how I rigged it up. One 6 foot sling was all I needed and I had a nice level pick so nothing to
fight on the way down when I dropped it on the column. I want to add that the sling is not wrapped
around like that just to take up excess length. I had shorter slings but I _wanted_ this one so I could
rig it just this way. I did that to ensure it could not slip if the head should rotate. This pick was made
in one lift with the head on the floor and laying on it's side. It had to be rigged such that when it was
upright it would be level and could not slip. Working alone as I was meant I had to double check
everything to ensure I did not get hurt or damage the drill press or anything else in the shop.

I probably should have made a spreader out of a piece of wood to keep the sling from crushing the
top of the head since it is plastic.  A piece of 3/4 play about 2 inches wide and slightly longer than
the width of the head is what is needed. A slight notch in each end for the sling to rest in or some
other way to keep it from slipping off should be used.

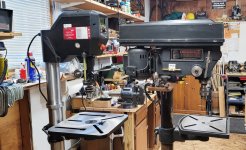
Once I had the head mounted there were just a few bits left to go and I had all that done in a few
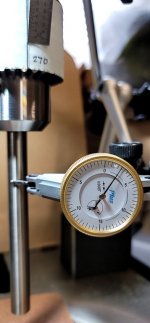
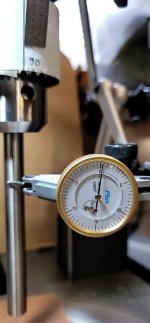
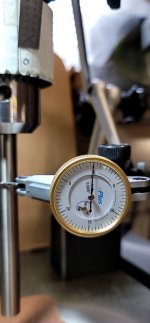
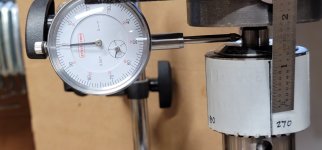
minutes. I had to reinstall the depth gauge that I took off so I didn't have to worry about damaging
it during the rigging operation, the quill handles, and the arbor and chuck to install. Only other piece
was the table and that just dropped right in.

The last couple photos are my old DP alongside the Voyager.
 

Attachments

  • NOVA Voyager 20210610_01.jpg
    NOVA Voyager 20210610_01.jpg
    264.4 KB · Views: 309
  • NOVA Voyager 20210610_16.jpg
    NOVA Voyager 20210610_16.jpg
    267.8 KB · Views: 339
  • NOVA Voyager 20210610_10.jpg
    NOVA Voyager 20210610_10.jpg
    306.6 KB · Views: 404
  • NOVA Voyager 20210610_12.jpg
    NOVA Voyager 20210610_12.jpg
    200.5 KB · Views: 342
  • NOVA Voyager 20210610_07.jpg
    NOVA Voyager 20210610_07.jpg
    319.7 KB · Views: 344
  • NOVA_Voyager_Shipping_Damage_04.PNG
    NOVA_Voyager_Shipping_Damage_04.PNG
    1.3 MB · Views: 272
  • NOVA Voyager 20210610_03.jpg
    NOVA Voyager 20210610_03.jpg
    260.4 KB · Views: 271
  • NOVA Voyager 20210610_02.jpg
    NOVA Voyager 20210610_02.jpg
    165.2 KB · Views: 304
Took a few checks after mounting the chuck and squaring up the table. Doesn't look too bad.
I got the table within 0.005" of square over the 18 inch table width.

On the arbor I am only seeing 0.001" of runout and on a piece of 1/2" drill rod mounted in
the chuck I have just a bit under 0.004" runout measured with a test indicator.

Here is how I set it up. I used a piece of paper which I marked the circumference of the chuck on, then folded twice to give me four creases 90 degrees apart. I mounted this on the chuck with some tape so it couldn't shift. I labeled every 90 degrees with a Sharpie. I took a small magnet and a 6 inch steel pocket rule and used them to make a indicator that came up close to the chuck. That way I could be sure I was rotating the chuck 90 degrees for each reading. Not exact but much better than guessing.

Placed the 1/2" drill rod which I keep only for making measurements like this in the chuck and tightened all three jaws evenly.
I set my dial indicator up on the arbor and took a reading every 90 degrees. Then I set the test indicator up on the drill rod and measured the runout for the chuck. Photos below, first one is showing the overall setup.
 

Attachments

  • Voyager Chuck Runout 270 deg.jpg
    Voyager Chuck Runout 270 deg.jpg
    59.6 KB · Views: 257
  • Voyager Chuck Runout 180 deg.jpg
    Voyager Chuck Runout 180 deg.jpg
    58.9 KB · Views: 236
  • Voyager Chuck Runout 90 deg.jpg
    Voyager Chuck Runout 90 deg.jpg
    58.7 KB · Views: 250
  • Voyager Chuck  Runout 0 deg.jpg
    Voyager Chuck Runout 0 deg.jpg
    57.2 KB · Views: 244
  • NOVA Voyager Arbor Runout 270 Deg.jpg
    NOVA Voyager Arbor Runout 270 Deg.jpg
    173 KB · Views: 274
  • NOVA Voyager Arbor Runout 180 Deg.jpg
    NOVA Voyager Arbor Runout 180 Deg.jpg
    165.6 KB · Views: 257
  • NOVA Voyager Arbor Runout 90 Deg.jpg
    NOVA Voyager Arbor Runout 90 Deg.jpg
    168.6 KB · Views: 276
  • NOVA Voyager Arbor Runout 0 Deg.jpg
    NOVA Voyager Arbor Runout 0 Deg.jpg
    176.6 KB · Views: 278
  • Voyager Test Setup.jpg
    Voyager Test Setup.jpg
    83.8 KB · Views: 293
The NOVA DP does not have a work light or a laser. For the money you'd think they would be there.

I found a nice magnetic base LED light on Amazon that arrived today and is working out nicely.
The magnet is very strong, it will not fall off. It's almost too strong if that's possible and it has
a soft face that will keep it from scratching the DP paint.

It should work on any drill press and it's less than $20.
https://www.amazon.com/gp/product/B07J4ZKGF4

I plan to pick up a Wixey DP laser soon. I have a laser on my old DP but I don't want to remove it.
 
Now, what I don't like so far.

1. Table finish is rough. Flat maybe but it is not even close to being smooth.
    Lots of mill marks that will collect dirt and debris and make work to keep
    it clean so not happy about that.
2. The center insert is screwed in with a pair of tiny flat head hex screws. You
    need a 3mm hex wrench to remove them which did not come with the tools
    included with the machine. To top it off they are not even 180 degrees apart.
    If you rotate the insert 180 the two screw holes don't line up. Put a screw
    in one hole and the other is off by half the screw diameter. That's quality.
3. The insert sits about 1mm below the table surface, so if you are drilling near
    the edge of a small piece that end may be unsupported. Another quality hit.
4. The center of the insert has a hole about an inch in diameter. If you don't hang
    on to your bit or cover that opening and should drop your bit while loosening it
    is plunging straight down to crash into the cast iron base which will not be good.
5. The insert is a round, thin disc only 2mm thick, so not easily replaceable with some
    consumable material by the user. If it had been 6mm or 1/4" thick that would be
    nice, but a square insert of MDF one half inch thick would have been better.
6. The table has a rib around the underside of the edge that will make it difficult to
    clamp anything down. The slots in the table top are huge and do not accept any of
    my hold down hardware from my clamping set. They are not even t-slots like you
    see in my Craftsman DP table.

All-in-all the NOVA table is a disappointment.

I'm going to look into having the table machined to change the insert opening from round to square so I can use some 1/2" MDF and include a leveling screw in each corner. Looking at the casting I believe there is more than enough material to do this. I certainly can't do it, I will have to give it to a local machine shop. I will also look into having the surface made smoother.

If it were possible I would replace the NOVA table with the support arm and table from the Delta 18-900L drill press. I would need to replace the arm as well as the table because of the way the Delta table mounts. It's not on a post that can rotate left or right like most other drill presses, it can tilt front to back also with it double trunnion setup which is very much like that used on larger bandsaws. But this will not work because the column on the Delta is only 80mm in diameter and the NOVA is 92mm, so can't do a straight swap.
 
Anyone know what this jack is for next to the USB port?

It has two pins.

Couldn't find a mention of it in the manual or anywhere else.


Attachments

  • NOVA Voyager 20210610_08 (Medium).jpg
    NOVA Voyager 20210610_08 (Medium).jpg
    109 KB · Views: 365
Thank you. I have seen mention of the guard that is required in
the EU and elsewhere but didn't realize it had a lockout switch.
 
Bob D. one big question. Would you buy it again? If not what would you look at instead?
 
If I couldn't get the Vulcan, I would go for either the Viking if I was determined to have the DVR motor and all the wizardry that comes with it, or a toss up between the PowerMatic and the Delta. The price of either of those two is not far behind the Voyager, so for a couple hundred more I went with the NOVA.

The Delta tilt/swivel table looks to be an advantage but in all the years I wonder how many times I would have used that capability on my current DP. I don't think I ever wanted for it but that could be because I just knew it wasn't possible. I like the ability to clamp easily to the table edges and the replaceable insert.

The table on the Voyager is not as good as it could be for woodworking. Other than that I don't really have a gripe so far, but it's only been a couple days and I have yet to really give it something to do. I also bought the NOVA fence but don't like it at all, it's going back today for a full refund. Not worth the money.

I would have rather had the Vulcan for the stouter MT3 spindle and the ability to use an ER32 collet so I could do some light milling. I would like to have a small milling machine and if I could have had both in one tool and saved a bunch of money that would have been great.

I would like the ability to do some slotting in metal bits and maybe some light facing operations to square up pieces, mostly in aluminum. But NOVA's decision to halt production of the Vulcan and the four parts needed to convert the Voyager ended that dream for me. I doubt I will ever buy a dedicated milling machine. Just don't have enough use for it.

So to your question yes I would consider it but I would have to think hard about spending the ~$700 over the price of the Viking floor model. I don't know that there is enough advantage to the Voyager over the Viking for that much money. I could buy some other tool I need/want with that $700 I saved by going with the Viking. On top of the the Viking has a built in light and laser, so that bumps the price up another $80 to add those two features to the Voyager.

If I was NOVA I would stop making the Voyager and make it only as a Vulcan aimed at the metalworking crowd. And continue making the Viking for woodworking but improve on the table making it more like the Delta with a replaceable insert, smooth top surface, and flat edges that are easy to clamp to.
 
Just a couple of observations:

Firstly, the Nova Voyager (which I have), as with every other drill press, missed out on building a square (rather than round) column. This would ensure repeated accuracy in positioning the chuck.

Secondly, I do not know another drill press where the table does not need something custom.

My response, as with others, was to build my own table. The main feature here is a round, offset waste section.

The Nova fence is actually a good one as long as it tracks in the new table t-tracks - the underside of the cast iron table is uneven and the bolts will not slide. The set up now is excellent.

The fence is extended with a subfence.

fence1.jpg


fence2.jpg


Add the Wixey laser cross hairs, and a bicycle light.

Regards from Perth

Derek
 
I thought the fence was a POC for almost $100 so I sent it back. You
are right my biggest problem with it was the interface with the table
and the tables' underside being uneven which makes repositioning and
locking the fence down a PITA.

A auxiliary table top is in my future that is certain.

A square column I don't think I have ever seen on a drill press.
I don't know if I would like that or not. Both shapes have pros and cons.
 
MikeGE said:
Bob D. said:
Anyone know what this jack is for next to the USB port?

It has two pins.

Couldn't find a mention of it in the manual or anywhere else.

This is for the optional safety guard.  This prevents the motor from starting unless the guard is rotated into place in front of the chuck.
https://www.kingcanada.com/en/produ...safety-guard-for-nova-voyager-dvr-drill-press

It’s not optional here!

That safety guard is the most ridiculous thing - first job was to remove it, what a waste of money must be involved in fitting it. The lockout switch, however, has to be operated to run the drill and I didn’t see any option to disable this. Maybe this could be avoided by loading the non-EU firmware, I don’t know, but what I did was to desolder the flex from the plug that fits the DIN (?) socket and just soldered across the two contacts in the plug that I leave in position, so it is permanently enabled.

Cheers

 
[member=4358]derekcohen[/member] You asked for it. A square column conversion for a drill press.
 
I have a simpler idea, machine a slot in the column and a locating key in the collar which the table is fixed to and call it done. The location key in the column could be screwed in if the table needed to be moved horizontally.
 
That could work but I wonder how it would affect the rigidity of the column. I find the 92mm column on the Voyager to not be as rigid as I would like. It seems no better than the column on my old DP on which the column is about 25mm less in diameter.

But maybe the rigidity problem is the base and not the column itself. The base on the Voyager is of the same design as that on my old Craftsman and most other low-end drill presses. Industrial and heavy duty models have bases that are heavier and thicker castings. The Voyager DP base doesn't seem much better than the Craftsman.  Thinking back I don't believe it weighs more than 30 pounds. It was not difficult to pick up at all. I will measure the column ODs on both tomorrow. Don't think I can get a wall thickness measurement without removing the motor and that's not going to happen.
 
If you don't want the table to move from side to side when adjusting the height just fix the vertical rack to the column by either screwing it to the column or clamping it.
 
Bohdan said:
If you don't want the table to move from side to side when adjusting the height just fix the vertical rack to the column by either screwing it to the column or clamping it.

That would be even more simple. I am not familiar with the Nova DP's but I doubt a few holes or a shallow slot would affect the rigidity of the column. It wouldn't work for me as I frequently move the table on mine for different jobs as needed and I don't see that losing the centre of the drilled hole as such a problem. If the DP is not rigid I would be taking a really close look at why. I did look at one when they first came out and knocked it back due to the small screen and the way the menu system worked, if only they had a port to plug a tablet or touch screen into it would make using one much easier.
 
Bohdan said:
If you don't want the table to move from side to side when adjusting the height just fix the vertical rack to the column by either screwing it to the column or clamping it.

The slot that the rack passes through is too large be anything near accurate. Also you would have to secure it to the column about every 4 inches (100mm) or replace it with a rack of much better steel.
 
Am I missing something? I have made an insert for my drill press table that has a hole with the diameter of a rod that I know is straight. When I have the need for repeatable offsets after adjusting the height of the table I just put that rod in the chuck and change the height while the rod is sticking through the hole in the insert. That way it cannot move in the horizontal plane. I've been doing this for years without any problems when it comes to accuracy. There might be some slight movement in the horizontal plane, but it definitely is not much.

I am not near the shop right now to make a photo of it, but if you look at this photo then it is the square insert, not the round offset insert in the square insert.

[attachimg=1]
 

Attachments

  • 20190627@101752-01.jpg
    20190627@101752-01.jpg
    178 KB · Views: 1,231
Back
Top