Nova Voyager Drill Press

Mario Turcot

Member
Joined
Nov 26, 2017
Messages
1,288
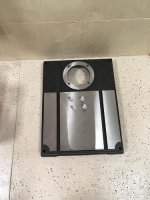
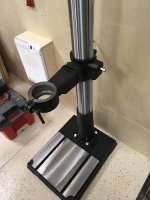
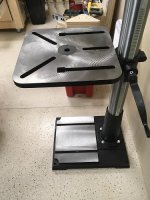
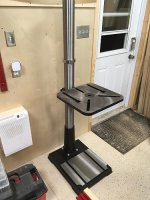
Any one have any experience with the Nova voyager drill press? I currently have a cheap bench drill press and I am sick of it. Next to zero accuracy a pita to change speed and it feels like everything is going to fell apart when running.

I watched several videos of the Nova Voyager and I am wondering if what they claim is real  [eek]

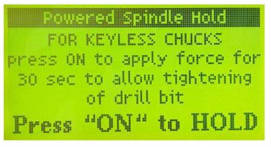
Also if you have experience with it do you think a keyless chuck would be a good idea despite the fact that the reverse feature would not be of much use.

Thanks!
 
I just find out this new feature;

Power Spindle Hold (for keyless chucks)
A new feature which has been introduced is the “Powered Spindle Hold” function which powers and holds
the spindle for 30 seconds, freeing up one hand to hold the drill bit and tighten the chuck.
NOTE: This function applies 11% of the maximum motor power to the spindle when tightening
To access the Powered Spindle Hold function, go to Menu > Advance Modes and select the Pwrd Spindle
Hold function. To activate the hold, press the button while the following screen is displayed.

[attachimg=1]
 

Attachments

  • keylesschuck.PNG
    keylesschuck.PNG
    98.5 KB · Views: 4,890
Good morning Mario. Do a search here of the FOG.
There was a post about the drill press ~18 months ago.
Rick
 
I have one.  Purchased around the first of the year.  I like it a lot.  The 50 RPM to 5000 RPM infinitely variable speed is great with the turn of the dial.  Digital depth readout in digital or fractions.  I use the hole depth auto stop, the speed control, the various drilling modes for speed based on bit size (forstner, metal, etc).  I have not tried the auto tapping mode but will. 

There have been two software updates since I purchased.  You plug a Windows machine into the unit and download their update utility.  It will also update the SW with a Mac IF you are running a windows emulator on it, which is what I do.

The standard chuck doesn't quite go down small enough for a 1/16" bit, so I changed out the chuck with one from Amazon.  But I've found runout to be minimal and the tool to be great to use.  It is keyless and I replaced it with a Chinese import keyless that is accurate.

Yes the keyless auto hold is a cool feature too.  For larger bits I use it but have found sizes below 3/8 in wood work with a hand tightening of the chuck.

Fit and finish are great.  It does take two people to assemble and get the motor on the column.  I upgraded from a 20 year old Delta and the difference is night and day in performance, torque, accuracy, etc.  I made a custom top for it using Woodpecker's components for a fence, T-tracks, etc.

neil
 
The Nova Voyager is a great machine. With the push button speed changes and a keyless chuck you can work very quickly. Once you get used to using the dp that pre-programmed 30 second hold will seem like an eternity. I’d consider it a drag rather than a feature. You can tighten a non-keyless chuck in less time.

Get a keyles chuck that allows you to mechanically tighten also so you can make use of the reverse feature when tapping metal.
 
It is possible for one person to assemble but get help if you can.

Bought mine early 2017. The features I needed were only available via the first sw update. Had a deadline and wasn’t familiar with sw emulation on Mac so I just bought a cheap PC. Have not done the second update.
 
Michael Kellough said:
Once you get used to using the dp that pre-programmed 30 second hold will seem like an eternity. I’d consider it a drag rather than a feature. You can tighten a non-keyless chuck in less time.

Get a keyles chuck that allows you to mechanically tighten also so you can make use of the reverse feature when tapping metal.

Ya, I wouldn't get too excited about that feature. It'll definitely slow you down and rapidly become a nuisance.

I have an old Delta that I put an Albrecht keyless chuck on. I just hold the chuck with one hand and tighten with the other hand, you don't need to use much force. It literally takes me less than 2 seconds to tighten the chuck. The Albrecht chuck tightens itself when you're drilling.

Presently, I'm drilling 13/32" through-holes in schedule 80 steel pipe with just a quick twist of the chuck.

So, chuck up a 1/4" bit, tighten, drill pilot hole, loosen, chuck up the 13/32" bit, tighten, drill through-hole, loosen and move to the next hole.  [big grin]  The keyless chuck is a god send.
 
Rick, I did search on Nova Voyager and found/read a few threads. However what I am looking for is people that have worked with the drill press and gather their impression on the subject... thanks.

Thanks Neil and Micheal for your inputs. I have mine in the SUV and plan to unpack and stare at it tonight, than start the assembly a few days from now  [eek]
 
Solo assembly,
put pole in stand
Add table mount and rack collars (and leave parked right on top of base so you won’t have to lift so much of it later)
Lay pole on side on an adjustable riser (I used a cardboard box so it could be crushed to get top of pole to height of head)
Place head unit on folded packing blanket on dolly (folded blanket is another adjustable shim)
Roll head/dolly to pole and wiggle into place (leave head at wacky rotation so you can tighten set screw without leaving a mark anywhere near final rotation)
Lift assembly upright (easier said than done)
Loosen head set screw and rotate to suit base
Re-tighten set screw
Raise table mount and add rack
Add table (at this point I realized the table mount was upside down and had to lay it down and start over, easier the second time) [embarassed]
 
Mario,

I just found this

What a drill press!

Did you get yours from King Canada?
 
I pondered doing what Michael suggested with my Delta drill press.  But looking at the 4 tiny bolts that hold the flange to the thin casting on the base, I decided it wasn't worth the risk.  With my luck, the casting would crack and the head would drop on my foot!
With an extra set of hands, it was very easy to lift the head over the post. 
 
The connection of the pole to the base is robust on the Voyager. The weak point is the way the head attaches to the pole.

The pole is a cast iron pipe that has been ground round on the outside. The remaining wall thickness is much less than I’d like. What’s worse, instead of a clamp connection the head has an oversized hole that slides over the pole and is “secured” by a single set screw. Really wanky in my opinion but it seems to work okay.
 
[member=297]Michael Kellough[/member]
Michael Kellough said:
The connection of the pole to the base is robust on the Voyager. The weak point is the way the head attaches to the pole.

The pole is a cast iron pipe that has been ground round on the outside. The remaining wall thickness is much less than I’d like. What’s worse, instead of a clamp connection the head has an oversized hole that slides over the pole and is “secured” by a single set screw. Really wanky in my opinion but it seems to work okay.

My head have two set crews
[attachimg=1]
I know I will look dumb for asking but what is that key for?
[attachimg=2]
 

Attachments

  • dp-head.jpg
    dp-head.jpg
    71.3 KB · Views: 4,426
  • dp-key.jpg
    dp-key.jpg
    58.8 KB · Views: 4,430
[member=57948]ChuckM[/member]  I bought it from a local store called Ottawa Fastener Supply. The Nova Voyager drill press and lathe are distributed by King Canada Industrial. The drill press was 1999 + our famous taxes that bring it to 2250... Some times I wish I live in Alberta  [big grin]

That's one sweet drill press with a ton of features. I am now looking at drill press jigs so if you have any suggestions let me know.
 
Pickup time - Fit nicely in the SUV
[attachimg=1]
Getting the monster parts on the abomination table
[attachimg=2]
Leveling the base
[attachimg=3]
Attaching the column
[attachimg=4]
Checking handle clearance
[attachimg=5]
Attaching the table
[attachimg=6]

Still have to set the head. It's ~100lbs and I really don't want to drop it. Will do it tomorrow with some help  [smile]
 

Attachments

  • dp-suv.jpg
    dp-suv.jpg
    74.2 KB · Views: 4,374
  • dp-parts.jpg
    dp-parts.jpg
    83.8 KB · Views: 4,418
  • dp-base.jpg
    dp-base.jpg
    72 KB · Views: 4,425
  • dp-column.jpg
    dp-column.jpg
    70.8 KB · Views: 4,506
  • dp-clearance.jpg
    dp-clearance.jpg
    86.3 KB · Views: 4,386
  • dp-ready.jpg
    dp-ready.jpg
    76.4 KB · Views: 4,382
Mario Turcot said:
Still have to set the head. It's ~100lbs and I really don't want to drop it. Will do it tomorrow with some help  [smile]
Assemble it horizontally on the floor and than lift the hole thing upright. Attach the table last.
 
Svar said:
Assemble it horizontally on the floor and than lift the hole thing upright. Attach the table last.

I’m with Svar again on this one (I hate it when that happens). I assembled a 400# plus Delta drill press horizontally on the floor and simply attached it to a come-along mounted to the floor joists and just raised it into place. Easy-peasy.
 
Svar said:
Mario Turcot said:
Still have to set the head. It's ~100lbs and I really don't want to drop it. Will do it tomorrow with some help  [smile]
Assemble it horizontally on the floor and than lift the hole thing upright. Attach the table last.

From the last picture you can tell it was late last night, around midnight when I closed the shop. I will try that today if I cannot get my son's help. He is in weight lifting so i thought it would be an easy and safe task for him. Thinking about it, that's how I assemble the band saw and it was darn easy and pretty much the same weight ~300lbs
 
Back
Top