Nova Voyager Drill Press

Mario Turcot said:
I will give a try to the chuck coming and if accuracy do not meet my expectation will look at Rohm chucks

Accuracy is only one thing to look at with a keyless chuck. The real bug-a-boo is does the chuck hold the drill bits tightly enough to prevent rotation in the keyless chuck.

Over the last almost 50 years or so, I've been fortunate to be able to use keyless chucks in all sorts of machine tools. When it came time to purchase one for myself, I chose Albrecht because it was pretty much standard fare in machine shops and model shops. I did look at the Rohm and at the Jacobs brands because they were significantly cheaper than the Albrecht when purchased new.

Like Michael said, place one hand on the top ring of the chuck and the other hand on the chuck body and wring them together. With a good functioning chuck, you don't need to exert much force. On the Albrecht, the process takes 1-2 seconds...that 30 second delay will just become a nuisance.
 
[member=21249]RKA[/member], [member=297]Michael Kellough[/member], [member=167]neilc[/member], [member=41086]Vondawg[/member] Any of you guys convert it to 220v yet?
 
Mario Turcot said:
Michael Kellough said:
The Voyager does come with a drift key.

[poke] about time you answer that question  [crying] I was wondering what that key was for lol. It have a magnet and both ends are shaped differently. see image on page #1

That isn’t the drift key, just some half useful wrench for assembly. Just google images to see what the drift key looks like.
 
Mario Turcot said:
[member=21249]RKA[/member], [member=297]Michael Kellough[/member], [member=167]neilc[/member], [member=41086]Vondawg[/member] Any of you guys convert it to 220v yet?

Why bother?
 
I try to run everything I can on 220v, so I was curious if any one did.
From the instructions, you only have to change the plug and that's it.
 
[member=66597]Mario Turcot[/member] you might also want to pick up a 4 or 5 inch machined 1/2 inch dowel like this.
https://www.mcmaster.com/#98381a727/=1ea7u86

It’s useful for a lot of operations. Chuck it up and pair it with a mag base dial indicator and you test run out. The solid nature makes it easier to see on a square if the table is perpendicular to the quill.

With it chucked you always know the exact center of the bit is 1/4 inch from the outside edge of the rod. Need to put a hole 1 inch from the edge? Put a 3/4 inch spacer between the rod and the fence.

If you’re one of those metric folks then opt for a 12mm dowel
https://www.mcmaster.com/#91595a773/=1ea80p8

Ron

 
Forgot about this issue I had with the Voyager. The table was concave. They sent another but in the meantime I put a large cross slide table on the existing table and shimmed it square. Haven’t even opened the replacement table to check its condition.
 
Michael Kellough said:
Forgot about this issue I had with the Voyager. The table was concave. They sent another but in the meantime I put a large cross slide table on the existing table and shimmed it square. Haven’t even opened the replacement table to check its condition.

Good to know, I will check mine. However for wood I will use a phenolic table like Neil.
 
rvieceli said:
[member=66597]Mario Turcot[/member] you might also want to pick up a 4 or 5 inch machined 1/2 inch dowel like this.
https://www.mcmaster.com/#98381a727/=1ea7u86

It’s useful for a lot of operations. Chuck it up and pair it with a mag base dial indicator and you test run out. The solid nature makes it easier to see on a square if the table is perpendicular to the quill.

With it chucked you always know the exact center of the bit is 1/4 inch from the outside edge of the rod. Need to put a hole 1 inch from the edge? Put a 3/4 inch spacer between the rod and the fence.

If you’re one of those metric folks then opt for a 12mm dowel
https://www.mcmaster.com/#91595a773/=1ea80p8

Ron

[member=3192]rvieceli[/member], thanks for the tip and the links. I will order both in case my dark side made me switch to imperial again  [tongue].

I never order from McMaster before and just discovered all the goodies they have...  [eek]
 
Can't wait..

[attachimg=1]

..what? by 9PM  [eek]


Attachments

  • dop-chuck.PNG
    dop-chuck.PNG
    55.6 KB · Views: 1,582
I too have stayed with 120 volts( only have 3 220 curcuits) and it was where I have the drill press ...never checked my table for flat just added table/fence  [eek] now I'll have to check it. Look forward to knowing how keyless Chuck works...
 
What I did wrong?

The arbor that came with the keyless chuck do not fit in the chuck  [eek]

No luck removing the arbor that came with the machine  [crying]

I don't have any arbor wedge... pushing a bolt through the chuck?
 
Mario DO NOT try to remove the existing chuck and taper without a drift key. The taper and the mating surfaces in the quill are some of the most critically machined area on the press. Don’t risk screwing them up. Order a drift key and wait for it to come.

As for the new taper, the fit is designed to be a tight friction fit. That’s the only thing that holding the two pieces together. There should be some YouTube videos on installing the taper in  the chuck.

Ron
 
rvieceli said:
Mario DO NOT try to remove the existing chuck and taper without a drift key. The taper and the mating surfaces in the quill are some of the most critically machined area on the press. Don’t risk screwing them up. Order a drift key and wait for it to come.

As for the new taper, the fit is designed to be a tight friction fit. That’s the only thing that holding the two pieces together. There should be some YouTube videos on installing the taper in  the chuck.

Ron

No, I did used the drift key to remove the arbor from the quill and everything is intact. Now I need to remove the Arbor from the chuck to put it on the new chuck.
 
It's a press fit.  Place the arbor in a hole on your MFT or loosely in a vise with padding and use a punch and hammer to lightly tap inside the chuck to drive it out.

Should come out easily.  Just make sure you catch the arbor so it's not damaged.

 
Do you even know if the taper in the original chuck is the same as the taper in the new chuck? There are several different sized tapers they could be. It be a shame to remove the arbor, and possibly damage it, only to find out that it won’t fit anyways.
 
neilc said:
It's a press fit.  Place the arbor in a hole on your MFT or loosely in a vise with padding and use a punch and hammer to lightly tap inside the chuck to drive it out.

Should come out easily.  Just make sure you catch the arbor so it's not damaged.

Thanks Neil, that's the confirmation I was looking for. I watched a video where the guy said exactly that and when he was about to do it, he said do not attempt to push from inside the chuck. I was a bit confused  [eek]

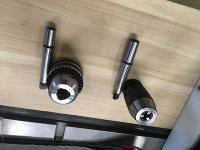
Both chucks and arbors, you can tell that the new arbor is longer. Hard to tell it is bigger but my bet is that it is a J33 instead of a B16.
[attachimg=1]
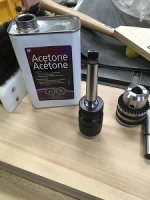
Old arbor fit in the new chuck, so the new chuck is B16.
[attachimg=2]
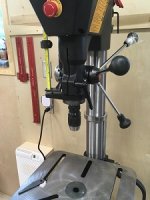
And now on the drill press  [big grin]
[attachimg=3]

Going to bore some on the weekend.
 

Attachments

  • pb-chucks.jpg
    pb-chucks.jpg
    42 KB · Views: 1,521
  • pd-fit.jpg
    pd-fit.jpg
    30.9 KB · Views: 1,451
  • pd-voila.jpg
    pd-voila.jpg
    29.8 KB · Views: 1,510
Back
Top