Novice Chisel/Plane Sharpening?

Hotwheels

Member
Joined
Jan 23, 2007
Messages
237
I'm mostly a power tool person, although I have a few chisels that see occasional use.  I have some projects planned where I want to use more hand tools, mortise and tenon type joinery.  I have some Hirsch bench and mortise chisels I bought some time ago and I have practiced some, but immediately realized those tools need sharpening, a topic I have avoided in the past.

I have read through numerous posts here and elsewhere about sharpening methods and preferences, watched numerous YouTube videos and I think I am ready to try sharpening the tools I have, but I am not sure I have all the sharpening supplies that will get me started.  Talking this over with a friend, he said he had a drawer full of Lee valley stuff he has never used and he generously donated those to me. I received: (1) Older Mark II honing guide, (2) flat glass plate with some sandpaper/abrasives (15 micron and 5 micron) (3) a combination 1000/4000 water stone that has seen very little use.

So, the way I understand it, I use the glass plate and the 15 micron abrasive to "flatten the back" of the chisel, then use the 5 micron to work on the primary bevel.  Do I need higher grit abrasives (like .5 micron) to sharpen chisels and plane blades? And, what do I do with this combination water stone (it is an older Lee Valley branded made in Japan stone)?  Is there anything else I need to get started?

I'm not prepared to get a Tormek, Worksharp, or any other mechanical tool yet since I have no idea where this hand tool sharpening will lead. For now I just need to cut some mortises and trim and clean up some tenons. 

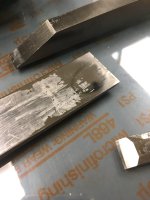
Pic below of the condition of the chisels, they have some pretty ragged edges....
[attachimg=1]
 

Attachments

  • IMG_0409.jpeg
    IMG_0409.jpeg
    106.1 KB · Views: 961
The microfinishing film / sandpaper that you have is approximately equivalent to your 1000/4000 water stone so you will have to decide which you like better and therefore which road to go down. Sandpaper on glass is less expensive up front but more expensive in the long run, if you do much sharpening because the films only hold up for a sharpening session or two. Taylor Toolworks ( Taytools.com ) is a good source for film based sharpening supplies also known as The Scary Sharp System. If you intend go further with wet stones you will need a a diamond plate or something to easily flatten your wet stones. IMO dished out stones are a big reason that people get disillusioned with wet stones. You must be able to flatten them easily.

Either way the two types of 1000/4000 are basically the center of my sharpening arsenal. If a tool is in good shape or it it comes to you very flat you can probably start with 1000 and be ok but often times I use 120 grit stick back sandpaper on glass to start the flattening process on the backs of new chisels that are not of the highest quality (or if they just have too many high spots in important places). Then I use 220 before switching to 1000 grit. After that I use a 4000 grit stone and then for me I then go up from there to an 8000 grit stone and a 16,000 grit stone for a nice polish.

Since you already have the glass and some of the film, if I were you, I would probably just order a seven piece pack of films from Taytools and see how you do with that. It is very economical and you can decide from there if you like the films and if you are pleased with the results.
 
I just looked at this again. That larger chisel in the middle of your picture is probably going to need to be reground on a grinding wheel of some sort to reform a new bevel. Doing that one on glass with sandpaper or on wet stones will be quite the task and if you did attempt it you would need something much more aggressive than 1000 grit. You could do it on glass but it would probably take starting with 80 grit sandpaper. It would take a lot of patience and a quite a few sheets of sandpaper (and btw your hands would be sore the next day😊).
 
I'd strongly recommend the Dia-Sharp diamond plates used wet, with a drop of liquid detergent added to your water. They're essentially a slab of steel coated with diamond, so they don't dish like stones do. They're quite pricey to begin with, but mine are now 3 years old, they get heavy use, but they still work like new.

I have three grades - coarse, fine, and extra-fine. I can't remember which grits these terms refer to (I'm sure the website will tell you) - but I can tell you that;

a) The coarse one will put a whole new primary bevel on that damaged chisel in around 10 minutes.
b) The fine one will then get the chisel into a decent, real-world usable condition in around 5 minutes.
c) The extra-fine one will then polish everything up nicely, and put on a micro-bevel capable of shaving hairs off my arm.

They have rubber feet which stops them from sliding around as you sharpen. The slab nature of them also means dead-flat chisel backs. I'm not sure I could stand goofing around with sandpaper and pieces of glass. Super-happy with mine.
https://www.dmtsharp.com/sharpeners/bench-stones/dia-sharp-bench-stone.html

Hope you get fixed up.
Kevin
 
+1 for those DMT Dia-Flat plates. They are indeed very durable and very nice in use. Well worth their hefty price.

However, I use them to flatten my Shaptons. I know I could use the Dia-Flats directly, but I prefer the ceramic stones to sharpen my chisels and plane irons.  I put some squiggles with a thick pencil on the stones and then go on until the lines are gone. Once I've reached that point I know the stones are flat again.

Make sure you dry the plates properly before storing them, because otherwise they might rust. I've not had that happen to me yet, but metal and moisture make for a bad combo...
 
Thanks for these comments and suggestions.  I am hoping to avoid a grinding wheel (I'm assuming you mean a slow speed bench grinder) since I have no idea how to use one for sharpening and I could probably cause more damage than anything.  I'm willing to invest the time to do it by hand and if what is needed to get the backs flat and get the nicks off the bevel, then I can do that. However, most of my chisels look like the one in the middle when I examine them closely so......

I've read about the diamond stones and particularly the DMT ones.  Maybe that is the answer to get all my chisels into working shape. It seems that I could use a coarse stone for getting the primary bevels restored then the glass and abrasives for the sharpening/honing? 

I'm struggling with how to use what I have to get my chisels into shape without buying grinders or stones until I know more about sharpening. 
 
[member=296]John Russell[/member] DMT also make these plates in extra-coarse and extra-extra-coarse. The E-E-C is suggested by DMT as a means of getting badly-damaged chisels back into basic shape. I suggested the standard coarse one since hopefully they won't get into such bad condition again once you've fixed them up. A bit more work and time will be involved obviously as the grit is finer, but I didn't want to suggest something which you'd use only once. You'd honestly be amazed at just how efficient these E-E-C plates are as a primary fix method - rendering machines like the Tormek completely unnecessary unless you have a huge and ongoing pile of damaged chisels to fix. So you're right - a C, E-C or E-E-C diamond plate would be a good basic fix, followed by the additional stuff you already have.

FWIW although my C doesn't see much action these days, I put a huge dent in one of my Kirschens today. Which goofball put a hidden nail just where I needed to chisel?  [mad]

And for future reference - the forum's handtool guru is [member=4358]derekcohen[/member] - a true craftsman right here amongst us.

The final piece of advice is that many of the YouTube channels massively overcomplicate chisel/plane iron sharpening, turning it into a virtually evangelical, mystical experience. It's not. You already have pretty much everything else you need to get them to do exactly what you've said you need - so proceed with confidence and with a joyful heart. It's really not that difficult.

Kevin
 
Thanks Kevin,

I think I may need the EEC to restore the primary bevel on some of the chisels.  For practice, I took a significantly damaged chisel I have used for some carpentry and used the 15 micron abrasive with glass plate just to see what might be involved in restoring the bench chisels.  Based on that, I don't want to try to restore the bench chisels without using something significantly more aggressive --- it was a job and I hardly made a dent in getting the gouges out of the bevel. 

So, it looks as if the best path is to get something like the DMT EEC and maybe the coarse too and just realize that is what is necessary to get things back on track.

Yep, came across numerous posts by Derek and I found them very useful and informative.

Thanks again for the help.
 
You're most welcome, John. Post back some time and let us know how you get on.

Best wishes.

Edit = if the old Lee Valley honing guide doesn't hit the spot for you, check out the Veritas Mk. II one (as used by yours truly [smile]). It's fabulous in terms of its engineering and design, and it will enable you to create any conceivable bevel angle on any sharp, pointy object you possess. At just £65 (UK) it's an absolute steal.

15 degrees through to 54 .....  [eek]
http://www.veritastools.com/products/Page.aspx?p=144
 
John Russell said:
Thanks Kevin,

I think I may need the EEC to restore the primary bevel on some of the chisels.  For practice, I took a significantly damaged chisel I have used for some carpentry and used the 15 micron abrasive with glass plate just to see what might be involved in restoring the bench chisels.  Based on that, I don't want to try to restore the bench chisels without using something significantly more aggressive --- it was a job and I hardly made a dent in getting the gouges out of the bevel. 

So, it looks as if the best path is to get something like the DMT EEC and maybe the coarse too and just realize that is what is necessary to get things back on track.

Yep, came across numerous posts by Derek and I found them very useful and informative.

Thanks again for the help.

John I do a lot of sharpening and you can redo the bevel with just sandpaper and a glass plate, but as others have said start out SUPER aggressive.  60 grit will eat up the damage and then you work your way up the grits just like sanding in wood working. Have a shop vac near you to suck up the metal swarf and wear a dust mask.  That metal dust is not healthy!  I'd expect an hour per chisel with no power tools to get those in good shape but it is possible and can be done with what you have and some wet dry paper from home depot.  I prefer the wet dry stuff and.will just tack it to the the glass with contact 77 adhesive spray. 

Eventually you'll get annoyed, loose your mind and invest in a set of diamond or CBN Plates (or both because...reasons) and then a Tormek T8 with optional CBN wheels, and before you know it you become obsessed with sharpening...this may be a desperate cry for help from a sharpening addict. 
 
Look up "Charlesworth ruler trick". One of those small thin $5 pocket rulers will do the purpose of preserving your sanity.
 
The above 'ruler trick' is fantastic for plane irons, but definitely not for chisels.
 
mattgam said:
Eventually you'll get annoyed, loose your mind and invest in a set of diamond or CBN Plates (or both because...reasons) and then a Tormek T8 with optional CBN wheels, and before you know it you become obsessed with sharpening...this may be a desperate cry for help from a sharpening addict.

And then become frustrated with the speed of the Tormek and buy a half speed bench grinder and use the CBN wheels from the Tormek on it and do in a minute what the Tormek does in ten times the time. Derek did exactly that because the Tormek took so long to do anything. I can put a new bevel on a chisel in about one minute using a 180 CBN wheel on a half speed bench grinder using the Tormek flat blade tool rest.
 
"Eventually you'll get annoyed, loose your mind and invest in a set of diamond or CBN Plates (or both because...reasons) and then a Tormek T8 with optional CBN wheels, and before you know it you become obsessed with sharpening...this may be a desperate cry for help from a sharpening addict. "

I'm going to try the 60 grit paper today and see where that gets me. However, I am not a patient person and I can see that the  diamond/CBN stones and/or a low speed grinder with the CBN wheels might make the process faster and get me to using the chisels quicker. Keeping in mind I'm clueless about most of this, my concern with a grinder is how to grind the primary bevel without ruining the chisel. I assume there is a guide for that, but I've watched videos where folks are doing it freehand.

I watched some video about the ruler trick and that looks straightforward for the secondary bevel assuming you have the correct stones/sandpaper. Since I do have the Veritas Mark II guide, is there any advantage to the ruler method over using the honing guide for that purpose?

This is going to be a journey and I'm trying to make it as time and cost efficient as possible so I can use the tools and not be too obsessive about how shiny they are.

Thanks again, these comments have helped me to move ahead with sharpening and using my chisels.

 
John Russell said:
Since I do have the Veritas Mark II guide, is there any advantage to the ruler method over using the honing guide for that purpose?

None whatsoever. Just flip the brass cam positioning wheel on the Veritas roller and that will instantly add 5 degrees to the bevel angle - so you can go from 25 to 30 for firmer/bench chisels for example. The secondary microbevel only needs to be a coupla mm long. I usually de-burr first, then microbevel (just a few strokes on the extra-fine plate) and then de-burr again.
 
John Russell said:
I watched some video about the ruler trick and that looks straightforward for the secondary bevel assuming you have the correct stones/sandpaper. Since I do have the Veritas Mark II guide, is there any advantage to the ruler method over using the honing guide for that purpose?

Finally a topic in which there is only one right answer and everyone universally agrees to the one solution.  [big grin]

You can use your Veritas MK2 guide to establish the primary, secondary, and tertiary bevel angles on the chisels.  The purpose for the secondary and tertiary bevels, as I was taught by the late David Charlesworth, is to reduce the time spent resharpening the chisel or plane iron.  When the width of the secondary bevel becomes too big (more time spent sharpening), then its back to the stone of choice to establish a new 25-degree primary bevel.

David taught me to establish a primary angle of 25 degrees over the entire bevel of the chisel with any grade of stone.  The intent is to remove as much metal as necessary to provide a clean area for the next two bevels.  The 800-grit water stone and sharpening guide of choice is used to put a 30-degree secondary bevel of about one millimeter (about four or five passes over the stone).  Finally, the 10,000-grit stone and sharpening guide of choice is used to put a 35-degree polishing hone on the cutting tip of the chisel (two or three light passes over the stone).  Changing the angle is accomplished by moving the chisel on the guide to a higher angle.  I tried the freehand method, and my results were all over the place...mainly inconsistent and never as sharp as I realized using the sharpening guide.

Before I started using the Tormek T8, I used diamond stones to establish the primary 25-degree angle.  I can't remember how long it took, but the Tormek is certainly faster.  I don't have any desire to invest in another grinder or CBN wheels.  If you are using secondary and tertiary angles, then the primary bevel is not that important as long as it is less than the angle for the edge doing the cutting.  Some people manage with only the 25-degree primary and a light polish with a leather strop.

My sharpening hall of shame is filled with failed attempts at the various methods.  I now have a system that works for me and is consistent.  As soon as you find a system that works for you, stop looking for the next best thing.

The ruler trick is used to establish a small back bevel on the flat side of plane irons.  It is NOT used for chisels because you want the flat side as flat as possible.  Here is a video by the late David Charlesworth demonstrating the ruler trick:


MikeGE said:
Snip. As soon as you find a system that works for you, stop looking for the next best thing.Snip.
Agreed (though the journey to finding that system can be frustrating for some, especially when the advice from all good sharpeners can be so different! [big grin]).

If I have anything to add, it's this: sharpen (hone?) often, and don't wait to attend to your blades or chisels until the edge is too dull. It's a habit good for your tools, and good for your work. (And that is where learning how to sharpen freehand (later in the sharpening journey) pays dividends.)
 
In every sharpening thread I have read there is always one point that never gets discussed, how does a person who is new to sharpening judge if the result they get is actually sharp. I like a lot of WW's have used many systems never realising that my ''sharp'' was not sharp enough, in fact it was most probably where those WW's who understood sharp would say the blade needs sharpening. Around the same time as Derek I went the same way as him using nearly identical equipment, read his sharpening stuff on his website and if the less time spent sharpening for the best result follow his advice. It literally takes a few minutes to sharpen a blade his way.
 
John Russell said:
"Eventually you'll get annoyed, loose your mind and invest in a set of diamond or CBN Plates (or both because...reasons) and then a Tormek T8 with optional CBN wheels, and before you know it you become obsessed with sharpening...this may be a desperate cry for help from a sharpening addict. "

I'm going to try the 60 grit paper today and see where that gets me. However, I am not a patient person and I can see that the  diamond/CBN stones and/or a low speed grinder with the CBN wheels might make the process faster and get me to using the chisels quicker. Keeping in mind I'm clueless about most of this, my concern with a grinder is how to grind the primary bevel without ruining the chisel. I assume there is a guide for that, but I've watched videos where folks are doing it freehand.

I watched some video about the ruler trick and that looks straightforward for the secondary bevel assuming you have the correct stones/sandpaper. Since I do have the Veritas Mark II guide, is there any advantage to the ruler method over using the honing guide for that purpose?

This is going to be a journey and I'm trying to make it as time and cost efficient as possible so I can use the tools and not be too obsessive about how shiny they are.

Thanks again, these comments have helped me to move ahead with sharpening and using my chisels.

John you really can't ruin it unless you grind off so much you run out of metal.  With a half speed grinder you can overheat the metal and lose the temper but even then you just grind of the mistake and try again.  I do find that sandpaper and cbn/diamond both have their place if by hand.  60 grit paper just cuts faster than my cbn plates but it is annoying to have to swap out every 10ish min to keep fresh grit available.  pre-tormek i'd just use 60->200 then switch to my plates since they refine way better.  With the tormek I skip that and just use 200grit and 1200 grit wheels then polish on some super fine plates and am done.  I have some neurological issues with my hands so I stick to the slower tormek because I'm unsure I can control the force of a proper grinder.  For me slower equals more time to correct a mistake.  Its a hobby so I don't mind 10min to sharpen...I did say I have developed a sharpening hobby now too.  A mirror finish is so satisfying even if it is unnecessary.

Basically just go for it.  with a honing jig and a bit of time you'll get those chisels useful in short order
 
For those saying ruler trick doesn't work for chisels, it does.  Albeit, if you're spending $$$$ on new chisels, I wouldn't do it as you're paying for someone to flatten that back - but for working chisels or restorations that back bevel makes no difference.  It pares fine.  The offset of the cutting edge to the back reference is so small, if you're actually working at that tolerance I'd be really impressed.

edit: if you don't want to take my word for it, I think Stumpy nubs did a video trying it out.
 
Back
Top