OF1400 on guide rail

oakhilltop

Member
Joined
Apr 15, 2015
Messages
32
So far, I have been disappointed with this system. It is new to me, so, I'm hoping that it's just me. It certainly wouldn't be the first time!

I am trying to make a double rabbet joint for the first time, as a way to get use to this system. After the many mistakes I made in dimensions of cuts, I got something that looked close. But still not very good. And I noticed that some of the faces of the joint were at angles. It dawned on me that the base of the router is not flat to the workpiece, because the router is attached to the rail stops on the guide. Even if I use the outrigger adjustment, it is difficult to tell if it is really parallel to the workpiece.

All of the videos that I watched prior to buying the of1400 make it look so easy and precise. But I don't think it is. Half inch shy says to get the table widener. Another $90! And, will that really make this system work? I don't want to keep throwing money at it.

Have you made your own baseplate for this to get the bottom of the router at the same level of the guide? Other tips? Stupid things that I'm doing?  [embarassed]

Thanks,
Steve
 
[member=49497]oakhilltop[/member]

Are you using the support foot?
http://www.bobmarinosbesttools.com/support-replacement/p/438608/

If your router is newer, it may not have come with the support foot because Festool is too cheap to include it now, mine came with one. To make matters worse, I did not even see it listed under accessories on the Festool USA website. I found it on Bob Marino’s site, even then it was listed as a replacement part for the OF1010.

Sorry for you frustration!
 
Yes, that is what I meant by the outrigger support. That's what one video called it.

Even with that, I would be guessing at the height that it should be. Maybe being off by 1 or 2mm isn't an issue for a router bit. You also have to be careful to set the depth after setting the support foot. Guess how I discovered that?  [smile]

I dunno, so far, there seems to be a lot of fiddling. One problem is that I've been doing this on some scrap pieces which are only 3 or 4 inches wide. I may go get some wider pine boards to play with.

Thanks for the reply.
 
What I have done is hold the base of the router tight to the rail with my left hand, loosen the knob on the outrigger with my right, let the foot drop down and then tighten the knob.  Maybe that will work for you too.

Peter
 
The width of the boards could be the issue then. Do you have and MFT/3 that you are using? Narrow boards are difficult to work with because there isn’t much support under the rail. You can always add scrap pieces of the same thickness under the rail to help, but everything need to be clamp to prevent any movement. Can you post pictures of your setup?

You should just buy a router table with a lift or a CMS.  [big grin]
 
I did search the forums before posting, but I just searched using duckduckgo and found this thread.
http://festoolownersgroup.com/festool-jigs-tool-enhancements/of1400-router-enhancement/

I guess it makes me feel better that I'm not the only one who had this problem. I do agree with one of the posters who said that this is why we spend the xtra money on these tools, so that we don't have to make jigs to make them work. I don't think that the outrigger is a solution worthy of Festool.

I will try running the router more on the guide and see how that goes. I may end up making a similar base though.
 
I found some 3/4 plywood scraps that were wider, put the router way up on the rail. I used the outrigger running on another 3/4 plywood scrap because I was cutting rabbets.

The joint came out good!  [big grin]

I'm going to use this method for now for running the router on the rail. I think a thicker base may still be better, but I'll wait before I go down that path.

I appreciate all of the feedback. It was a couple of frustrating evenings.
 
The OF2200 actually ha s a stepped optional base plate that solves this problem.  Maybe they could make one for the 1400 as well?

As you figured out, however, the trick when working close to edge with the rail is to add some additional supports -- this also can be important at the front and end of the cut to avoid the base suddenly dropping when the outrigger runs out of board.

Just curious though, why not use the edge guide if you are just working off the edge, as you were on the rabbet?
 
ear3 said:
The OF2200 actually ha s a stepped optional base plate that solves this problem.  Maybe they could make one for the 1400 as well?

As you figured out, however, the trick when working close to edge with the rail is to add some additional supports -- this also can be important at the front and end of the cut to avoid the base suddenly dropping when the outrigger runs out of board.

Just curious though, why not use the edge guide if you are just working off the edge, as you were on the rabbet?

Yes, an optional, reasonably priced, base plate would be great.

Ummmm, I had been trying to learn how to use the router and accessories. I started with the 4" wide ~14" long pieces and was trying to make the joints along the 4" edge. The edge guide was not very stable then. This time, I switched to the bigger plywood and ......... just had this thread in mind and tried the rail guide. The edge guide never crossed my mind. What can I say? Now that you reminded me, I think I'll try the edge guide on a different edge tomorrow. Thanks.
 
As of today, I am facing the same challenge as the OP with my brand new OF 1400 by wanting to cut a long, straight groove with my guide rails and Guide Stop Adapter.  I noticed that because of the height of the guide rails, the bottom of the router does not sit flat on the work piece. First, I tried the support foot (which came with the router I bought (in USA) just a couple of weeks ago).  However, it left a small but noticeable running dent in my soft plywood.  At least one other easy solution by "Daviddubya" is available at the link below.  I discovered I have a sheet of underlayment that seems to be exactly 0.2" thick from which I'll make a sub-base plate to lift the router up to rail-height.

http://festoolownersgroup.com/festool-jigs-tool-enhancements/of1400-router-enhancement/

 
Ulmus said:
First, I tried the support foot (which came with the router I bought (in USA) just a couple of weeks ago).  However, it left a small but noticeable running dent in my soft plywood. 

Try placing a small thin strip of sheet metal under the support foot. It'll prevent the foot from damaging the ply, it acts like a ski/sled.
 
Don’t use the rail. Or don’t use the rail in the traditional sense. Use the back of the rail and just guide the router against it. No bars or anything else needed.

I also make use of my mfs quite a bit for these tasks but some mdf or chip board can be used as well.

We have all had issues with the system on occasion mate!

Cheers. Bryan

Sent from my iPhone using Tapatalk
 
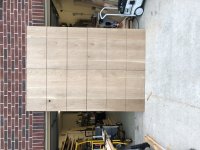
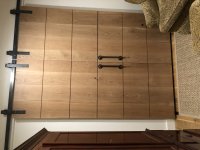
Used my OF1400 today on the track to put some dadoes in two 5/4 white oak doors...worked like a charm with zero issues...
 

Attachments

  • 21EFB9C2-CA78-4303-9710-1B3DA07EB9A4.jpeg
    21EFB9C2-CA78-4303-9710-1B3DA07EB9A4.jpeg
    2.9 MB · Views: 469
Use of the OF1400 on the guide rail one of the features that sold me on the router (when I already had other very good routers). For me, it has always worked. What makes the Festool router easy to use both off an on the rail is the fact that the router base has marks to indicate the center of the bit. This is a real plus because you can easily setup the router on the rail using the marks on all 4 sides of the router base to pinpoint the center of the dado or groove required. I haven't found the foo that hard to use. The only problems I encountered were when the boards I was working were very narrow. That requires some additional support under the rail to make it work and a creative way to hold the spacers and the piece being worked on securely.
 
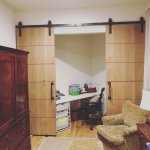
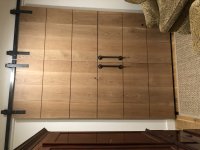
Here are (10) dados I put on some 5/4 white oak doors using the OF1400 on the guide rail...
 

Attachments

  • 879EB97D-5810-43C7-9D48-ACECDC49E0A0.jpeg
    879EB97D-5810-43C7-9D48-ACECDC49E0A0.jpeg
    2.9 MB · Views: 371
  • 8FF79FA7-13C0-47CE-A161-8A611AAB9C5B.jpeg
    8FF79FA7-13C0-47CE-A161-8A611AAB9C5B.jpeg
    300 KB · Views: 357
Peter Halle said:
What I have done is hold the base of the router tight to the rail with my left hand, loosen the knob on the outrigger with my right, let the foot drop down and then tighten the knob.  Maybe that will work for you too.

Peter

Spot on Peter... Work fine that way
 
TXFIVEO said:
Used my OF1400 today on the track to put some dadoes in two 5/4 white oak doors...worked like a charm with zero issues...

Nice looking...curious what the width and depth of the dado is?
 
I used a Whiteside upcut spiral bit with a 1/2” cut length and went 3/16” deep.  Downcut spiral bit would have produced less sawdust in the channel but after vacuuming up the dust the cut was flawless on the hard white oak.  No tear out. 
 

Attachments

  • 83361BE8-7091-46AA-8F94-B7FEB5EADFFE.jpeg
    83361BE8-7091-46AA-8F94-B7FEB5EADFFE.jpeg
    2.9 MB · Views: 360
Back
Top