You are using an out of date browser. It may not display this or other websites correctly.
You should upgrade or use an alternative browser.
You should upgrade or use an alternative browser.
On-going shop reorganization build thread [updated 7.18.20]
- Thread starter ear3
- Start date
ear3
Member
[member=43773]Neal W[/member] That's right. I only bothered to drill two columns of holes though, and used the 5mm vix bit to bore the center hole for the slides as needed.
Neal W said:A Question for my ignorance....
You used the LR-32 to pre drill holes to mount the drawer slides for the systainers, is this correct?
ear3
Member
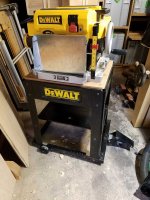
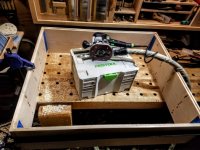
Last summer I upgraded my planer from the Dewalt 734 to the 735 -- I stumbled across a good deal on Craigslist and decided to jump at the opportunity, primarily so I could add the Shelix cutterhead and make planing a little less noisesome for me and my neighbors (and get a great finish on my boards along with a durable cutters to boot!).
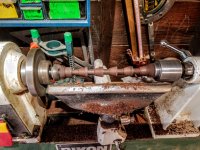
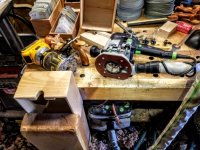
I had been storing my 734 under my lathe stand, but since the Craigslist deal came with the stand included, and because the 735 is heavier and bulkier than the older model, I decided to just keep the stand and move it around in my narrow shop as needed.
View attachment 1
It has worked out so far, but it has been a bit of a nuisance having the stand in the way all the time. I was considering adding some additional storage capacity to the Dewalt stand, like I've done with my Kreg router table, but because of how wide the leg profiles, I rejected that option and recently decided to build my own mobile stand with integral storage.
I'll just show a few finished or near-finished pictures since the design/build is so basic. I had to buy an extra piece of 8/4 white oak, but for the most part was using up extra material I had lying around my shop (which is why I mixed in the red oak ply for the top and the drawer sides/back).
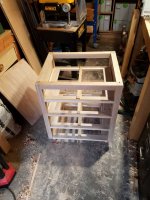
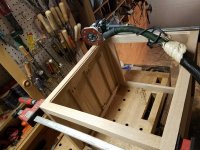
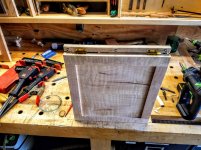
Basic frame and panel construction using 12mm dominoes and a dado/groove to fit the 5mm plywood panel. The drawers sit on 3/4" white oak frames that rest on supports pocket screwed into the inner part of the frame, as you can see in this picture I took while routing out a rabbet on the back for the back panel (the drawer frames are in addition pocket screwed into the legs from the underside):
View attachment 2
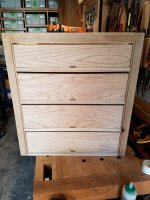
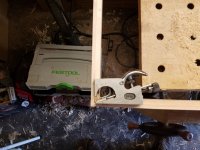
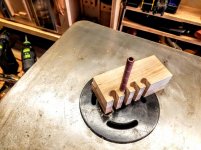
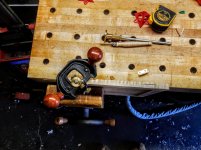
I didn't feel like buying drawer runners, so I just built in a center guide on the underside of the drawers and the drawer frames:
View attachment 3
View attachment 4
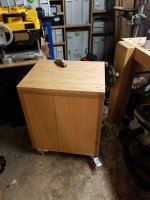
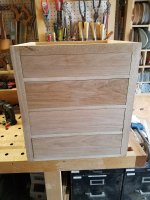
Drawers extend all the way to the back of the caracasse:
View attachment 5
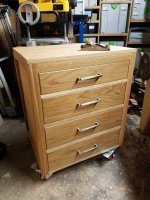
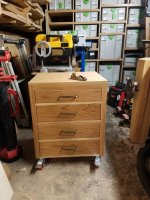
And here's the front of the stand prior to finishing (I used solid 3/4 white oak for the drawer fronts):
View attachment 6
I did add some white oak edge banding to the tops of the ply on the drawer sides and back, as well as around the top.
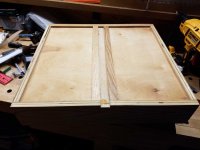
Wheels are just 3" locking casters sourced from my local HD. Also added some cheap handles that I had bought last year for another cabinet but ended up not using. Finished it with Surfix heavy duty oil, and block planed a slight chamfer on the drawer fronts. The top, which is simply screwed into the stand, has holes added for the bolts to secure the planer, and the 1/4 back panel has been fitted flush into the rabbet and pinned:
View attachment 7
View attachment 8
View attachment 9
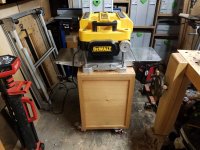
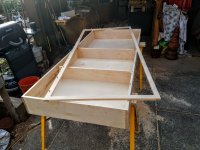
The advantage of this stand over the Dewalt metal one, in addition to having integral storage, is that the wheels make it fully 360 degree mobile. I sized the stand so that I have the option in the future to build into the back a collapsable extension for when I'm planing longer boards, similar to what I did on my Kapex cart. But for now I will continue to rely on the metal extension tables that I got with the planer.
View attachment 10
Now I have to figure out what to put in the drawers -- it will not be a problem filling them, but I want to figure out the most efficient use possible of that space, since my shop is currently stuffed to the gills.
BTW, I've put the Dewalt metal stand up on Craigslist NYC in case anyone in the area is interested -- I'd be more than happy to add in a FOG discount:http://festoolownersgroup.com/classifieds/dewalt-planer-stand/
I had been storing my 734 under my lathe stand, but since the Craigslist deal came with the stand included, and because the 735 is heavier and bulkier than the older model, I decided to just keep the stand and move it around in my narrow shop as needed.
View attachment 1
It has worked out so far, but it has been a bit of a nuisance having the stand in the way all the time. I was considering adding some additional storage capacity to the Dewalt stand, like I've done with my Kreg router table, but because of how wide the leg profiles, I rejected that option and recently decided to build my own mobile stand with integral storage.
I'll just show a few finished or near-finished pictures since the design/build is so basic. I had to buy an extra piece of 8/4 white oak, but for the most part was using up extra material I had lying around my shop (which is why I mixed in the red oak ply for the top and the drawer sides/back).
Basic frame and panel construction using 12mm dominoes and a dado/groove to fit the 5mm plywood panel. The drawers sit on 3/4" white oak frames that rest on supports pocket screwed into the inner part of the frame, as you can see in this picture I took while routing out a rabbet on the back for the back panel (the drawer frames are in addition pocket screwed into the legs from the underside):
View attachment 2
I didn't feel like buying drawer runners, so I just built in a center guide on the underside of the drawers and the drawer frames:
View attachment 3
View attachment 4
Drawers extend all the way to the back of the caracasse:
View attachment 5
And here's the front of the stand prior to finishing (I used solid 3/4 white oak for the drawer fronts):
View attachment 6
I did add some white oak edge banding to the tops of the ply on the drawer sides and back, as well as around the top.
Wheels are just 3" locking casters sourced from my local HD. Also added some cheap handles that I had bought last year for another cabinet but ended up not using. Finished it with Surfix heavy duty oil, and block planed a slight chamfer on the drawer fronts. The top, which is simply screwed into the stand, has holes added for the bolts to secure the planer, and the 1/4 back panel has been fitted flush into the rabbet and pinned:
View attachment 7
View attachment 8
View attachment 9
The advantage of this stand over the Dewalt metal one, in addition to having integral storage, is that the wheels make it fully 360 degree mobile. I sized the stand so that I have the option in the future to build into the back a collapsable extension for when I'm planing longer boards, similar to what I did on my Kapex cart. But for now I will continue to rely on the metal extension tables that I got with the planer.
View attachment 10
Now I have to figure out what to put in the drawers -- it will not be a problem filling them, but I want to figure out the most efficient use possible of that space, since my shop is currently stuffed to the gills.
BTW, I've put the Dewalt metal stand up on Craigslist NYC in case anyone in the area is interested -- I'd be more than happy to add in a FOG discount:http://festoolownersgroup.com/classifieds/dewalt-planer-stand/
Attachments
-
 20180424_182246.jpg248.4 KB · Views: 402
 -
 20180427_200819.jpg210.5 KB · Views: 436
 -
 20180427_200553.jpg181 KB · Views: 366
 -
 20180427_200539.jpg245.6 KB · Views: 400
 -
 20180427_200525.jpg224.2 KB · Views: 399
 -
 20180424_130659.jpg248.5 KB · Views: 369
 -
 20180424_130650.jpg212.7 KB · Views: 398
 -
 20180424_180916.jpg249.9 KB · Views: 497
 -
 20180427_190548.jpg121.2 KB · Views: 341
 -
 20180414_200536.jpg224.7 KB · Views: 402
ear3
Member
[member=31307]Picktool[/member] Close! It's 20x8. But the 13" height of the roof peak makes all the difference, affording space for a loft to store lumber and other bulk items, and allowing me to maneuver tall, unwieldy things when needed in and out of the space.
Picktool said:If Ed gets any more tighter fitting in there with the tools,
he'll be posting the addition of a 4x4 CNC ?? [wink] I see it coming.
What size space is that... 12x20?
ear3
Member
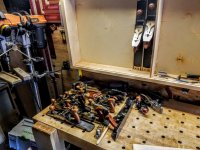
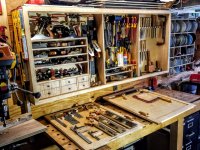
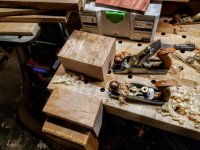
After 4 years of faithful service, my workbench cabinet is being retired.
While it was good for what I needed at the time, the pegboard configuration meant that it was primarily a hanging tool cabinet. As I've been shifting my carpentry toward a greater reliance on hand tools over the past few years, I've run out of space for the gear that I've been integrating into my arsenal.
View attachment 1 View attachment 2 View attachment 3
It also doesn't help that I hold on to legacy tools that I rarely if ever reach for -- so the new cabinet will also be an opportunity to clean house of the stuff that doesn't get used.
The logjam has also frankly become a stumbling block to my work. I've had to stuff tools anywhere I could find room -- behind the lathe, under the router table, in empty systainers -- and not having immediate access to some of them means that I don't keep all of them tuned up and ready to go. I've retained easy access to all of my bench planes throughout, and so have been able to develop some facility with them and make determinations on the fly whether, say, a no. 6 or a no. 7 is working best on a particular task, but with some of the more specialized planes, because many of them reside away from the bench, it's not as easy to just grab one and measure its relative performance.
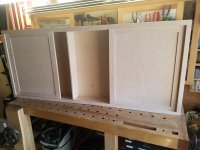
The overall dimensions of the new cabinet, made in maple and Baltic Birch rather than poplar, were roughly the same as the old one: 76" x 32" x 7 1/4" (vs. 76" x 29" x 7" for the old one) -- but I gain some internal space by not having to factor in a 3/4" spacer on the back to offset the cabinet from the wall, as I did on the old one to permit proper functioning of the pegboard. I've also retained the sliding door feature of the old one that I find to be incredibly useful. My shop is such that when I'm working on big projects, I sometimes have to keep things on the bench, and so a hinged door design of a more traditional handtool cabinet would limit access in certain situations.
Nothing fancy about the carcasse construction -- just 4 fixed verticals dominoed into the tops and bottoms, with 1/2" Baltic Birch set flush into a rabbet on the back.
I did use a method on the glue up which I've been doing more recently, which is to blue tape at the glue joint:
View attachment 4
It does take more time on the front end doing all the dry fitting and taping, but you recoup most if not all of it on the back end by not having to scrape or sand the glue out of the joints:
View attachment 5 View attachment 6
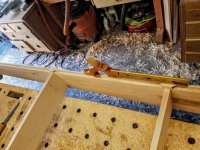
I did the rabbet after the fact, riding the 1010 precariously along the 11/16 boards:
View attachment 7
And then finished up by hand around the verticals by sawing out the bulk and then using a shoulder plane to even the line:
View attachment 8 View attachment 9
Even got to use my Clifton 3in1 combination plane to do the corners, which was one of the very first planes I got, but remains one of the least used:
View attachment 10
I dominoed a face frame to the carcasse to act as the front track for the sliding doors:
View attachment 11
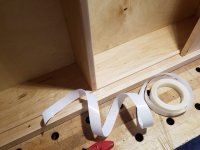
And then nailed in 1/2" maple strips on the top and bottom of the case to complete the track, insetting them into notches I had made into the verticals at the front. Although the doors worked great on the first cabinet, I added UVHM tape to the track and at various strategic points on the new one to make the action even smoother:
View attachment 12
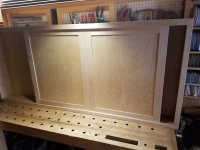
The doors, which are just a frame and 1/4" BB panel construction, slide incredibly smoothly now:
View attachment 13 View attachment 14
My neighbor has inherited the old cabinet. Thanks to Festool, he also has a serviceable shop filled with my old tools purchased in the 2000s, such as a Ridgid chopsaw, Ryobi portable table saw, oldstyle Dewalt 18V drills.
Next up, putting in the tools
While it was good for what I needed at the time, the pegboard configuration meant that it was primarily a hanging tool cabinet. As I've been shifting my carpentry toward a greater reliance on hand tools over the past few years, I've run out of space for the gear that I've been integrating into my arsenal.
View attachment 1 View attachment 2 View attachment 3
It also doesn't help that I hold on to legacy tools that I rarely if ever reach for -- so the new cabinet will also be an opportunity to clean house of the stuff that doesn't get used.
The logjam has also frankly become a stumbling block to my work. I've had to stuff tools anywhere I could find room -- behind the lathe, under the router table, in empty systainers -- and not having immediate access to some of them means that I don't keep all of them tuned up and ready to go. I've retained easy access to all of my bench planes throughout, and so have been able to develop some facility with them and make determinations on the fly whether, say, a no. 6 or a no. 7 is working best on a particular task, but with some of the more specialized planes, because many of them reside away from the bench, it's not as easy to just grab one and measure its relative performance.
The overall dimensions of the new cabinet, made in maple and Baltic Birch rather than poplar, were roughly the same as the old one: 76" x 32" x 7 1/4" (vs. 76" x 29" x 7" for the old one) -- but I gain some internal space by not having to factor in a 3/4" spacer on the back to offset the cabinet from the wall, as I did on the old one to permit proper functioning of the pegboard. I've also retained the sliding door feature of the old one that I find to be incredibly useful. My shop is such that when I'm working on big projects, I sometimes have to keep things on the bench, and so a hinged door design of a more traditional handtool cabinet would limit access in certain situations.
Nothing fancy about the carcasse construction -- just 4 fixed verticals dominoed into the tops and bottoms, with 1/2" Baltic Birch set flush into a rabbet on the back.
I did use a method on the glue up which I've been doing more recently, which is to blue tape at the glue joint:
View attachment 4
It does take more time on the front end doing all the dry fitting and taping, but you recoup most if not all of it on the back end by not having to scrape or sand the glue out of the joints:
View attachment 5 View attachment 6
I did the rabbet after the fact, riding the 1010 precariously along the 11/16 boards:
View attachment 7
And then finished up by hand around the verticals by sawing out the bulk and then using a shoulder plane to even the line:
View attachment 8 View attachment 9
Even got to use my Clifton 3in1 combination plane to do the corners, which was one of the very first planes I got, but remains one of the least used:
View attachment 10
I dominoed a face frame to the carcasse to act as the front track for the sliding doors:
View attachment 11
And then nailed in 1/2" maple strips on the top and bottom of the case to complete the track, insetting them into notches I had made into the verticals at the front. Although the doors worked great on the first cabinet, I added UVHM tape to the track and at various strategic points on the new one to make the action even smoother:
View attachment 12
The doors, which are just a frame and 1/4" BB panel construction, slide incredibly smoothly now:
View attachment 13 View attachment 14
My neighbor has inherited the old cabinet. Thanks to Festool, he also has a serviceable shop filled with my old tools purchased in the 2000s, such as a Ridgid chopsaw, Ryobi portable table saw, oldstyle Dewalt 18V drills.
Next up, putting in the tools
Attachments
-
 20190606_090137.jpg401.2 KB · Views: 290
 -
 20190606_090936.jpg741.7 KB · Views: 292
 -
 20190607_074642.jpg869.5 KB · Views: 383
 -
 20190609_094848.jpg621.1 KB · Views: 301
 -
 20190608_172021.jpg638 KB · Views: 350
 -
 20190609_090215.jpg593.9 KB · Views: 346
 -
 20190606_083847.jpg203 KB · Views: 310
 -
 20190605_193643.jpg728.1 KB · Views: 318
 -
 20190520_220249.jpg186.9 KB · Views: 413
 -
 20190520_220259.jpg170.9 KB · Views: 351
 -
 20190520_220312.jpg177 KB · Views: 369
 -
 20190605_111434.jpg897.5 KB · Views: 340
 -
 20190605_175439.jpg570.8 KB · Views: 271
 -
 20190605_175618.jpg638.9 KB · Views: 293
ear3
Member
A tool cabinet is incredibly personal, where tool selection and placement is a reflection of the specific kinds of work you do. This is what makes pegboard so ingenious, because it allows an endless amount of reconfiguration as your priorities and habits shift, permitting the cabinet to evolve as you do. And within a certain range of tools, there's basically no chance of making a mistake or limiting yourself in the future, because you can just move the tool you no longer use from its prominent place and shift it to the back.
Although I'm by no means done acquiring new tools, I felt like I was ready to make the switchover to a fixed back cabinet because I have assembled a core set of handtools at this point that won't change in the future.
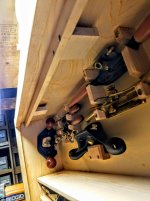
It's a different experience staring at the empty plywood back of a pegboard-less tool cabinet. I looked at it for over a day as I procrastinated doing other trivial stuff around the shop, wondering where to start and worried that the choices I made at the outset would create a path dependence leading to severe underutilization of the available space. The only thing that I had determined from the outset was where the bulk of the handplanes would go. I made the left hand bay wider than the others, and made sure in the cabinet design to have at least a 5 1/2" clearance between the back and the doors so that my bench planes could fit vertically:
View attachment 1
The other main difference from a pegboard cabinet is obviously that you have to make all the toolholders yourself. So this project has become a nice way of reducing the scrap and offcut stockpile in my shop.
I'll spare you the complete, tedious blow by blow account of toolholder manufacture and just do a few highlights. After much brow furrowing, I decided to start with the easiest and make the chisel holder, since this could be moved around as needed if I later on became dissatisfied with its placement. I fortunately have a bunch of curly maple offcuts that will provide some flair for the cabinet:
View attachment 2
A real workhorse on this project has been the LN 102 Block Plane which I only acquired about 2 months ago, but which has already become one of my favorite planes. I did all the chamfering of the toolholders and cabinet with it:
View attachment 3
View attachment 4
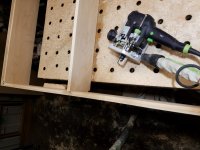
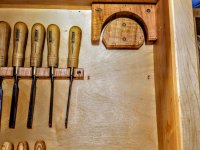
The cool thing about making the toolholders is that some of the tiniest details end up making all the difference. Like these holders I made for my combination squares, a tiny 1/8 cube glued on the edge helps ensure that the squares, which are mounted on one of the sliding doors, don't fall off as the door is moved back and forth:
View attachment 5
View attachment 6
It takes time though to make them all of the toolholders individually. Like the ones for the saws, you have to trace and cope out the basic shape:
View attachment 7
View attachment 8
Then rasp and sand to final fit:
View attachment 9 View attachment 10 View attachment 11
Especially excited that I got to use up some of the remaining scrap from the maple conference table I built a few months ago, and convert it into the door handles:
View attachment 12 View attachment 13 View attachment 14
Next up, the handplane till.
Although I'm by no means done acquiring new tools, I felt like I was ready to make the switchover to a fixed back cabinet because I have assembled a core set of handtools at this point that won't change in the future.
It's a different experience staring at the empty plywood back of a pegboard-less tool cabinet. I looked at it for over a day as I procrastinated doing other trivial stuff around the shop, wondering where to start and worried that the choices I made at the outset would create a path dependence leading to severe underutilization of the available space. The only thing that I had determined from the outset was where the bulk of the handplanes would go. I made the left hand bay wider than the others, and made sure in the cabinet design to have at least a 5 1/2" clearance between the back and the doors so that my bench planes could fit vertically:
View attachment 1
The other main difference from a pegboard cabinet is obviously that you have to make all the toolholders yourself. So this project has become a nice way of reducing the scrap and offcut stockpile in my shop.
I'll spare you the complete, tedious blow by blow account of toolholder manufacture and just do a few highlights. After much brow furrowing, I decided to start with the easiest and make the chisel holder, since this could be moved around as needed if I later on became dissatisfied with its placement. I fortunately have a bunch of curly maple offcuts that will provide some flair for the cabinet:
View attachment 2
A real workhorse on this project has been the LN 102 Block Plane which I only acquired about 2 months ago, but which has already become one of my favorite planes. I did all the chamfering of the toolholders and cabinet with it:
View attachment 3
View attachment 4
The cool thing about making the toolholders is that some of the tiniest details end up making all the difference. Like these holders I made for my combination squares, a tiny 1/8 cube glued on the edge helps ensure that the squares, which are mounted on one of the sliding doors, don't fall off as the door is moved back and forth:
View attachment 5
View attachment 6
It takes time though to make them all of the toolholders individually. Like the ones for the saws, you have to trace and cope out the basic shape:
View attachment 7
View attachment 8
Then rasp and sand to final fit:
View attachment 9 View attachment 10 View attachment 11
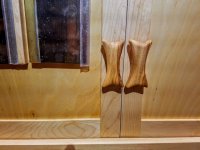
Especially excited that I got to use up some of the remaining scrap from the maple conference table I built a few months ago, and convert it into the door handles:
View attachment 12 View attachment 13 View attachment 14
Next up, the handplane till.
Attachments
-
 20190611_112628.jpg912.4 KB · Views: 202
 -
 20190611_115518.jpg766.4 KB · Views: 221
 -
 20190611_125602.jpg683.6 KB · Views: 235
 -
 20190611_162026.jpg908.7 KB · Views: 231
 -
 20190611_172955.jpg837 KB · Views: 238
 -
 20190611_193337.jpg711.8 KB · Views: 236
 -
 20190611_104855.jpg833.4 KB · Views: 218
 -
 20190611_104647.jpg995.1 KB · Views: 233
 -
 20190609_181810.jpg183.5 KB · Views: 255
 -
 20190609_182832.jpg781.1 KB · Views: 231
 -
 20190609_191509.jpg401.7 KB · Views: 216
 -
 20190609_195543.jpg644.5 KB · Views: 237
 -
 20190611_194943.jpg1 MB · Views: 252
 -
 20190612_170021.jpg667.8 KB · Views: 238
ear3
Member
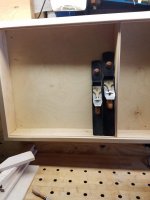
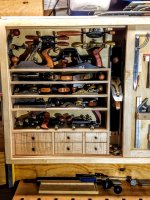
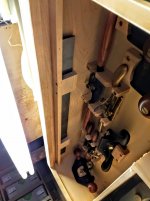
The handplane till has proven to be the biggest challenge so far. I started off doing a vertical configuration for the longer nos. 7 and 8:
View attachment 1
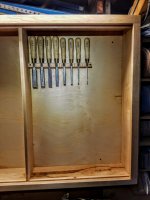
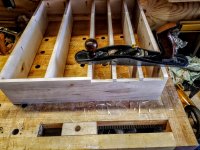
And was going to continue in that vein, though preserving a space at the bottom for some drawers for small parts and blades. But the differing widths of the various planes made me switch over to doing a horizontal placement, reserving space at the top for spokeshaves and similarly odd shaped items:
View attachment 2
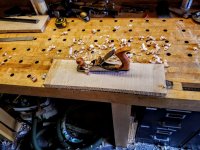
I was building the 1/2" shelves level by level, dryfitting them initially with 4mm dominoes. I did this so that I could have shelves of varying width -- but after I had it all setup I realized that I wasn't gaining anything by having narrower shelves, as there wasn't anything of substance I was going to be able to fit along the sides of the cabinet even with this configuration. So I scrapped that idea and instead glued up a fixed shelf cabinet all at once, where the top shelves were notched at the back so I could nestle the toe of certain planes for extra security:
View attachment 3
The advantage of doing all the shelves equal to the internal usable depth of the cabinet was that it gave some extra space to fit some of the smaller planes, which would otherwise be a nuisance around which to build a dedicated spot.
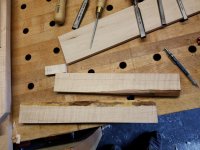
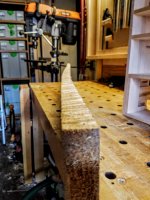
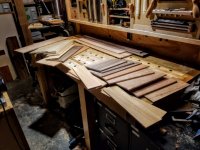
In order to make it more than a utilitarian build, I decided to use a nice piece of curly maple for the drawer faces, where the drawers would preserve a continuous grain of the original board. I had one piece that has been sitting in my lumber loft for a few years, and which I've never used because it is so warped:
View attachment 4
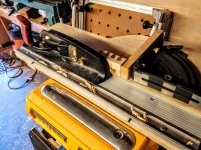
Even after cutting a small section out of it, I had to joint a significant twist and a bow:
View attachment 5 View attachment 6
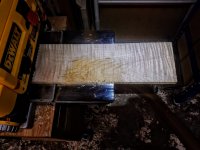
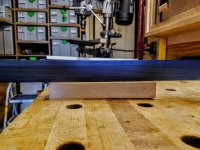
But running it through the planer showed that this particular board was worth the effort:
View attachment 8
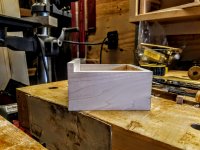
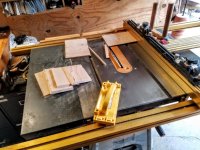
The drawers were just a simple mitered box construction, punched out on the table saw, with the lower drawers notched to provide clearance for the drawer runners I installed on the shelf:
View attachment 9 View attachment 10
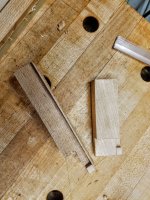
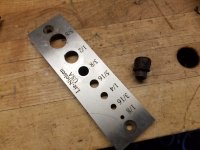
Turned some wenge scrap for the drawer pulls, the posts of which I pounded through a dowel plate for an even fit:
View attachment 11 View attachment 12
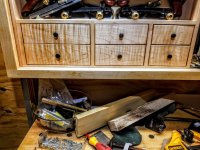
Really happy with the final result:
View attachment 13
I have a habit of making drawers that are too big, and thus wasting a bunch of space, so I'm also happy to have made something so compact that gives me a few different spots to store stuff.
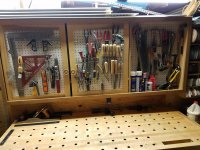
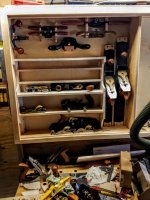
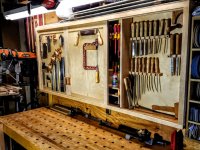
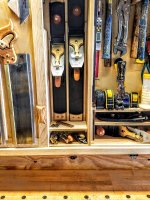
So this is where I'm at now:
View attachment 14 View attachment 15 View attachment 16
Almost all the planes have a home, and the middle bay is mostly open for more tools. Although the tool configuration in the right bay might seem inefficient at first glance, I'm going to be adding a hanged internal door about midway deep so I can put in additional toolholders, and thus have two levels in operation.
I welcome any suggestions you might have for better or more efficient placement.
View attachment 1
And was going to continue in that vein, though preserving a space at the bottom for some drawers for small parts and blades. But the differing widths of the various planes made me switch over to doing a horizontal placement, reserving space at the top for spokeshaves and similarly odd shaped items:
View attachment 2
I was building the 1/2" shelves level by level, dryfitting them initially with 4mm dominoes. I did this so that I could have shelves of varying width -- but after I had it all setup I realized that I wasn't gaining anything by having narrower shelves, as there wasn't anything of substance I was going to be able to fit along the sides of the cabinet even with this configuration. So I scrapped that idea and instead glued up a fixed shelf cabinet all at once, where the top shelves were notched at the back so I could nestle the toe of certain planes for extra security:
View attachment 3
The advantage of doing all the shelves equal to the internal usable depth of the cabinet was that it gave some extra space to fit some of the smaller planes, which would otherwise be a nuisance around which to build a dedicated spot.
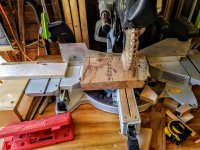
In order to make it more than a utilitarian build, I decided to use a nice piece of curly maple for the drawer faces, where the drawers would preserve a continuous grain of the original board. I had one piece that has been sitting in my lumber loft for a few years, and which I've never used because it is so warped:
View attachment 4
Even after cutting a small section out of it, I had to joint a significant twist and a bow:
View attachment 5 View attachment 6
But running it through the planer showed that this particular board was worth the effort:
View attachment 8
The drawers were just a simple mitered box construction, punched out on the table saw, with the lower drawers notched to provide clearance for the drawer runners I installed on the shelf:
View attachment 9 View attachment 10
Turned some wenge scrap for the drawer pulls, the posts of which I pounded through a dowel plate for an even fit:
View attachment 11 View attachment 12
Really happy with the final result:
View attachment 13
I have a habit of making drawers that are too big, and thus wasting a bunch of space, so I'm also happy to have made something so compact that gives me a few different spots to store stuff.
So this is where I'm at now:
View attachment 14 View attachment 15 View attachment 16
Almost all the planes have a home, and the middle bay is mostly open for more tools. Although the tool configuration in the right bay might seem inefficient at first glance, I'm going to be adding a hanged internal door about midway deep so I can put in additional toolholders, and thus have two levels in operation.
I welcome any suggestions you might have for better or more efficient placement.
Attachments
-
 20190617_102729.jpg753.4 KB · Views: 330
 -
 20190617_164604.jpg1,006.5 KB · Views: 332
 -
 20190617_183512.jpg736.9 KB · Views: 303
 -
 20190617_202958.jpg980.9 KB · Views: 355
 -
 20190617_203451.jpg187.9 KB · Views: 315
 -
 20190617_203341.jpg730.6 KB · Views: 246
 -
 20190617_203418.jpg796.3 KB · Views: 306
 -
 20190616_164706.jpg1,007.3 KB · Views: 307
 -
 20190616_072450.jpg643.1 KB · Views: 353
 -
 20190612_175552.jpg841.6 KB · Views: 253
 -
 20190614_173331.jpg806.8 KB · Views: 312
 -
 20190615_143913.jpg942.7 KB · Views: 251
 -
 20190615_180620.jpg740.8 KB · Views: 303
 -
 20190615_181314.jpg780.8 KB · Views: 323
 -
 20190615_181729.jpg893.7 KB · Views: 307
 -
 20190615_181729.jpg893.7 KB · Views: 508
ear3
Member
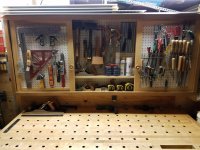
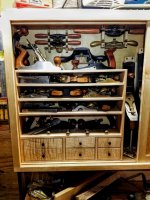
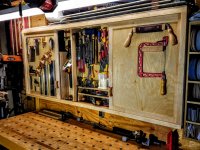
Pretty much finished up on the cabinet for now. Which is a good thing, as my shop has been turned upside down for almost two weeks while working on this, and has prevented any other work from happening while going on.
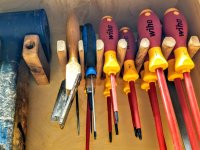
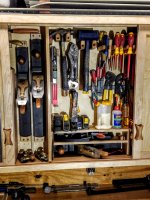
The plane and chisel storage were relatively easy compared to the rest of the tools, which had a wide range of shapes and dimensions making standardization difficult. Most of that stuff I ended up locating in the middle bay, paring down to the most frequently used miscellaneous hand tools, and placing the rest in drawers. I did take a short cut in the middle bay for the pliers by adding in a magnetic tool holder rather than trying to shape wooden tool holders -- it just would not have been efficient to try to hang them individually.
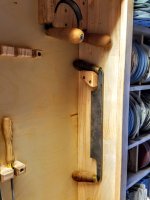
I had a lot of fun making the holder for the scorp in the upper righthand corner of the right bay (shown in close up in the last three images). I considered not dedicating space to it in the cabinet, since I don't use it very often, but it's not the sort of thing that's very practical to stick in a drawer. I traced out the concave and convex the shape of the blade onto two plywood templates that I then routed into some maple scrap. The top piece is 1 1/2" thick so that the blade is fully protected.
I don't really have much room left. A few more items can go on the right door, and then I will add a hinged partition in the right bay to accommodate an additional layer of chisels, but otherwise, any additions will have to be made by moving out tools into other spaces.
The plane and chisel storage were relatively easy compared to the rest of the tools, which had a wide range of shapes and dimensions making standardization difficult. Most of that stuff I ended up locating in the middle bay, paring down to the most frequently used miscellaneous hand tools, and placing the rest in drawers. I did take a short cut in the middle bay for the pliers by adding in a magnetic tool holder rather than trying to shape wooden tool holders -- it just would not have been efficient to try to hang them individually.
I had a lot of fun making the holder for the scorp in the upper righthand corner of the right bay (shown in close up in the last three images). I considered not dedicating space to it in the cabinet, since I don't use it very often, but it's not the sort of thing that's very practical to stick in a drawer. I traced out the concave and convex the shape of the blade onto two plywood templates that I then routed into some maple scrap. The top piece is 1 1/2" thick so that the blade is fully protected.
I don't really have much room left. A few more items can go on the right door, and then I will add a hinged partition in the right bay to accommodate an additional layer of chisels, but otherwise, any additions will have to be made by moving out tools into other spaces.
Attachments
-
 20190621_195739.jpg637.5 KB · Views: 411
 -
 20190622_193645.jpg542.6 KB · Views: 444
 -
 20190622_191152.jpg643.8 KB · Views: 385
 -
 20190622_191133.jpg648.7 KB · Views: 348
 -
 20190622_194757.jpg732.6 KB · Views: 453
 -
 20190622_194745.jpg729 KB · Views: 411
 -
 20190622_194732.jpg709.2 KB · Views: 428
 -
 20190622_194723.jpg709.3 KB · Views: 418
 -
 20190622_194714.jpg700.1 KB · Views: 418
 -
 20190622_093915.jpg724.4 KB · Views: 460
 -
 20190622_094107.jpg804.1 KB · Views: 514
ear3
Member
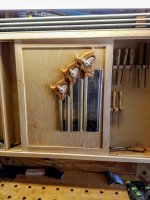
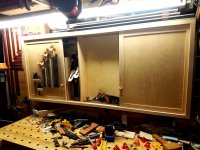
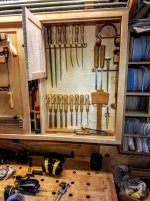
Few more minor improvements I just wanted to document.
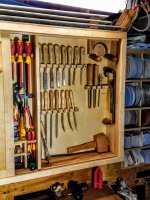
The biggest one is the addition of a swinging door in the right bay so I can fit another run of chisels.
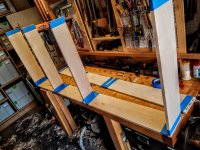
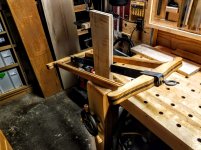
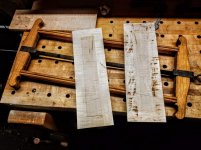
I still had pieces of the curly maple I used for the drawers, so I took one and resawed it with my Roubo frame saw (running in a kerf made with the table saw) to form a bookmatched center panel for the door:
View attachment 1 View attachment 2
I kept the pieces clamped flat while the moisture readjusted in the boards, but probably should have kept them flat a bit longer, as the resulting panel (glued up after the boards were jointed and thicknessed) still had a twist to it:
View attachment 3
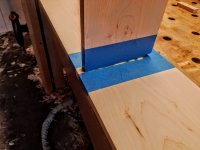
Not a huge deal though -- at 1/4", the panel is thin enough to bend into the slot I made in the frame, joined together with 6mm dominoes:
View attachment 4
Mortised out the hinge placements with the router plane on both the door and a 5/8th strip that gets attached to the cabinet
View attachment 5
View attachment 6
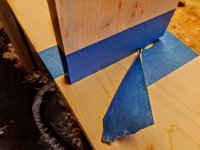
I used Brusso stop hinges (JB 103 if anyone's curious), which Tools for Working Wood in Brooklyn carries. I didn't know the price before walking them up to the register, and my eyes almost popped out when they rang me up for $62 for two packages. Well, at least they look good:
View attachment 7
And for that price I assume they will last the life of the cabinet. I fortunately had made a few extra wenge door pulls, which, because I now have more drawers for holding small odds and ends, I had stored away just in case -- so I added one to the swinging door.
View attachment 8 View attachment 9
I will probably make another door at some point for that lower half of the right bay, but will wait until the tools requiring it show up.
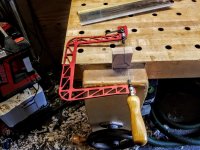
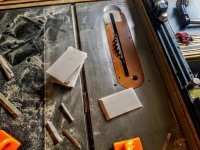
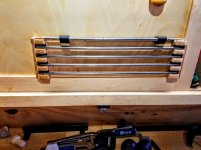
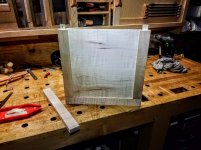
I'm proud of the holder I came up with for my bar gauge, which up until now has lived in the drawer with my pneumatic nails.
Stuck two scrap blocks together with double-sided tape, drilled 3/8" holes that I opened to the edge with a saw, then worked with the spindle sander to ensure proper clearance:
View attachment 10
The holes sit slightly lower than the channel so that gravity holds the bars in place.
Added some grooves to the top where the actual gauge would sit, then flushed the backs on the shooting board:
View attachment 11
Here's the holder on the right door panel:
View attachment 12
I 2P-10'ed a thin strip on the outside of either block so that the bars don't slide back and forth when the door moves. I may try to redo it in the future so that I can fit two bars on each level, thus making for a more compact footprint, but for now this will do.
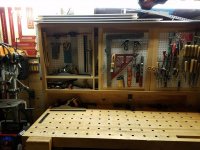
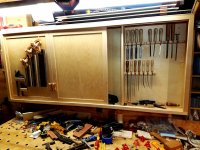
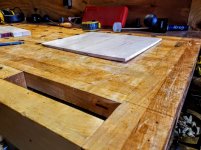
Finally, I'm also continuing to tweak things here and there to add a few extra square inches of space or take advantage of a nook. I added some holders to the top of the cabinet to fit my 24" straightedge that I use all the time when jointing boards:
View attachment 13 View attachment 14
Also moved the large bench planes up a few inches to give clearance for my small planes, which are now protected by a tiny shelf on which I can set thin items that won't interfere with removing and putting back the large planes:
View attachment 15
The biggest one is the addition of a swinging door in the right bay so I can fit another run of chisels.
I still had pieces of the curly maple I used for the drawers, so I took one and resawed it with my Roubo frame saw (running in a kerf made with the table saw) to form a bookmatched center panel for the door:
View attachment 1 View attachment 2
I kept the pieces clamped flat while the moisture readjusted in the boards, but probably should have kept them flat a bit longer, as the resulting panel (glued up after the boards were jointed and thicknessed) still had a twist to it:
View attachment 3
Not a huge deal though -- at 1/4", the panel is thin enough to bend into the slot I made in the frame, joined together with 6mm dominoes:
View attachment 4
Mortised out the hinge placements with the router plane on both the door and a 5/8th strip that gets attached to the cabinet
View attachment 5
View attachment 6
I used Brusso stop hinges (JB 103 if anyone's curious), which Tools for Working Wood in Brooklyn carries. I didn't know the price before walking them up to the register, and my eyes almost popped out when they rang me up for $62 for two packages. Well, at least they look good:
View attachment 7
And for that price I assume they will last the life of the cabinet. I fortunately had made a few extra wenge door pulls, which, because I now have more drawers for holding small odds and ends, I had stored away just in case -- so I added one to the swinging door.
View attachment 8 View attachment 9
I will probably make another door at some point for that lower half of the right bay, but will wait until the tools requiring it show up.
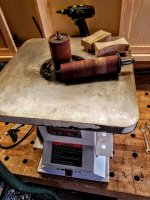
I'm proud of the holder I came up with for my bar gauge, which up until now has lived in the drawer with my pneumatic nails.
Stuck two scrap blocks together with double-sided tape, drilled 3/8" holes that I opened to the edge with a saw, then worked with the spindle sander to ensure proper clearance:
View attachment 10
The holes sit slightly lower than the channel so that gravity holds the bars in place.
Added some grooves to the top where the actual gauge would sit, then flushed the backs on the shooting board:
View attachment 11
Here's the holder on the right door panel:
View attachment 12
I 2P-10'ed a thin strip on the outside of either block so that the bars don't slide back and forth when the door moves. I may try to redo it in the future so that I can fit two bars on each level, thus making for a more compact footprint, but for now this will do.
Finally, I'm also continuing to tweak things here and there to add a few extra square inches of space or take advantage of a nook. I added some holders to the top of the cabinet to fit my 24" straightedge that I use all the time when jointing boards:
View attachment 13 View attachment 14
Also moved the large bench planes up a few inches to give clearance for my small planes, which are now protected by a tiny shelf on which I can set thin items that won't interfere with removing and putting back the large planes:
View attachment 15
Attachments
-
 20190623_145431.jpg548.7 KB · Views: 236
 -
 20190623_163126.jpg626.3 KB · Views: 244
 -
 20190625_144054.jpg447.4 KB · Views: 240
 -
 20190623_193005.jpg461.7 KB · Views: 255
 -
 20190623_193042.jpg400.1 KB · Views: 240
 -
 20190626_123725.jpg260.6 KB · Views: 268
 -
 20190625_143951.jpg564 KB · Views: 308
 -
 20190625_144008.jpg208.1 KB · Views: 220
 -
 20190626_100043.jpg355.3 KB · Views: 231
 -
 20190623_204223.jpg565.7 KB · Views: 237
 -
 20190623_204404.jpg193 KB · Views: 238
 -
 20190624_145251.jpg518.7 KB · Views: 224
 -
 20190624_210322.jpg477 KB · Views: 237
 -
 20190625_111557.jpg533.4 KB · Views: 215
 -
 20190625_124432.jpg580.8 KB · Views: 196
nclemmons
Member
Edward
Fantastic review of your thinking and build. The maple cabinet looks great! It should be an heirloom with all the tools being custom fit to it!
Fantastic review of your thinking and build. The maple cabinet looks great! It should be an heirloom with all the tools being custom fit to it!
rvieceli
Member
Very nice Edward.
ear3
Member
[member=3192]rvieceli[/member] and [member=167]neilc[/member] Thanks guys!
ear3
Member
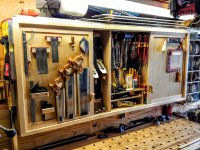
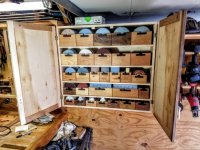
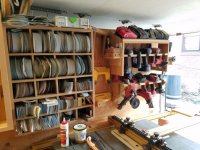
Quarantine has given me some time to get an earlier start on Summer upgrades to the Shop. So I decided to once again tackle abrasive storage, which will be the third or fourth iteration of a solution to a problem that seems to return every other year.
This is my current setup:
[attachimg=1]
I built it before I got the RS2 and Pro5, so the boxes of those abrasives are crammed into drawers and other shelves around the shop. The open shelf design also means it acts as a dust trap over time, so I decided to build a shelving unit with ample space as well as doors, which would also multiply the surface area I can use for hanging tools like I have on the sliding doors of my tool cabinet.
I cut down some 1x10 maple to 9", dominoed the verticals for the shelves using the rule stop to get the exact same height on both sides, then glued up the carcasse (prior to glue-up, I added a rabbet on the back to inset the rear panel).
[attachimg=2]
[attachimg=4]
[attachimg=3]
I had to redo the mortise plunges on a couple of the shelves after spot-checking for proper fit -- fortunately the adjustment was only a few mm in either direction,so the false plunges remained mostly covered. If this had been a piece for inside the house or for someone else, I would have patched the holes, but I figured this application didn't require perfection.
Originally I had just planned to recreate the basic function of the old storage unit, with the abrasives running lengthwise along the shelves, adding partitions as needed. But since I had upped the depth to accommodate the RS2 abrasives, I realized that I could actually gain a lot of efficiency by storing the abrasives front to back -- but it would require containerizing/boxing the abrasives. So what had originally been a project of a few days turned into a two-week affair, which has ended up producing a gold-plated abrasive storage unit as you'll see.
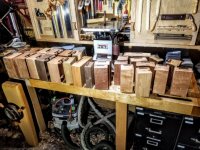
I've built up a lot of hardwood scrap from various projects and commissions over the past few years, boards anywhere from 10" to 36", so I decided to turn this into a reclamation project and clean out that stock.
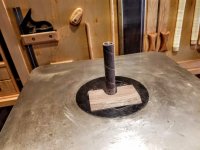
I put all of the pieces through the planer and took them down to about 5/16"
[attachimg=5]
[attachimg=6]
Some of them were thick enough to have resawn and gotten double the board, but the prospect of resawing so many small pieces by hand, and then waiting a few days while they stabilized and flattened, wasn't really appealing, so I resigned myself to a 1:1 yield.
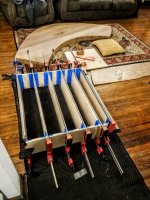
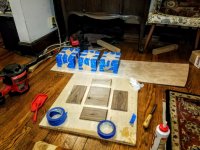
Used the table saw to create the mitered edges, glued them up with blue tape, and then finished the exteriors by hand with a plane.
[attachimg=7]
[attachimg=8]
[attachimg=9]
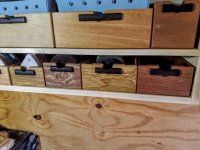
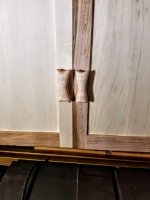
The boxes were 8 1/2", leaving not a lot of space at the front for handles/knobs once the cabinet doors were closed, so I added an extra piece to the interior front of each box with a rough semi-circle cut out, then used a flush trim router bit to pattern out that hole on the front of the box, and finished up with half-round pulls I created out of some wenge scrap:
[attachimg=10]
[attachimg=11]
[attachimg=12]
[attachimg=13]
I've ended up with 28 boxes made out of Cherry, Walnut, Spanish Cedar, Western Cedar, Mahogany, Iroko, Elm, Cypress, Reclaimed Red Oak, Reclaimed Spruce, and Sapele scrap:
[attachimg=14]
Cabinet doors are just basic dominoed frame and dadoed-inset 1/4" maple ply panel, which I attached with some cheap home depot utility hinges. I made some magnet blocks attached at the top to keep the doors closed, and shaped a pair of door handles out of some curly maple scrap.
[attachimg=15]
[attachimg=16]
[attachimg=17]
[attachimg=18]
I'm now in the process of adding cards into the boxes to separate and catalog the grits. I even have a bit of extra space for small part storage. Hopefully this iteration of my abrasive storage will serve my needs for some time to come.
This is my current setup:
[attachimg=1]
I built it before I got the RS2 and Pro5, so the boxes of those abrasives are crammed into drawers and other shelves around the shop. The open shelf design also means it acts as a dust trap over time, so I decided to build a shelving unit with ample space as well as doors, which would also multiply the surface area I can use for hanging tools like I have on the sliding doors of my tool cabinet.
I cut down some 1x10 maple to 9", dominoed the verticals for the shelves using the rule stop to get the exact same height on both sides, then glued up the carcasse (prior to glue-up, I added a rabbet on the back to inset the rear panel).
[attachimg=2]
[attachimg=4]
[attachimg=3]
I had to redo the mortise plunges on a couple of the shelves after spot-checking for proper fit -- fortunately the adjustment was only a few mm in either direction,so the false plunges remained mostly covered. If this had been a piece for inside the house or for someone else, I would have patched the holes, but I figured this application didn't require perfection.
Originally I had just planned to recreate the basic function of the old storage unit, with the abrasives running lengthwise along the shelves, adding partitions as needed. But since I had upped the depth to accommodate the RS2 abrasives, I realized that I could actually gain a lot of efficiency by storing the abrasives front to back -- but it would require containerizing/boxing the abrasives. So what had originally been a project of a few days turned into a two-week affair, which has ended up producing a gold-plated abrasive storage unit as you'll see.
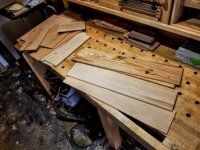
I've built up a lot of hardwood scrap from various projects and commissions over the past few years, boards anywhere from 10" to 36", so I decided to turn this into a reclamation project and clean out that stock.
I put all of the pieces through the planer and took them down to about 5/16"
[attachimg=5]
[attachimg=6]
Some of them were thick enough to have resawn and gotten double the board, but the prospect of resawing so many small pieces by hand, and then waiting a few days while they stabilized and flattened, wasn't really appealing, so I resigned myself to a 1:1 yield.
Used the table saw to create the mitered edges, glued them up with blue tape, and then finished the exteriors by hand with a plane.
[attachimg=7]
[attachimg=8]
[attachimg=9]
The boxes were 8 1/2", leaving not a lot of space at the front for handles/knobs once the cabinet doors were closed, so I added an extra piece to the interior front of each box with a rough semi-circle cut out, then used a flush trim router bit to pattern out that hole on the front of the box, and finished up with half-round pulls I created out of some wenge scrap:
[attachimg=10]
[attachimg=11]
[attachimg=12]
[attachimg=13]
I've ended up with 28 boxes made out of Cherry, Walnut, Spanish Cedar, Western Cedar, Mahogany, Iroko, Elm, Cypress, Reclaimed Red Oak, Reclaimed Spruce, and Sapele scrap:
[attachimg=14]
Cabinet doors are just basic dominoed frame and dadoed-inset 1/4" maple ply panel, which I attached with some cheap home depot utility hinges. I made some magnet blocks attached at the top to keep the doors closed, and shaped a pair of door handles out of some curly maple scrap.
[attachimg=15]
[attachimg=16]
[attachimg=17]
[attachimg=18]
I'm now in the process of adding cards into the boxes to separate and catalog the grits. I even have a bit of extra space for small part storage. Hopefully this iteration of my abrasive storage will serve my needs for some time to come.
Attachments
-
 20200428_160919.jpg236.6 KB · Views: 640
 -
 20200428_201211.jpg193.3 KB · Views: 628
 -
 20200430_134250.jpg239.1 KB · Views: 636
 -
 20200430_181456.jpg227.4 KB · Views: 627
 -
 20200502_151114.jpg210 KB · Views: 644
 -
 20200502_151208.jpg188.4 KB · Views: 638
 -
 20200502_151130.jpg176.8 KB · Views: 624
 -
 20200502_203710.jpg143.8 KB · Views: 636
 -
 20200428_130330.jpg168.5 KB · Views: 622
 -
 20200418_193645.jpg203.7 KB · Views: 624
 -
 20200408_164805.jpg219.3 KB · Views: 654
 -
 20200414_160748.jpg206.5 KB · Views: 645
 -
 20200424_121502.jpg223.8 KB · Views: 638
 -
 20200423_202023.jpg199.3 KB · Views: 641
 -
 20200415_195535.jpg198.5 KB · Views: 649
 -
 20200420_172558.jpg204.1 KB · Views: 644
 -
 20200417_172139.jpg215.8 KB · Views: 639
 -
 20200417_201456.jpg218.2 KB · Views: 639
ear3
Member
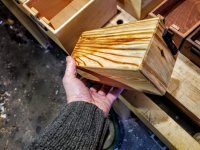
Just an added note on some of the cool features of the scrap I used. One of the boards was the last bit of spruce (or fir?) I had pulled off the loft of the garage when I first did the chaos cabinet. Despite being from the 1930s, it still had a large sap pocket that becomes illuminated when you hold it up to the light:
[attachimg=1]
[attachimg=2]
Good thing I used a plane to surface the board, as it would have immediately gummed up any abrasive.
[attachimg=1]
[attachimg=2]
Good thing I used a plane to surface the board, as it would have immediately gummed up any abrasive.
Attachments

nclemmons
Member
Nice cabinet, Edward!
jroth33139
Member
- Joined
- Sep 12, 2011
- Messages
- 35
Nice! I have watched your evolution as a woodworker over the years, and your posts are always quite informative and entertaining.
Similar threads
- Replies
- 52
- Views
- 3K
- Replies
- 25
- Views
- 2K
- Replies
- 8
- Views
- 396
- Replies
- 9
- Views
- 659