Other Uses for the Domino

Filler cutting station on my field mft. I'm tough on this table's tops, so have to replace them every  job or two.  Just domino holes in cheap big box mdf for clamping,  dogs,  or what not.  They're not lined up in true mft precision, but works for me. This mft has been cut down so the top is only 17x43, so I can get 5 tops from 1 piece of 4x8 material. I bang them out in an hour or so and am good for a few months.
a4ba9aba3286e442f68aec945b866708.jpg
 
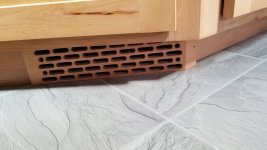
Interesting toe kick. Did you go by pencil lines or make a cradle/jig to make the mortises?
 
Mine is an old pin style so used the pins for slot spacing. Clamped a straight edge down and referenced off bottom to keep rows in line.
 
Jim Kirkpatrick said:
I just built some tables and I used my 500 to cut slots in the aprons for the table top hold down clips.  I used to just route or cut a long dado but this looks more professional.

I just use my biscuit cutter to make the slots for the clips.  They are much longer than your Domino holes, but it works.  And being under the table top, they are invisible.
 
shanegrilah said:
Mine is an old pin style so used the pins for slot spacing. Clamped a straight edge down and referenced off bottom to keep rows in line.
Easy peasy with the pins, eh?
 
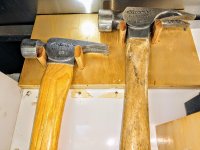
I've used Domino's instead of dowels for tool holders.  I created a notch in the tops of them do help keep the hammers in place.

[attachimg=1]
 

Attachments

  • HammerHolderDomino.jpg
    HammerHolderDomino.jpg
    279.9 KB · Views: 2,512
On a Baltic birch shop box for holding accessories, use Dominos at each end (3/4") to line up the box top and bottom, then (in theory) use spring latches to latch to box shut.  I'll post a pic if I remember after the latches get here.

I tried to put said accessories in a systainer, but that failed due to a mix of accessories that were slightly too large and slightly too awkward to be lined up efficiently.  My box is smaller in volume, fits in my existing shop drawers better, and allows better access than the systainer would have.

I need three of these boxes, and built only one so far.  After I built it, I found a Really Useful Box that was just the right size each of the last two boxes, allowed for reasonable organization, though not as good as my custom box, and fit very nicely in my shop drawers.  However, the Really Useful Boxes were $12. and my custom box has at least $12 of Baltic birch, and I have time and hardware in the custom box.  The custom box does look better though.
 
Good thread, thanks for starting this Jim. I picked up a couple tricks that I can use. I had been using my PC Biscuit Joiner for table top fastener slots but when I got the DF500 I gave it to my SIL. My shop is a biscuit free zone now. :-)
 
I cut the table’s slots for the Z clamps today with my 500 and it’s much nicer looking than with the biscuit cutter. Thanks. The two benches are next.
 
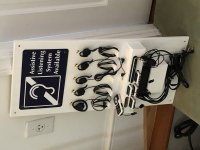
I made a rack for assistive listening devices for our church.  The system has five earpieces with cords, five receivers, the minister's transmitter, its microphone, and a charging brick and cables. 

I made the slots for the receivers with my 14mm cutter in the XL, overlapping the cuts for wider slots, 50 mm deep.  The larger transmitter needed about a 15mm tall slot, so I had to raise the fence 1mm and repeat the cuts.

I also used 8x50 dominoes for winding the cords.  The combination of the L-shaped hooks and the dominoes works well for keeping the earpiece cord loops in place, with enough give in the loops to make them easy to slip off when needed.  I glued the dominoes in tight slots and filed and sanded off the reeded edges. 


Attachments

  • 74D4D770-CCE6-4B7F-A4B6-FB635C4E9445.jpeg
    74D4D770-CCE6-4B7F-A4B6-FB635C4E9445.jpeg
    1.2 MB · Views: 727
Crox G said:
Snip.

I also used 8x50 dominoes for winding the cords. 
I actually missed the white painted dominoes in the image until I read the post.
 
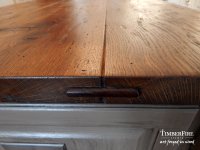
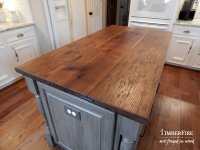
I used a series of domino cuts to create the mortise for faux splines on a kitchen island top.

[attachimg=1]
 

Attachments

  • Reclaimed Island Top 08.jpg
    Reclaimed Island Top 08.jpg
    1.1 MB · Views: 1,589
Here's the whole top.  As I recall, the extra wide mortises were made by establishing the two ends followed by overlapping cuts to remove the middle.  You have to plan your cuts.  It's important for the domino cutter to have plenty of material to remove so it does not drift.

The top is reclaimed White Oak salvaged from an Amish timber frame barn in Pennsylvania Dutch country.  The boards were originally part of the threshing floor where grain was separated from straw and husks.  (They were nasty and full of square nails.)  The finish is a custom mix of two colors of Osmo to coordinate with the floor.  (Sorry for the tread drift.)

[attachimg=1]
 

Attachments

  • Reclaimed Island Top 03.jpg
    Reclaimed Island Top 03.jpg
    1.3 MB · Views: 1,495
I love to use the domino connector to attach table tops. It looks so good.
 
Joe, that countertop looks wonderful.  I really like how you got the Osmo finish just right.  Which two colors did you use?  [smile]
 
Back
Top