Outdoor Kitchen

afish

Member
Joined
May 25, 2020
Messages
1,514
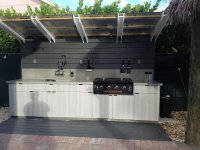
I have posted about building this so I figured I would post a picture now that its wrapping up.  Still want to do a few more things like a floating shelf for larger items like basting lids etc. but the way I did the back wall allows the use of slat wall hooks so its easy to move stuff around as needs change.  I wanted to maximize storage and dont like the way most outdoor kitchens have so much wasted space so I built mine more like a traditional kitchen with all full extension drawer slides and full access to storage instead of just having a 1 or 2 drawer/doors.  I would have liked to use a darker laminate on the doors and drawers but it faces due west and gets blasted by afternoon sun so I kept it lighter to hopefully not absorb as much heat.  Well see I guess.  So far so good.  Sorry about the crappy cell phone pic.  Looking at it now I should have cleaned up a bit more before taking but its the only pic I have. Not sure why it looks like there is a wave in the decking on the ground it must be my camera lens distorting it. 
 

Attachments

  • outdoor kitchen.jpg
    outdoor kitchen.jpg
    742.3 KB · Views: 475
Thanks CRG, A keen eye will notice all the grain matches too.  Which wasnt as easy as it should have been since I dont have a large enough vacuum press to do a full sheet at once so I had to cut all the substrate first then the laminate and match up as I glued it.  It took a bit but I notice these things even if some dont.

So now Im working on designing a flipable vacuum press that can do a full 49x97 I dont have the space for it to stay horizontal and it will mean selling the unisaw but I never use it anymore anyways I still have a bosch contrator saw for those rare times I need it.  Im going to build  it into some cabinets and a partition with storage on one side and most likely face it with slat wall on the shop side to hang small items.  was working on it now. So far this is the rough draft.


Attachments

  • open.jpg
    open.jpg
    339.3 KB · Views: 247
  • closed.jpg
    closed.jpg
    239.9 KB · Views: 247
Nice job on the kitchen...did you just remove the 4 burner Blackstone from it's cart?
 
yes, just unbolted the blackstone.  The cabinet "boxes" other than the doors and decking is all concrete.  I cnc cut forms with all the screw anchors figured out ahead of time so I could cast plastic anchors in.  That way I could just screw the hinges, drawer slides etc. on later with no issue. I did have to drill for the flip down panel in front of the sink. Originally I wasnt going to have it but changed my mind afterwards. (thats the small piles of concrete dust on the ground in the first pick) Here is a progress pick that shows the guts. the 2x4's across the front came out after the top was glued down.  I hadent planned on a 3rd outlet either at first as you can tell from this pic. 

The roof is made into 2 panels so I can unscrew the 1/4-20 on the bottom side of the rafters and take it each half down in case a hurricane is coming. 
 

Attachments

  • out kit pro.jpg
    out kit pro.jpg
    1.1 MB · Views: 293
Thanks for the additional information... [smile] ...I like the concrete construction and especially the cast-in anchors make a lot of sense, that really makes the assembly easy...nice touch.

The cabinet back appears to be cement board?

Is the countertop also poured in-place concrete or was it poured and then moved into place?
 
Counter top was formed and poured then moved into position. I wanted granite but got tired of trying to find someone. So it was quicker to just cast it myself. Yes just cement backerboard for the back. 
 
afish said:
Thanks CRG, A keen eye will notice all the grain matches too.  Which wasnt as easy as it should have been since I dont have a large enough vacuum press to do a full sheet at once so I had to cut all the substrate first then the laminate and match up as I glued it.  It took a bit but I notice these things even if some dont.

So now Im working on designing a flipable vacuum press that can do a full 49x97 I dont have the space for it to stay horizontal and it will mean selling the unisaw but I never use it anymore anyways I still have a bosch contrator saw for those rare times I need it.  Im going to build  it into some cabinets and a partition with storage on one side and most likely face it with slat wall on the shop side to hang small items.  was working on it now. So far this is the rough draft.

Oh, yeah. I caught that right away. That is part of the AWI premium standard, which we meet, as normal operations. There are other requirements that we don't do unless it is specified as part of the job, but the grain matching is just done, because why not?
In years past, we did the horizontal grain on drawer fronts, as you would with solid hardwood. We still do, when requested, but that doesn't happen very often.
The big desks that I normally do have no standards. The specs for them can be nearly anything.
You really have to be looking for it because the doors are so far apart, but the grain does continue down from the upper doors onto the base doors on that aquarium stand I posted not long ago, as do the panels on the back.
 
Back
Top